HP C3916A HP LaserJet 5, 5M, and 5N Printer - User's Guide - Page 149
Tray 2 Pickup Roller
 |
View all HP C3916A manuals
Add to My Manuals
Save this manual to your list of manuals |
Page 149 highlights
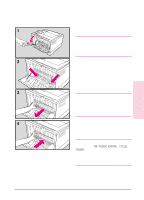
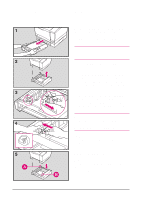
Tray 2 Pickup Roller Before you begin these steps, turn the printer off and unplug the power cord. 1 Open the top cover and remove the toner cartridge. 2 Remove Tray 2. 3 Gently rotate the printer onto its left side so that the bottom of the printer is easily accessible. 4 To remove the Pickup Roller pinch the retaining clip on top of the roller with your right hand while sliding the roller up off the shaft with your left hand. To install a new Pickup Roller, slide it over the shaft and rotate it until properly aligned. Slide the roller down until it clicks into place. Place the printer upright. Replace the toner cartridge and Tray 2. Plug in the power cord. Switch the printer on. Discard the used roller. Maintaining and 8 Adjusting the EN Maintaining and Adjusting the Printer 8-11
-
 1
1 -
2
-
3
-
4
-
5
-
6
-
7
-
8
-
9
-
10
-
11
-
12
-
13
-
14
-
15
-
16
-
17
-
18
-
19
-
20
-
21
-
22
-
23
-
24
-
25
-
26
-
27
-
28
-
29
-
30
-
31
-
32
-
33
-
34
-
35
-
36
-
37
-
38
-
39
-
40
-
41
-
42
-
43
-
44
-
45
-
46
-
47
-
48
-
49
-
50
-
51
-
52
-
53
-
54
-
55
-
56
-
57
-
58
-
59
-
60
-
61
-
62
-
63
-
64
-
65
-
66
-
67
-
68
-
69
-
70
-
71
-
72
-
73
-
74
-
75
-
76
-
77
-
78
-
79
-
80
-
81
-
82
-
83
-
84
-
85
-
86
-
87
-
88
-
89
-
90
-
91
-
92
-
93
-
94
-
95
-
96
-
97
-
98
-
99
-
100
-
101
-
102
-
103
-
104
-
105
-
106
-
107
-
108
-
109
-
110
-
111
-
112
-
113
-
114
-
115
-
116
-
117
-
118
-
119
-
120
-
121
-
122
-
123
-
124
-
125
-
126
-
127
-
128
-
129
-
130
-
131
-
132
-
133
-
134
-
135
-
136
-
137
-
138
-
139
-
140
-
141
-
142
-
143
-
 144
144 -
 145
145 -
 146
146 -
 147
147 -
 148
148 -
 149
149 -
 150
150 -
 151
151 -
 152
152 -
 153
153 -
 154
154 -
155
-
156
-
157
-
158
-
159
-
160
-
161
-
162
-
163
-
164
-
165
-
166
-
167
-
168
-
169
-
170
-
171
-
172
-
173
-
174
-
175
-
176
-
177
-
178
-
179
-
180
-
181
-
182
-
183
-
184
-
185
-
186
-
187
-
188
-
189
-
190
-
191
-
192
-
193
-
194
-
195
-
196
-
197
-
198
-
199
-
200
-
201
-
202
-
203
-
204
-
205
-
206
-
207
-
208
 |
 |
