HP C3916A HP LaserJet 5, 5M, and 5N Printer - User's Guide - Page 135
Problems Using Optional Accessories
 |
View all HP C3916A manuals
Add to My Manuals
Save this manual to your list of manuals |
Page 135 highlights
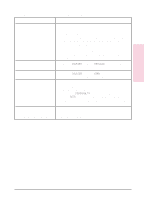
Solving Printer 7 Problems Problems Using Optional Accessories 500-sheet Tray 3 problems Situation Solution General operation problems. For general operation and problems, see "Printing from the 500-sheet Tray 3" in Chapter 4. Paper jams and paper feeding 1. See "Clearing Paper Jams" earlier in this chapter. problems. 2. Ensure that paper weight is within recommended range. (See Appendix A, "Media Specifications," and Chapter 4, "Printing") Then see Chapter 4 for information on setting Tray 3 tension adjustment. Cannot access Tray 3. Adjust the paper size knob for the correct size paper (see "To Load Paper into the Optional Tray 3" in Chapter 4). Printer does not recognize Tray 3. 1. Ensure the Tray 3 Assembly is firmly seated, then switch printer off, then on again. If the printer still does not recognize Tray 3, contact your dealer or authorized HP service provider. 2. Verify that you are using a Tray 3 Assembly for the HP LaserJet 5/5M printers (the Lower Cassette Assembly for the HP LaserJet 4/4M printers will not work). A grinding noise is coming from Tray 3. This noise will occur if the pickup roller has been rotated out of adjustment. This can happen from removing jammed paper too vigorously, causing the paper to catch the roller and rotate it out of position. This noise will also occur if a replacement roller has been installed incorrectly. Follow the instructions in the "Optional Tray 3 Pickup Roller" section in Chapter 8 for readjusting the roller. Duplex option problems Situation Solution General operation problems. For general operation tasks, see "Printing with the Duplex Unit" in Chapter 4. You must have the optional duplex unit installed to do two-sided printing with the HP LaserJet 5/5M printers. Paper jams. See "Clearing Paper Jams" earlier in this chapter. EN Solving Printer Problems 7-33
-
 1
1 -
2
-
3
-
4
-
5
-
6
-
7
-
8
-
9
-
10
-
11
-
12
-
13
-
14
-
15
-
16
-
17
-
18
-
19
-
20
-
21
-
22
-
23
-
24
-
25
-
26
-
27
-
28
-
29
-
30
-
31
-
32
-
33
-
34
-
35
-
36
-
37
-
38
-
39
-
40
-
41
-
42
-
43
-
44
-
45
-
46
-
47
-
48
-
49
-
50
-
51
-
52
-
53
-
54
-
55
-
56
-
57
-
58
-
59
-
60
-
61
-
62
-
63
-
64
-
65
-
66
-
67
-
68
-
69
-
70
-
71
-
72
-
73
-
74
-
75
-
76
-
77
-
78
-
79
-
80
-
81
-
82
-
83
-
84
-
85
-
86
-
87
-
88
-
89
-
90
-
91
-
92
-
93
-
94
-
95
-
96
-
97
-
98
-
99
-
100
-
101
-
102
-
103
-
104
-
105
-
106
-
107
-
108
-
109
-
110
-
111
-
112
-
113
-
114
-
115
-
116
-
117
-
118
-
119
-
120
-
121
-
122
-
123
-
124
-
125
-
126
-
127
-
128
-
129
-
 130
130 -
 131
131 -
 132
132 -
 133
133 -
 134
134 -
 135
135 -
 136
136 -
 137
137 -
 138
138 -
 139
139 -
 140
140 -
141
-
142
-
143
-
144
-
145
-
146
-
147
-
148
-
149
-
150
-
151
-
152
-
153
-
154
-
155
-
156
-
157
-
158
-
159
-
160
-
161
-
162
-
163
-
164
-
165
-
166
-
167
-
168
-
169
-
170
-
171
-
172
-
173
-
174
-
175
-
176
-
177
-
178
-
179
-
180
-
181
-
182
-
183
-
184
-
185
-
186
-
187
-
188
-
189
-
190
-
191
-
192
-
193
-
194
-
195
-
196
-
197
-
198
-
199
-
200
-
201
-
202
-
203
-
204
-
205
-
206
-
207
-
208
 |
 |