HP C3916A HP LaserJet 5, 5M, and 5N Printer - User's Guide - Page 181
How I/O Buffering Improves Performance
 |
View all HP C3916A manuals
Add to My Manuals
Save this manual to your list of manuals |
Page 181 highlights
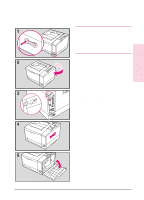
D Printer Memory Note Note 8 Press [Item] until either PS MEM=400K or PCL MEM=400K appears, then press [- Value +] until the number you determined in Step 6 appears. Press [Select] to save your selection. An asterisk (*) appears next to your selection in the display. 9 Press [Go] to exit menus. 10 Repeat Step 5. You must download all fonts again because all downloaded resources are deleted when you change the Resource Saving setting. The downloaded fonts remain in memory until you change Resource Saving or I/O Buffering settings or turn the printer off. How I/O Buffering Improves Performance The printer's I/O Buffer holds a print job in progress, freeing up computer memory. This allows the user to continue operating the computer without waiting for the print job to finish. When additional memory is added to the printer 100 KBytes are automatically reserved for the I/O Buffer for each MByte of memory added. In most cases, it is to your advantage to let the printer automatically reserve memory for I/O Buffering. Network administrators might want to increase I/O Buffering to speed network printing. See "Memory Configuration Menu" in Chapter 3 for information about changing this setting. When you change the I/O BUFFER setting, all downloaded resources will need to be downloaded again. EN Printer Memory D-5
-
 1
1 -
2
-
3
-
4
-
5
-
6
-
7
-
8
-
9
-
10
-
11
-
12
-
13
-
14
-
15
-
16
-
17
-
18
-
19
-
20
-
21
-
22
-
23
-
24
-
25
-
26
-
27
-
28
-
29
-
30
-
31
-
32
-
33
-
34
-
35
-
36
-
37
-
38
-
39
-
40
-
41
-
42
-
43
-
44
-
45
-
46
-
47
-
48
-
49
-
50
-
51
-
52
-
53
-
54
-
55
-
56
-
57
-
58
-
59
-
60
-
61
-
62
-
63
-
64
-
65
-
66
-
67
-
68
-
69
-
70
-
71
-
72
-
73
-
74
-
75
-
76
-
77
-
78
-
79
-
80
-
81
-
82
-
83
-
84
-
85
-
86
-
87
-
88
-
89
-
90
-
91
-
92
-
93
-
94
-
95
-
96
-
97
-
98
-
99
-
100
-
101
-
102
-
103
-
104
-
105
-
106
-
107
-
108
-
109
-
110
-
111
-
112
-
113
-
114
-
115
-
116
-
117
-
118
-
119
-
120
-
121
-
122
-
123
-
124
-
125
-
126
-
127
-
128
-
129
-
130
-
131
-
132
-
133
-
134
-
135
-
136
-
137
-
138
-
139
-
140
-
141
-
142
-
143
-
144
-
145
-
146
-
147
-
148
-
149
-
150
-
151
-
152
-
153
-
154
-
155
-
156
-
157
-
158
-
159
-
160
-
161
-
162
-
163
-
164
-
165
-
166
-
167
-
168
-
169
-
170
-
171
-
172
-
173
-
174
-
175
-
 176
176 -
 177
177 -
 178
178 -
 179
179 -
 180
180 -
 181
181 -
 182
182 -
 183
183 -
 184
184 -
 185
185 -
 186
186 -
187
-
188
-
189
-
190
-
191
-
192
-
193
-
194
-
195
-
196
-
197
-
198
-
199
-
200
-
201
-
202
-
203
-
204
-
205
-
206
-
207
-
208
 |
 |
