HP C3916A HP LaserJet 5, 5M, and 5N Printer - User's Guide - Page 148
Tray 1 Paper Pickup Roller & Separation Pad
 |
View all HP C3916A manuals
Add to My Manuals
Save this manual to your list of manuals |
Page 148 highlights
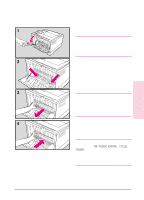
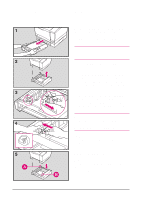
Tray 1 Paper Pickup Roller & Separation Pad Before you begin these steps, turn the printer off and unplug the power cord. 1 Open Tray 1 by pulling down on the top center of the front door. 2 Remove the envelope feeder access cover by grasping each side of the tab and pulling downward and toward you. 3 To release the Pickup Roller pinch the retaining clip on the right end of the roller with your right hand while sliding the roller to the right with your left hand. 4 To remove the Pickup Roller push in on the small plastic tab with your right hand while sliding the roller off the shaft with your left hand. 5 To remove the Separation Pad insert a flat-blade screwdriver into the indentation at the front of the pad. Carefully rotate the screwdriver to loosen the pad. When loose, gently lift out the pad. To install a new separation pad, place it over the opening and press it down firmly with your forefinger to seat it. Be sure the metal edge is toward the front of the printer. To install a new Pickup Roller, slide it over the shaft and rotate it so that the flat side of the roller is aligned with the flat side of the shaft. Slide the roller to the left until it clicks into place. Reinstall the envelope feeder access cover and discard the used roller and pad. 8-10 Maintaining and Adjusting the Printer EN
-
 1
1 -
2
-
3
-
4
-
5
-
6
-
7
-
8
-
9
-
10
-
11
-
12
-
13
-
14
-
15
-
16
-
17
-
18
-
19
-
20
-
21
-
22
-
23
-
24
-
25
-
26
-
27
-
28
-
29
-
30
-
31
-
32
-
33
-
34
-
35
-
36
-
37
-
38
-
39
-
40
-
41
-
42
-
43
-
44
-
45
-
46
-
47
-
48
-
49
-
50
-
51
-
52
-
53
-
54
-
55
-
56
-
57
-
58
-
59
-
60
-
61
-
62
-
63
-
64
-
65
-
66
-
67
-
68
-
69
-
70
-
71
-
72
-
73
-
74
-
75
-
76
-
77
-
78
-
79
-
80
-
81
-
82
-
83
-
84
-
85
-
86
-
87
-
88
-
89
-
90
-
91
-
92
-
93
-
94
-
95
-
96
-
97
-
98
-
99
-
100
-
101
-
102
-
103
-
104
-
105
-
106
-
107
-
108
-
109
-
110
-
111
-
112
-
113
-
114
-
115
-
116
-
117
-
118
-
119
-
120
-
121
-
122
-
123
-
124
-
125
-
126
-
127
-
128
-
129
-
130
-
131
-
132
-
133
-
134
-
135
-
136
-
137
-
138
-
139
-
140
-
141
-
142
-
 143
143 -
 144
144 -
 145
145 -
 146
146 -
 147
147 -
 148
148 -
 149
149 -
 150
150 -
 151
151 -
 152
152 -
 153
153 -
154
-
155
-
156
-
157
-
158
-
159
-
160
-
161
-
162
-
163
-
164
-
165
-
166
-
167
-
168
-
169
-
170
-
171
-
172
-
173
-
174
-
175
-
176
-
177
-
178
-
179
-
180
-
181
-
182
-
183
-
184
-
185
-
186
-
187
-
188
-
189
-
190
-
191
-
192
-
193
-
194
-
195
-
196
-
197
-
198
-
199
-
200
-
201
-
202
-
203
-
204
-
205
-
206
-
207
-
208
 |
 |
