Singer 2010 Superb Instruction Manual 2 - Page 39
Selecting, Stitch, selection, point, SelecciOn, punto
 |
View all Singer 2010 Superb manuals
Add to My Manuals
Save this manual to your list of manuals |
Page 39 highlights
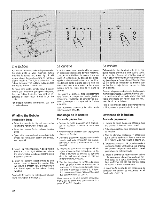
3. Ei ctr•nic 3. La co t rep et ue 3. C•st ra ica A 1 •2 • 3 1 s1v R •5 •6 •7 • 8 a9 • 10 • 11 • 12 • 13 I • 14 • 15 516 • 17 •18 III III • 19 020 • 21 •22 •23 •24 025 •26 •27 028 029 Selecting a Stitch Your sewing machine will produce most of your stitching requirements at a preprogrammed stitch width, stitch length, and balance. Turn the machine on. You will note a movement of the needle each time the power switch is turned on and a beep will be heard to indicate the machine is ready to sew a straight stitch. Select a pattern. For your convenience, the patterns on the stitch panel are colour coded and grouped by sewing application. A. The white patterns illustrated above are the basic stitches on your machine. 1. Straight Stitch; 2. Zig-Zag; and 3. Speed Basting will be selected often during your sewing time. The green pattern is the reverse stitch. B. Yellow patterns 4 through 13 are called Construction Stitches. Although several of these patterns have decorative applications, they most often are used for garment construction and alteration. C. Orange patterns 14 through 23 are the Functional Stitches on your machine. These stitches, traditionally hand sewn, are widely used in ready-to-wear items. D. Red patterns 24 through 29 are called Decorative Stitches. These stitches will add a personal touch to selected garments and craft projects. Touch the symbol of the pattern you wish to sew. When the stitch has been selected, a beep will be heard and a red light will be seen over the selected stitch symbol. La selection d'un point Votre machine a coudre reproduit la plupart des points dont vous puissiez avoir besoin, a une longueur, une largeur et un equilibre preprogrammes. Branchez la machine. Vous remarquerez un mouvement de l'aiguille a chaque fois que vous actionnez l'interrupteur de courant, alors qu'un signal sonore se fait entendre, indiquant ainsi que la machine est prate a coudre au point droit. Choisissez un point. Pour plus de facilite, les points sont repartis en un code de couleurs et sent groupes selon ('usage qu'on en fait. A. Les points en blanc representent les points elementaires de votre machine. Vous utiliserez frequemment 1. le point droit; 2. le point zig-zag; et 3. le faufilage rapide. Le symbole vert indique la couture en marche arriere. B. Les points jaunes, de 4 a 13, sont des points d'assemblage. Bien que plusieurs d'entre eux puissent servir de points de fantaisie, on les utilise communement pour ('assemblage de vetements et pour modifications. C. Les points oranges, de 14 a 23, sont les points pratiques de votre machine. Ces points, qui autrefois etaient cousus a la main, sont utilises couramment dans le prat-a-porter. D. Les points rouges, de 24 a 29, sent des points de fantaisie. Ce sont eux qui donneront un cachet personnel a vos vetements et projets d'artisanat. Touchez le symbole du point de votre choix. Lorsque le point aura ate selectionne, un signal sonore se fera entendre et un feu rouge s'allumera au-dessus du point choisi. SelecciOn del punto Su maquina de coser realizara la mayoria de sus necesidades de punto con el ancho, largo y equilibro preprogramados. Ponga la maquina en marcha. Usted observard el movimiento de la aguja cada vez que el interrupter de energia ponga la maquina en marcha y Used oira un tono corto para indicar que la maquina esta lista para producir un punto recto. Seleccione un patr6n o modelo. Para su conveniencia, los patrones de punto han sido identificados por colores y agrupados seg0n el tipo de costura. A. Los modelos o patrones blancos ilustrados arriba representan los puntos basicos de su maquina. 1. Punto recto; 2. Zigzag; y 3. Hilvanado rapid° seran seleccionados a menudo durante sus tareas de costura. El modelo verde representa al punto inverse. B. Los modelos amarillos 4 hasta 13 incluso se Ilaman los puntos de confecci6n. Aunque varios de estos patrones tienen aplicaciones decorativas, se usan a menudo para la confeccibn y las alteraclones de prendas. C. Los patrones color de naranja de 14 hasta 23 incluso son puntos funcionales. Estos puntos, tradicionalmente hechos a mane, se usan extensivamente en articulos confeccionados para Ilevar. D. Los patrones rojos de 24 hasta 29 incluso se Ilaman puntos decorativos. Estos puntos anadiran un toque personal a vestidos y proyectos de artesania seleccionados. Toque el simbolo del patr0n que desee producir. Una vez el punto seleccionado, Usted oira un sonido corto y vera una luz roja encima del simbolo del punto seleccionado. 37
-
 1
1 -
2
-
3
-
4
-
5
-
6
-
7
-
8
-
9
-
10
-
11
-
12
-
13
-
14
-
15
-
16
-
17
-
18
-
19
-
20
-
21
-
22
-
23
-
24
-
25
-
26
-
27
-
28
-
29
-
30
-
31
-
32
-
33
-
 34
34 -
 35
35 -
 36
36 -
 37
37 -
 38
38 -
 39
39 -
 40
40 -
 41
41 -
 42
42 -
 43
43 -
 44
44 -
45
-
46
-
47
-
48
-
49
-
50
-
51
-
52
-
53
-
54
-
55
-
56
-
57
-
58
-
59
-
60
-
61
-
62
-
63
-
64
-
65
-
66
-
67
-
68
-
69
-
70
-
71
-
72
-
73
-
74
-
75
-
76
-
77
-
78
-
79
-
80
-
81
-
82
-
83
-
84
-
85
-
86
-
87
-
88
-
89
-
90
-
91
-
92
-
93
-
94
-
95
-
96
-
97
-
98
-
99
-
100
-
101
-
102
-
103
-
104
-
105
-
106
-
107
-
108
-
109
-
110
-
111
-
112
-
113
-
114
-
115
-
116
 |
 |
