Yamaha M7CL M7cl V3 Owner's Manual - Page 181
Using an internal effect via send/return, INPUT L/R buttons
 |
View all Yamaha M7CL manuals
Add to My Manuals
Save this manual to your list of manuals |
Page 181 highlights
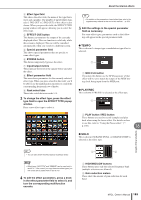
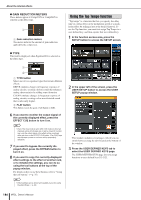
About the internal effects Using an internal effect via send/return Here we will explain how to use a MIX bus as an effect send bus and a ST IN channel as an effect return channel, so that the effect can be used in a send/return configuration. HINT • If you want to use a MIX bus as an effect send bus, select "VARI" as the bus type. This will allow you to adjust the send level separately for each input channel. • If you want to use the input to an effect in stereo, it is convenient to assign the send-source MIX bus to stereo. (For details on bus assignments → p. 234). 1 As described in "Virtual rack operations" (→ p. 172) steps 1-3, mount an effect in a rack. The rack in which an effect is mounted will indicate the effect type used by that effect, the number of inputs and outputs, and the levels before and following the effect. 2 1 3 1 Racks B INPUT button C OUTPUT button 2 Press the INPUT L button to open the OUTPUT CH SELECT popup window, and select a MIX channel as the input source for the rack. For details on the OUTPUT CH SELECT popup window, refer to step 5 of "Virtual rack operations" (→ p. 172). The output of the MIX channel you're using as the effect send is now assigned to the L input of the effect. If you're using a stereo source, assign the L/R signals of the stereo MIX channels to the L/R inputs of the rack. 3 Press the OUTPUT L button to open the INPUT CH SELECT popup window, and select the L input of the desired ST IN channel as the output-destination for the rack. For details on the INPUT CH SELECT popup window, refer to step 6 of "Virtual rack operations" (→ p. 172). The L input of the ST IN channel used as the effect return channel is now assigned to the L output of the effect. If you're using the output of the effect in stereo, assign the R input of the same ST IN channel to the R output of the rack in the same way. HINT • You can select more than one output destination for the effect. 4 Press the rack in which you mounted the effect. The EFFECT popup window will appear, allowing you to edit the parameters of the effect. 1 2 3 4 1 INPUT L/R buttons These buttons display the OUTPUT CH SELECT popup window. The operating procedure is the same as for the INPUT button in the GEQ/EFFECT field. B OUTPUT L/R buttons These buttons display the INPUT CH SELECT popup window. The operating procedure is the same as for the OUTPUT button in the GEQ/EFFECT field. C Input/output meters These indicate the level of the signals before and after the effect. D MIX BAL. knob This knob adjusts the balance between the original sound and effect sound included in the output signal from the effect. If you press this knob to select it, 16 you'll be able to adjust it using the corresponding mul- tifunction encoder. Graphic EQ and effects 5 As necessary, use the multifunction encoder to adjust the MIX BAL. knob. The MIX BAL. knob adjusts the balance between the original sound and effect sound included in the output signal from the effect. This parameter is provided for all effect types. If you're using the effect via send/return, set this to 100% (effect sound only). HINT • For details on editing the effect parameters, refer to Editing the internal effect parameters (P. 184). M7CL Owner's Manual 181
-
 1
1 -
2
-
3
-
4
-
5
-
6
-
7
-
8
-
9
-
10
-
11
-
12
-
13
-
14
-
15
-
16
-
17
-
18
-
19
-
20
-
21
-
22
-
23
-
24
-
25
-
26
-
27
-
28
-
29
-
30
-
31
-
32
-
33
-
34
-
35
-
36
-
37
-
38
-
39
-
40
-
41
-
42
-
43
-
44
-
45
-
46
-
47
-
48
-
49
-
50
-
51
-
52
-
53
-
54
-
55
-
56
-
57
-
58
-
59
-
60
-
61
-
62
-
63
-
64
-
65
-
66
-
67
-
68
-
69
-
70
-
71
-
72
-
73
-
74
-
75
-
76
-
77
-
78
-
79
-
80
-
81
-
82
-
83
-
84
-
85
-
86
-
87
-
88
-
89
-
90
-
91
-
92
-
93
-
94
-
95
-
96
-
97
-
98
-
99
-
100
-
101
-
102
-
103
-
104
-
105
-
106
-
107
-
108
-
109
-
110
-
111
-
112
-
113
-
114
-
115
-
116
-
117
-
118
-
119
-
120
-
121
-
122
-
123
-
124
-
125
-
126
-
127
-
128
-
129
-
130
-
131
-
132
-
133
-
134
-
135
-
136
-
137
-
138
-
139
-
140
-
141
-
142
-
143
-
144
-
145
-
146
-
147
-
148
-
149
-
150
-
151
-
152
-
153
-
154
-
155
-
156
-
157
-
158
-
159
-
160
-
161
-
162
-
163
-
164
-
165
-
166
-
167
-
168
-
169
-
170
-
171
-
172
-
173
-
174
-
175
-
 176
176 -
 177
177 -
 178
178 -
 179
179 -
 180
180 -
 181
181 -
 182
182 -
 183
183 -
 184
184 -
 185
185 -
 186
186 -
187
-
188
-
189
-
190
-
191
-
192
-
193
-
194
-
195
-
196
-
197
-
198
-
199
-
200
-
201
-
202
-
203
-
204
-
205
-
206
-
207
-
208
-
209
-
210
-
211
-
212
-
213
-
214
-
215
-
216
-
217
-
218
-
219
-
220
-
221
-
222
-
223
-
224
-
225
-
226
-
227
-
228
-
229
-
230
-
231
-
232
-
233
-
234
-
235
-
236
-
237
-
238
-
239
-
240
-
241
-
242
-
243
-
244
-
245
-
246
-
247
-
248
-
249
-
250
-
251
-
252
-
253
-
254
-
255
-
256
-
257
-
258
-
259
-
260
-
261
-
262
-
263
-
264
-
265
-
266
-
267
-
268
-
269
-
270
-
271
-
272
-
273
-
274
-
275
-
276
-
277
-
278
-
279
-
280
-
281
-
282
-
283
-
284
-
285
-
286
-
287
-
288
-
289
-
290
-
291
-
292
-
293
-
294
-
295
-
296
-
297
-
298
-
299
-
300
-
301
-
302
-
303
-
304
-
305
-
306
-
307
-
308
-
309
-
310
-
311
-
312
 |
 |
