Yamaha M7CL M7cl V3 Owner's Manual - Page 200
Using program changes to recall scenes and library items, Connect the M7CL to your external device.
 |
View all Yamaha M7CL manuals
Add to My Manuals
Save this manual to your list of manuals |
Page 200 highlights
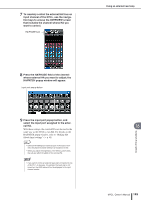
Basic MIDI settings • Using program changes to recall scenes and library items 6 To specify the channel on which MIDI messages will be transmitted or received, press the channel select popup button. The MIDI SETUP popup window for selecting the channel will appear. Operations in this window are the same for both transmission (Tx) and reception (Rx), and include the following items. 1 1 CH field Select CH 1-CH 16 as the channel that will be used to transmit or receive MIDI messages. 7 Select the channel. Use the ↑/↓buttons to select an item. Press the OK button to confirm the selected channel and close the MIDI SETUP popup window. HINT • Alternatively, you can select the channel by pressing the desired channel in the field or by turning one of the multifunction encoders. • When transmitting or received parameter changes, the channel number you specify here is used as the device number (a number that identifies the transmitting or receiving unit). 8 Turn transmission/reception on or off for each MIDI message. HINT • For details on using program changes, refer to "Using program changes to recall scenes and library items," below. • For details on using control changes, refer to "Using control changes to control parameters" (→ p. 203). Using program changes to recall scenes and library items The M7CL lets you assign a specific event (scene recall or effect library recall) to each program change number, so that when this event is executed on the M7CL, a program change message of the corresponding number will be transmitted to an external device. Conversely, the corresponding event can be executed when a program change message is received from an external device. 1 Connect the M7CL to your external device. The following illustration shows an example of using the MIDI IN/OUT connectors to transmit and receive MIDI messages. 2 In the function access area, press the SETUP button to access the SETUP screen. MIDI button MIDI IN MIDI OUT MIDI IN MIDI OUT external device M7CL 200 M7CL Owner's Manual 3 In the center of the screen, press the MIDI button to access the MIDI popup window.
-
 1
1 -
2
-
3
-
4
-
5
-
6
-
7
-
8
-
9
-
10
-
11
-
12
-
13
-
14
-
15
-
16
-
17
-
18
-
19
-
20
-
21
-
22
-
23
-
24
-
25
-
26
-
27
-
28
-
29
-
30
-
31
-
32
-
33
-
34
-
35
-
36
-
37
-
38
-
39
-
40
-
41
-
42
-
43
-
44
-
45
-
46
-
47
-
48
-
49
-
50
-
51
-
52
-
53
-
54
-
55
-
56
-
57
-
58
-
59
-
60
-
61
-
62
-
63
-
64
-
65
-
66
-
67
-
68
-
69
-
70
-
71
-
72
-
73
-
74
-
75
-
76
-
77
-
78
-
79
-
80
-
81
-
82
-
83
-
84
-
85
-
86
-
87
-
88
-
89
-
90
-
91
-
92
-
93
-
94
-
95
-
96
-
97
-
98
-
99
-
100
-
101
-
102
-
103
-
104
-
105
-
106
-
107
-
108
-
109
-
110
-
111
-
112
-
113
-
114
-
115
-
116
-
117
-
118
-
119
-
120
-
121
-
122
-
123
-
124
-
125
-
126
-
127
-
128
-
129
-
130
-
131
-
132
-
133
-
134
-
135
-
136
-
137
-
138
-
139
-
140
-
141
-
142
-
143
-
144
-
145
-
146
-
147
-
148
-
149
-
150
-
151
-
152
-
153
-
154
-
155
-
156
-
157
-
158
-
159
-
160
-
161
-
162
-
163
-
164
-
165
-
166
-
167
-
168
-
169
-
170
-
171
-
172
-
173
-
174
-
175
-
176
-
177
-
178
-
179
-
180
-
181
-
182
-
183
-
184
-
185
-
186
-
187
-
188
-
189
-
190
-
191
-
192
-
193
-
194
-
 195
195 -
 196
196 -
 197
197 -
 198
198 -
 199
199 -
 200
200 -
 201
201 -
 202
202 -
 203
203 -
 204
204 -
 205
205 -
206
-
207
-
208
-
209
-
210
-
211
-
212
-
213
-
214
-
215
-
216
-
217
-
218
-
219
-
220
-
221
-
222
-
223
-
224
-
225
-
226
-
227
-
228
-
229
-
230
-
231
-
232
-
233
-
234
-
235
-
236
-
237
-
238
-
239
-
240
-
241
-
242
-
243
-
244
-
245
-
246
-
247
-
248
-
249
-
250
-
251
-
252
-
253
-
254
-
255
-
256
-
257
-
258
-
259
-
260
-
261
-
262
-
263
-
264
-
265
-
266
-
267
-
268
-
269
-
270
-
271
-
272
-
273
-
274
-
275
-
276
-
277
-
278
-
279
-
280
-
281
-
282
-
283
-
284
-
285
-
286
-
287
-
288
-
289
-
290
-
291
-
292
-
293
-
294
-
295
-
296
-
297
-
298
-
299
-
300
-
301
-
302
-
303
-
304
-
305
-
306
-
307
-
308
-
309
-
310
-
311
-
312
 |
 |
