Yamaha M7CL M7cl V3 Owner's Manual - Page 194
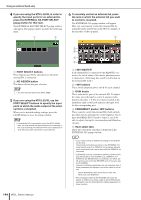
press the EXTERNAL HA PORT SELECT, PORT SELECT buttons
 |
View all Yamaha M7CL manuals
Add to My Manuals
Save this manual to your list of manuals |
Page 194 highlights
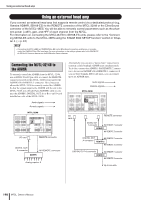
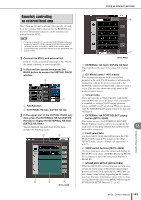
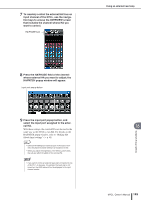
Using an external head amp 4 If you are using the M7CL-32/48, in order to specify the input ports for an external HA, press the EXTERNAL HA PORT SELECT popup button for that rack. The EXTERNAL HA PORT SELECT popup window will appear. The popup window includes the following items. 1 2 6 To remotely control an external HA, press the rack in which the external HA you want to control is mounted. The EXTERNAL HA popup window will appear. Here you can remotely control the external HA by using the knobs and buttons in the M7CL's display or the encoders of the top panel. 1 1 PORT SELECT buttons These buttons specify the input ports to which the external HA is connected. B NO ASSIGN button This button defeats the port selection. NOTE • The input ports are fixed on the M7CL-48ES. 5 If you are using the M7CL-32/48, use the PORT SELECT buttons to specify the input ports to which the audio output of the external HA is connected. When you've finished making settings, press the CLOSE button to close the popup window. NOTE • If an external HA is connected to one of the M7CL-32/48's slots, you must specify the appropriate input port manually. If this is set incorrectly, the external HA will not be detected correctly when you patch input ports to input channels. 194 M7CL Owner's Manual 2 3 4 5 1 +48V MASTER If an external HA is connected to the REMOTE connector, the on/off status of the master phantom power is shown here. (Switching this on/off is performed on the external HA itself.) B +48V buttons These switch phantom power on/off for each channel. C GAIN knobs These indicate the gain of the external HA. To adjust the value, press the knob to select it, and use multifunction encoders 1-8. The level meter located at the immediate right of the knob indicates the input level for the corresponding port. D FREQUENCY knobs / HPF buttons These controls switch the external HA's built-in highpass filter on/off, and adjust its cutoff frequency. If you press the FREQUENCY knob to select it, you'll be able to adjust it using the corresponding multifunction encoder. E Rack select tabs These tabs switch the rack that is displayed in the EXTERNAL HA popup window. HINT • If you newly connect an AD8HR, the setting for this AD8HR will be used. These knobs and buttons are shown in the EXTERNAL HA popup window even if an AD8HR is not connected, allowing you to create and store a scene even while the AD8HR is not connected. • If SB168-ES units are connected to the M7CL-32/48, the display will indicate as if two AD8HRs (e.g., AD8HR #1 and AD8HR #2) per SB168-ES were connected to the M7CL-32/ 48, and you can control the SB168-ES units in the same way as the AD8HRs. However, the following parameters are not supported. Even if these parameters are displayed, you will be unable to set values. Device Mode/Name, Word Clock Source, Gain Trim, Panel Lock, LED Brightness • Error messages related to the SB168-ES will not be displayed. In addition, you will be unable to set the EtherSound parameters. Use the AVS-ESMonitor software application for these functions.
-
 1
1 -
2
-
3
-
4
-
5
-
6
-
7
-
8
-
9
-
10
-
11
-
12
-
13
-
14
-
15
-
16
-
17
-
18
-
19
-
20
-
21
-
22
-
23
-
24
-
25
-
26
-
27
-
28
-
29
-
30
-
31
-
32
-
33
-
34
-
35
-
36
-
37
-
38
-
39
-
40
-
41
-
42
-
43
-
44
-
45
-
46
-
47
-
48
-
49
-
50
-
51
-
52
-
53
-
54
-
55
-
56
-
57
-
58
-
59
-
60
-
61
-
62
-
63
-
64
-
65
-
66
-
67
-
68
-
69
-
70
-
71
-
72
-
73
-
74
-
75
-
76
-
77
-
78
-
79
-
80
-
81
-
82
-
83
-
84
-
85
-
86
-
87
-
88
-
89
-
90
-
91
-
92
-
93
-
94
-
95
-
96
-
97
-
98
-
99
-
100
-
101
-
102
-
103
-
104
-
105
-
106
-
107
-
108
-
109
-
110
-
111
-
112
-
113
-
114
-
115
-
116
-
117
-
118
-
119
-
120
-
121
-
122
-
123
-
124
-
125
-
126
-
127
-
128
-
129
-
130
-
131
-
132
-
133
-
134
-
135
-
136
-
137
-
138
-
139
-
140
-
141
-
142
-
143
-
144
-
145
-
146
-
147
-
148
-
149
-
150
-
151
-
152
-
153
-
154
-
155
-
156
-
157
-
158
-
159
-
160
-
161
-
162
-
163
-
164
-
165
-
166
-
167
-
168
-
169
-
170
-
171
-
172
-
173
-
174
-
175
-
176
-
177
-
178
-
179
-
180
-
181
-
182
-
183
-
184
-
185
-
186
-
187
-
188
-
 189
189 -
 190
190 -
 191
191 -
 192
192 -
 193
193 -
 194
194 -
 195
195 -
 196
196 -
 197
197 -
 198
198 -
 199
199 -
200
-
201
-
202
-
203
-
204
-
205
-
206
-
207
-
208
-
209
-
210
-
211
-
212
-
213
-
214
-
215
-
216
-
217
-
218
-
219
-
220
-
221
-
222
-
223
-
224
-
225
-
226
-
227
-
228
-
229
-
230
-
231
-
232
-
233
-
234
-
235
-
236
-
237
-
238
-
239
-
240
-
241
-
242
-
243
-
244
-
245
-
246
-
247
-
248
-
249
-
250
-
251
-
252
-
253
-
254
-
255
-
256
-
257
-
258
-
259
-
260
-
261
-
262
-
263
-
264
-
265
-
266
-
267
-
268
-
269
-
270
-
271
-
272
-
273
-
274
-
275
-
276
-
277
-
278
-
279
-
280
-
281
-
282
-
283
-
284
-
285
-
286
-
287
-
288
-
289
-
290
-
291
-
292
-
293
-
294
-
295
-
296
-
297
-
298
-
299
-
300
-
301
-
302
-
303
-
304
-
305
-
306
-
307
-
308
-
309
-
310
-
311
-
312
 |
 |
