Yamaha M7CL M7cl V3 Owner's Manual - Page 193
Remotely controlling an external head amp, Connect the M7CL and external HA.
 |
View all Yamaha M7CL manuals
Add to My Manuals
Save this manual to your list of manuals |
Page 193 highlights
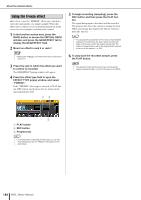
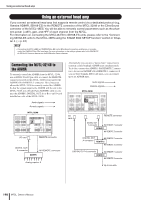
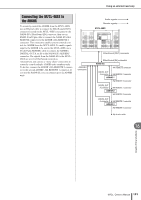
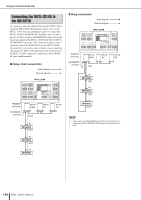
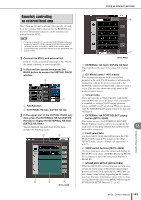
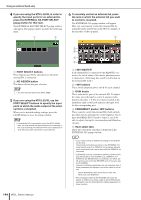
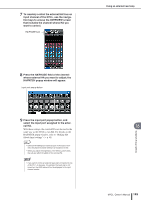
Remotely controlling an external head amp Here's how an external head amp (subsequently referred to as the "external HA") connected to the REMOTE connector or EtherSound connector can be remotely controlled from the M7CL. NOTE • To set up an external HA, you will use the EXTERNAL HA popup window on the M7CL-32/48, and the SB168-ES HA and EXT-ES HA popup windows on the M7CL-48ES. In this section, these popup windows are collectively referred to as the "EXTERNAL HA popup window." 1 Connect the M7CL and external HA. Refer to "Using an external head amp" (→ p. 190) or the owner's manual for your external HA. 2 In the function access area, press the RACK button to access the VIRTUAL RACK window. 2 1 1 RACK button B EXTERNAL HA tab / EXT-ES HA tab 3 In the upper part of the VIRTUAL RACK window, press the EXTERNAL HA tab (EXT-ES HA tab) to display the EXTERNAL HA field (EXT-ES HA field.) The EXTERNAL HA field (EXT-ES HA field) includes the following items. 1 5 2 3 4 M7CL-32/48 Using an external head amp 6 7 M7CL-48ES 1 EXTERNAL HA field / EXT-ES HA field This field shows the state of the connected external HA. B ID / Model name / +48V master This displays information for the external HA mounted in the rack. The ID number is automatically assigned in order of the devices connected to the REMOTE connector or EtherSound connector, from 1 to six. This area also shows the on/off status of the master phantom power. C Virtual racks These are six racks in which remotely controllable external HA units can be mounted. If an external HA is mounted, its settings (GAIN setting, phantom power, and HPF on/off) are shown. When you press a rack, the EXTERNAL HA popup window for that rack will appear. D EXTERNAL HA PORT SELECT popup button (M7CL-32/48) This button accesses the EXTERNAL HA PORT SELECT popup window, where you can specify the input ports to which the external HA mounted in the 16 rack will be connected. Graphic EQ and effects E Field select tabs Use these tabs to switch the field shown in the VIRTUAL RACK window. For details on the GEQ/ EFFECT fields, refer to "Virtual rack operations" (→ p. 172). F VIEW switch buttons (M7CL-48ES) Use these buttons to select the virtual rack display for SB168-ES or for others (AD8HR). If only the SB168ES is connected, select the virtual rack display for SB168-ES. G STAGE BOX SETUP (M7CL-48ES) When the SB168-ES is connected, you can turn on or off the automatic setup of EtherSound input/output patches and word clock on the M7CL-48ES. You can also change some settings depending on the connection type. For more information, please refer to "Connecting SB168-ES units to the M7CL-48ES using the STAGE BOX SETUP function" (→ p. 43). M7CL Owner's Manual 193
-
 1
1 -
2
-
3
-
4
-
5
-
6
-
7
-
8
-
9
-
10
-
11
-
12
-
13
-
14
-
15
-
16
-
17
-
18
-
19
-
20
-
21
-
22
-
23
-
24
-
25
-
26
-
27
-
28
-
29
-
30
-
31
-
32
-
33
-
34
-
35
-
36
-
37
-
38
-
39
-
40
-
41
-
42
-
43
-
44
-
45
-
46
-
47
-
48
-
49
-
50
-
51
-
52
-
53
-
54
-
55
-
56
-
57
-
58
-
59
-
60
-
61
-
62
-
63
-
64
-
65
-
66
-
67
-
68
-
69
-
70
-
71
-
72
-
73
-
74
-
75
-
76
-
77
-
78
-
79
-
80
-
81
-
82
-
83
-
84
-
85
-
86
-
87
-
88
-
89
-
90
-
91
-
92
-
93
-
94
-
95
-
96
-
97
-
98
-
99
-
100
-
101
-
102
-
103
-
104
-
105
-
106
-
107
-
108
-
109
-
110
-
111
-
112
-
113
-
114
-
115
-
116
-
117
-
118
-
119
-
120
-
121
-
122
-
123
-
124
-
125
-
126
-
127
-
128
-
129
-
130
-
131
-
132
-
133
-
134
-
135
-
136
-
137
-
138
-
139
-
140
-
141
-
142
-
143
-
144
-
145
-
146
-
147
-
148
-
149
-
150
-
151
-
152
-
153
-
154
-
155
-
156
-
157
-
158
-
159
-
160
-
161
-
162
-
163
-
164
-
165
-
166
-
167
-
168
-
169
-
170
-
171
-
172
-
173
-
174
-
175
-
176
-
177
-
178
-
179
-
180
-
181
-
182
-
183
-
184
-
185
-
186
-
187
-
 188
188 -
 189
189 -
 190
190 -
 191
191 -
 192
192 -
 193
193 -
 194
194 -
 195
195 -
 196
196 -
 197
197 -
 198
198 -
199
-
200
-
201
-
202
-
203
-
204
-
205
-
206
-
207
-
208
-
209
-
210
-
211
-
212
-
213
-
214
-
215
-
216
-
217
-
218
-
219
-
220
-
221
-
222
-
223
-
224
-
225
-
226
-
227
-
228
-
229
-
230
-
231
-
232
-
233
-
234
-
235
-
236
-
237
-
238
-
239
-
240
-
241
-
242
-
243
-
244
-
245
-
246
-
247
-
248
-
249
-
250
-
251
-
252
-
253
-
254
-
255
-
256
-
257
-
258
-
259
-
260
-
261
-
262
-
263
-
264
-
265
-
266
-
267
-
268
-
269
-
270
-
271
-
272
-
273
-
274
-
275
-
276
-
277
-
278
-
279
-
280
-
281
-
282
-
283
-
284
-
285
-
286
-
287
-
288
-
289
-
290
-
291
-
292
-
293
-
294
-
295
-
296
-
297
-
298
-
299
-
300
-
301
-
302
-
303
-
304
-
305
-
306
-
307
-
308
-
309
-
310
-
311
-
312
 |
 |
