Yamaha M7CL M7cl V3 Owner's Manual - Page 183
Inserting an internal effect into a channel
 |
View all Yamaha M7CL manuals
Add to My Manuals
Save this manual to your list of manuals |
Page 183 highlights
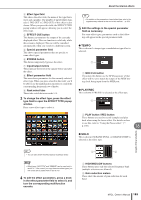
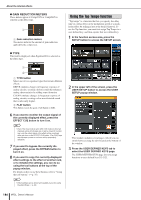
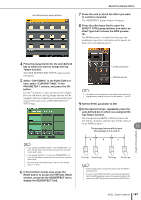
Inserting an internal effect into a channel Here we will explain how to insert an effect into a channel by assigning the input/output of the internal effect to the input/output of the desired channel (except for a ST IN channel). 1 As described in "Virtual rack operations" (→ p. 172) steps 1-3, mount an effect in a rack. The rack in which an effect is mounted will indicate the effect type used by that effect, the number of inputs and outputs, and the levels before and following the effect. About the internal effects 4 Use the navigation keys to access the OVERVIEW screen for the channel in which you want to insert the effect. 5 Press the INSERT/DIRECT OUT field to access the INSERT/DIRECT OUT popup window. Make sure that the rack you inserted in the input/output ports is selected. For details on Insert Out/In, refer to "Inserting an external device into a channel" (→ p. 110). INSERT ON/OFF button 2 1 3 1 Racks B INPUT buttons C OUTPUT buttons 2 Press the INPUT L button to open the OUTPUT CH SELECT popup window, and select the insert-out of a channel as the inputsource. For details on the OUTPUT CH SELECT popup window, refer to step 5 of "Virtual rack operations" (→ p. 172). Insert-out is now assigned to the L input of the effect. 3 Press the INPUT L button to open the INPUT CH SELECT popup window, and select the insert-in of the same channel as the output-destination. For details on the INPUT CH SELECT popup window, refer to step 6 of "Virtual rack operations" (→ p. 172). Insert-in is now assigned to the L output of the effect. If you are inserting in a channel that handles a stereo source, assign the R channel insert-out/insert-in to the R input/output. HINT • The INSERT/DIRECT OUT popup window also lets you change the insert-out/in position within the channel. 6 Make sure that the INSERT ON/OFF button is turned on for the channel into which you inserted the effect. If it is off, press the button to turn it on. In this state, effect insertion is enabled for the corresponding channel. 7 In the function access area, press the RACK button to access the VIRTUAL RACK window, and use the GEQ/EFFECT tab to display the GEQ/EFFECT field. 16 8 Press the effect rack that you want to insert into the channel; the EFFECT popup window will appear. In this popup window you can edit the parameters of the effect. The popup window contains the following items. Graphic EQ and effects M7CL Owner's Manual 183
-
 1
1 -
2
-
3
-
4
-
5
-
6
-
7
-
8
-
9
-
10
-
11
-
12
-
13
-
14
-
15
-
16
-
17
-
18
-
19
-
20
-
21
-
22
-
23
-
24
-
25
-
26
-
27
-
28
-
29
-
30
-
31
-
32
-
33
-
34
-
35
-
36
-
37
-
38
-
39
-
40
-
41
-
42
-
43
-
44
-
45
-
46
-
47
-
48
-
49
-
50
-
51
-
52
-
53
-
54
-
55
-
56
-
57
-
58
-
59
-
60
-
61
-
62
-
63
-
64
-
65
-
66
-
67
-
68
-
69
-
70
-
71
-
72
-
73
-
74
-
75
-
76
-
77
-
78
-
79
-
80
-
81
-
82
-
83
-
84
-
85
-
86
-
87
-
88
-
89
-
90
-
91
-
92
-
93
-
94
-
95
-
96
-
97
-
98
-
99
-
100
-
101
-
102
-
103
-
104
-
105
-
106
-
107
-
108
-
109
-
110
-
111
-
112
-
113
-
114
-
115
-
116
-
117
-
118
-
119
-
120
-
121
-
122
-
123
-
124
-
125
-
126
-
127
-
128
-
129
-
130
-
131
-
132
-
133
-
134
-
135
-
136
-
137
-
138
-
139
-
140
-
141
-
142
-
143
-
144
-
145
-
146
-
147
-
148
-
149
-
150
-
151
-
152
-
153
-
154
-
155
-
156
-
157
-
158
-
159
-
160
-
161
-
162
-
163
-
164
-
165
-
166
-
167
-
168
-
169
-
170
-
171
-
172
-
173
-
174
-
175
-
176
-
177
-
 178
178 -
 179
179 -
 180
180 -
 181
181 -
 182
182 -
 183
183 -
 184
184 -
 185
185 -
 186
186 -
 187
187 -
 188
188 -
189
-
190
-
191
-
192
-
193
-
194
-
195
-
196
-
197
-
198
-
199
-
200
-
201
-
202
-
203
-
204
-
205
-
206
-
207
-
208
-
209
-
210
-
211
-
212
-
213
-
214
-
215
-
216
-
217
-
218
-
219
-
220
-
221
-
222
-
223
-
224
-
225
-
226
-
227
-
228
-
229
-
230
-
231
-
232
-
233
-
234
-
235
-
236
-
237
-
238
-
239
-
240
-
241
-
242
-
243
-
244
-
245
-
246
-
247
-
248
-
249
-
250
-
251
-
252
-
253
-
254
-
255
-
256
-
257
-
258
-
259
-
260
-
261
-
262
-
263
-
264
-
265
-
266
-
267
-
268
-
269
-
270
-
271
-
272
-
273
-
274
-
275
-
276
-
277
-
278
-
279
-
280
-
281
-
282
-
283
-
284
-
285
-
286
-
287
-
288
-
289
-
290
-
291
-
292
-
293
-
294
-
295
-
296
-
297
-
298
-
299
-
300
-
301
-
302
-
303
-
304
-
305
-
306
-
307
-
308
-
309
-
310
-
311
-
312
 |
 |
