Yamaha M7CL M7cl V3 Owner's Manual - Page 186
Using the Tap Tempo function, GAIN REDUCTION METERS
 |
View all Yamaha M7CL manuals
Add to My Manuals
Save this manual to your list of manuals |
Page 186 highlights
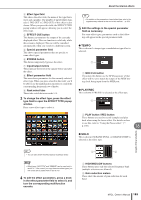
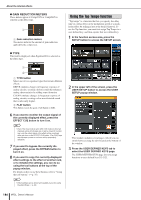
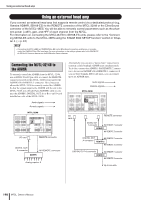
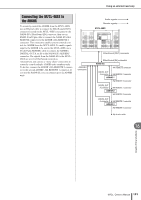
About the internal effects ● GAIN REDUCTION METERS These meters appear if Comp276/S or Comp260/S is selected as the effect type. 1 1 Gain reduction meters The meters indicate the amount of gain reduction applied by the compressor. Using the Tap Tempo function "Tap tempo" is a function that lets you specify the delay time of a delay effect or the modulation speed of a modulation effect by striking a key at the desired interval. To use the Tap function, you must first assign Tap Tempo to a user-defined key, and then operate that user-defined key. 1 In the function access area, press the SETUP button to access the SETUP screen. ● TYPE This field is displayed when Equalizer601 is selected as the effect type. 1 2 1 TYPE button Select one of two equalizer types that feature different effects. DRIVE emulates changes in frequency response of analog circuits, creating a driven sound that enhances analog characteristics by adding some distortion. CLEAN emulates changes in frequency response of analog circuits, creating a clear non-distorted sound that is inherently digital. B FLAT button This button resets the gain of all bands to 0dB. 6 If you want to monitor the output signal of the currently displayed effect, press the EFFECT CUE button to turn it on. HINT • Even if the Cue mode is set to MIX CUE mode (in which all channels whose [CUE] keys are on will be mixed for monitoring), only the output signal of the effect will be monitored when you turn on the EFFECT CUE button. (The [CUE] keys that had been turned on until then will be temporarily defeated.) 7 If you want to bypass the currently displayed effect, press the BYPASS button to turn it on. 8 If you want to copy the currently-displayed effect settings to the effect of another rack, or to initialize the settings, you can do so using the tool buttons at the top of the popup window. For details on how to use these buttons, refer to "Using the tool buttons" (→ p. 35). HINT • Effect settings can be stored and recalled at any time using the effect library (→ p. 35). 2 In the upper left of the screen, press the USER SETUP button to access the USER SETUP popup window. This window includes several pages, which you can switch between using the tabs located at the bottom of the window. 3 Press the USER DEFINED KEYS tab to select the USER DEFINED KEYS page. The USER DEFINED KEYS page lets you assign functions to user defined keys [1]-[12]. 186 M7CL Owner's Manual
-
 1
1 -
2
-
3
-
4
-
5
-
6
-
7
-
8
-
9
-
10
-
11
-
12
-
13
-
14
-
15
-
16
-
17
-
18
-
19
-
20
-
21
-
22
-
23
-
24
-
25
-
26
-
27
-
28
-
29
-
30
-
31
-
32
-
33
-
34
-
35
-
36
-
37
-
38
-
39
-
40
-
41
-
42
-
43
-
44
-
45
-
46
-
47
-
48
-
49
-
50
-
51
-
52
-
53
-
54
-
55
-
56
-
57
-
58
-
59
-
60
-
61
-
62
-
63
-
64
-
65
-
66
-
67
-
68
-
69
-
70
-
71
-
72
-
73
-
74
-
75
-
76
-
77
-
78
-
79
-
80
-
81
-
82
-
83
-
84
-
85
-
86
-
87
-
88
-
89
-
90
-
91
-
92
-
93
-
94
-
95
-
96
-
97
-
98
-
99
-
100
-
101
-
102
-
103
-
104
-
105
-
106
-
107
-
108
-
109
-
110
-
111
-
112
-
113
-
114
-
115
-
116
-
117
-
118
-
119
-
120
-
121
-
122
-
123
-
124
-
125
-
126
-
127
-
128
-
129
-
130
-
131
-
132
-
133
-
134
-
135
-
136
-
137
-
138
-
139
-
140
-
141
-
142
-
143
-
144
-
145
-
146
-
147
-
148
-
149
-
150
-
151
-
152
-
153
-
154
-
155
-
156
-
157
-
158
-
159
-
160
-
161
-
162
-
163
-
164
-
165
-
166
-
167
-
168
-
169
-
170
-
171
-
172
-
173
-
174
-
175
-
176
-
177
-
178
-
179
-
180
-
 181
181 -
 182
182 -
 183
183 -
 184
184 -
 185
185 -
 186
186 -
 187
187 -
 188
188 -
 189
189 -
 190
190 -
 191
191 -
192
-
193
-
194
-
195
-
196
-
197
-
198
-
199
-
200
-
201
-
202
-
203
-
204
-
205
-
206
-
207
-
208
-
209
-
210
-
211
-
212
-
213
-
214
-
215
-
216
-
217
-
218
-
219
-
220
-
221
-
222
-
223
-
224
-
225
-
226
-
227
-
228
-
229
-
230
-
231
-
232
-
233
-
234
-
235
-
236
-
237
-
238
-
239
-
240
-
241
-
242
-
243
-
244
-
245
-
246
-
247
-
248
-
249
-
250
-
251
-
252
-
253
-
254
-
255
-
256
-
257
-
258
-
259
-
260
-
261
-
262
-
263
-
264
-
265
-
266
-
267
-
268
-
269
-
270
-
271
-
272
-
273
-
274
-
275
-
276
-
277
-
278
-
279
-
280
-
281
-
282
-
283
-
284
-
285
-
286
-
287
-
288
-
289
-
290
-
291
-
292
-
293
-
294
-
295
-
296
-
297
-
298
-
299
-
300
-
301
-
302
-
303
-
304
-
305
-
306
-
307
-
308
-
309
-
310
-
311
-
312
 |
 |
