Brother International LT2-B845 MKII Instruction Manual - Multi - Page 32
Installing, cover, Montage, Riemenschutzes, Installation, couvercle, courroie, Instalacion, cubierta
 |
View all Brother International LT2-B845 MKII manuals
Add to My Manuals
Save this manual to your list of manuals |
Page 32 highlights
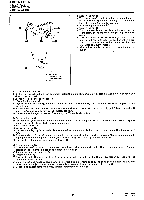
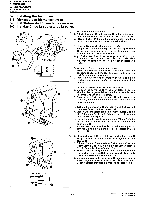
5. INSTALLATION 5. MONTAGE 5. INSTALLATION 5. INSTALACION 5-6. Installing the belt cover 5-6. Montage des Riemenschutzes 5-6. Installation du couvercle de courroie 5-6. Instalacion de la cubierta de la correa 1. Tilt back the machine head. 2. Attach the screw 0 and washers 0 to the rubber cush- ions on the inside of the belt cover U 0 (in four places). 3. Place belt cover U 0 onto the machine pulley, and then return the machine head to its original position. (Do 0 1. Klappen Sie das Maschiennoberteil zuriick. 2. Bringen Sie die Schrauben 0 und die Unterlegscheiben 0 an den Gummidannpfern auf der Innenseite des Riemenschutzes U 0 an vier Stellen an. 3. Bringen Sie den Riemenschutz U 0 an der Riemenscheibe an und klappen Sie das Maschinenoberteil wieder in die Ausgangsstellung zuriick. 1. Incliner Ia tete de machine vers l'arriere 2. Fixer la vis 0 et les rondelles 0 sur les amortisseurs en caoutchouc situes a l'interieur du couvercle de courroie U 0 la quatre emplacements). 3. Placer le couvercle de courroie U 0 sur la poulie de machine, puis remettre la tete de machine a sa position initiale. 0 a mm 1. Incliner Ia cabeza de la maquina hacia atras. 2. Colocar los tornillos 0 y las arandelas 0 en las almohadillas de goma del lado interior de la cubierta de la correa U 0 (en cuatro lugares). 3. Colocar Ia cubierta de la correa U 0 en la polea de la maquina, y luego volver la cabeza de la maquina a su posicion original. 4. Tighten the four screws 0 attached in step 2. above and the screw 0 to install belt cover U 0. 4. Ziehen Sie zum Befestigen des Riemenschutzes U 0 die vier Schrauben 0, die im 2. Schritt angebracht wurden und die Schraube 0 fest. 4. Serrer les quatre vis 0 fixees lors de l'etape 2 decrite ci-dessus et la vis 0 pour installer le couvercle de courroie U 0. 4. Apretar los cuatro tornillos 0 colocados en el paso 2. anterior y el tornillo 0 para instalar la cubierta en U de la correa 0. 0 O mm tps 5. Place belt cover D 0 so that it overlaps the belt cover U 0 by 2-3 mm, and then provisionally tighten the two screws 0. 5. Bringen Sie den Riemenschutz D 0 so an, daL er den Riemenschutz U 0 und 2 bis 3 mm tiberlappt und ziehen Sie die Schraube 0 provisorisch fest. 5. Placer le couvercle 0 de courroie D de maniere qu'il chevauche le couvercle U 0 de courroie de 2-3 mm, puis serrer provisoirement les deux vis 0. 5. Colocar Ia cubierta de la correa D 0 de manera que se superponga a la cubierta de la correa U 0 unos 2-3 mm, y luego apretar provisionalmente los dos tornillos 0. 2-3 mm - 17 - Model No. LT2-B840 Mark II LT2-B870 Mark II
-
 1
1 -
2
-
3
-
4
-
5
-
6
-
7
-
8
-
9
-
10
-
11
-
12
-
13
-
14
-
15
-
16
-
17
-
18
-
19
-
20
-
21
-
22
-
23
-
24
-
25
-
26
-
 27
27 -
 28
28 -
 29
29 -
 30
30 -
 31
31 -
 32
32 -
 33
33 -
 34
34 -
 35
35 -
 36
36 -
 37
37 -
38
-
39
-
40
-
41
-
42
-
43
-
44
-
45
-
46
-
47
-
48
-
49
-
50
-
51
-
52
-
53
-
54
-
55
-
56
-
57
-
58
-
59
-
60
-
61
-
62
-
63
-
64
-
65
-
66
-
67
-
68
-
69
-
70
-
71
-
72
-
73
-
74
-
75
-
76
-
77
-
78
-
79
-
80
-
81
-
82
-
83
-
84
-
85
-
86
-
87
-
88
-
89
-
90
-
91
-
92
-
93
-
94
-
95
-
96
-
97
-
98
 |
 |
