Brother International LT2-B845 MKII Instruction Manual - Multi - Page 38
Removing, bobbin, Entfernen, Spule, Spulenkapsel, Retrait, canette, capuchon, Desmontaje, bobina
 |
View all Brother International LT2-B845 MKII manuals
Add to My Manuals
Save this manual to your list of manuals |
Page 38 highlights
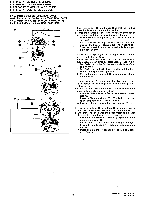
6. PREPARATION BEFORE SEWING 6. VORBEREITUNGEN ZUM NAHEN 6. PREPARATIFS AVANT LA COUTURE 6. PREPARATIVOS ANTES DE COSER 6-2. Removing the bobbin or cap 6-2. Entfernen der Spule bzw. der Spulenkapsel 6-2. Retrait de la canette ou du capuchon 6-2. Desmontaje de la bobina o tapa CAUTION/ACHTUNG/ATTENTION/ATENCION • Turn off the power supply before removing the bobbin or the cap. The motor will keep turning even after the power is switched off as a result of the motor's inertia. Wait until the motor stops fully before starting work. The machine may operate if the treadle is pressed by mistake, which could result in injury. • Vor dem Entfernen der Spule oder der Spulenkapsel mug die Stromversorgung ausgeschaltet werden. Warten Sie bis der Motor zum vollstandigen Stillstand gekommen ist, bevor Sie mit dem Arbeiten beginnen. Wenn die Maschine nicht ausgeschaltet wird kann sie sich durch unbeabsichtigtes Drucken des Pedals in Bewegung setzen und Verletzungen verursachen. • Couper l'alimentation electrique avant de retirer la canette ou le capuchon. Le moteur continuera de tourner en raison de sapropre inertie apres qu'on ait coupe l'alimentation electrique. Avant de commencer les travaux, attendre que le moteur se soit completement arrete. La machine risque de se mettre en marche si on enfonce accidentellement la pedale, et done de causer des blessures. • Desconectar la fuente de alimentation antes de desmontar la bobina o tapa. Como resultado de la inertia el motor continuara girando despues de desconectar el interruptor principal. Se debe esperar hasta que el motor se haya detenido completamente antes de comenzar con la limpieza. La maquina podria comenzar a funcionar si por descuido se pisara el pedal, lo que podria resultar en heridas. Bobbin Spulen Cannette _ Bobina Cap Spulenkapsel Capuchon Tapa t (1) mm Go 1. Raise the needles 0 to the highest positions, and open the slide plates 0 by moving them to the right and left. 2. Pull the rotary hook latches 0 upward, and then remove the bobbin 0. 1. Raise the needles 0 to the highest positions, and open the slide plates 0 by moving them to the right and left. 2. After lifting up the rotary hook latch 0, life the corner of the cap 0 to remove the cap 0. 1. Die Nadeln 0 ganz nach oben stellen und die Deckel 0 nach rechts und links auseinanderziehen. 2. Die Spulen 0 an den Laschen 0 herausziehen. 1. Relever les aiguilles 0 a leur position la plus haute. Ouvrir les plaques de glissement 0 en les glissant vers la droite ou vers la gauche. 2. Relever les cliquets du crochet rotatif 0 et enlever la cannette 0. 1. Levantar las agujas 0 a las posiciones mas altas y abrir las placas corredizas 0 moviendolas a la derecha y a la izquierda. 2. Tirar hacia arriba las perillas de los cangrejos 0 y sacar la bobina 0. 1. Die Nadeln 0 ganz nach oben stellen und die Deckel 0 nach rechts und links auseinanderziehen. 2. Klappen Sie die Greiferlasche 0 hoch und heben Sie die Kappe 0 an der Ecke hoch, um sie zu entfernen. 1. Relever les aiguilles 0 a leur position la plus haute. Ouvrir les plaques 0 en les glissant vers la droite ou vers la gauche. 2. Soulever le verrou 0 du crochet rotatif, puis soulever le coin du capuchon 0 pour retirer le capuchon 0. 1. Levantar Ia agujas 0 a las posiciones mas altas y abrir las placas corredizas 0 moviendolas a la derecha y a la izquierda. 2. Despues de tirar hacia arriba las perillas de los cangrejos 0, sacar la esquina de la tapa 0 para desmontar la tapa 0. - 23 - Model No. LT2-B840 Mark II LT2-B870 Mark II
-
 1
1 -
2
-
3
-
4
-
5
-
6
-
7
-
8
-
9
-
10
-
11
-
12
-
13
-
14
-
15
-
16
-
17
-
18
-
19
-
20
-
21
-
22
-
23
-
24
-
25
-
26
-
27
-
28
-
29
-
30
-
31
-
32
-
 33
33 -
 34
34 -
 35
35 -
 36
36 -
 37
37 -
 38
38 -
 39
39 -
 40
40 -
 41
41 -
 42
42 -
 43
43 -
44
-
45
-
46
-
47
-
48
-
49
-
50
-
51
-
52
-
53
-
54
-
55
-
56
-
57
-
58
-
59
-
60
-
61
-
62
-
63
-
64
-
65
-
66
-
67
-
68
-
69
-
70
-
71
-
72
-
73
-
74
-
75
-
76
-
77
-
78
-
79
-
80
-
81
-
82
-
83
-
84
-
85
-
86
-
87
-
88
-
89
-
90
-
91
-
92
-
93
-
94
-
95
-
96
-
97
-
98
 |
 |
