HTC EVO View 4G User Manual (Gingerbread) - Page 107
Camera Settings, Self-timer, Image adjustments, White balance, Resolution/Video quality
 |
View all HTC EVO View 4G manuals
Add to My Manuals
Save this manual to your list of manuals |
Page 107 highlights
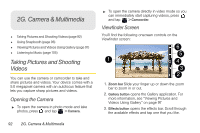
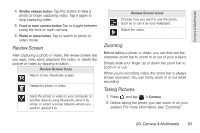
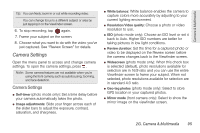
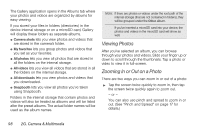
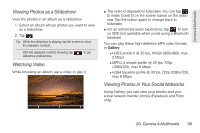
Camera & Multimedia Tip: You can freely zoom in or out while recording video. You can change focus to a different subject or area by just tapping it on the Viewfinder screen. 6. To stop recording, tap again. 7. Frame your subject on the screen. 8. Choose what you want to do with the video you've just captured. See "Review Screen" for details. Camera Settings Open the menu panel to access and change camera settings. To open the camera settings, press . Note: Some camera features are not available when you're using the front camera, such as autofocusing, zooming, and face detection. Camera Settings ⅷ Self-timer (photo mode only): Set a time delay before your camera automatically takes the photo. ⅷ Image adjustments: Slide your finger across each of the slider bars to adjust the exposure, contrast, saturation, and sharpness. ⅷ White balance: White balance enables the camera to capture colors more accurately by adjusting to your current lighting environment. ⅷ Resolution/Video quality: Choose a photo or video resolution to use. ⅷ ISO (photo mode only): Choose an ISO level or set it back to Auto. Higher ISO numbers are better for taking pictures in low light conditions. ⅷ Review duration: Set the time for a captured photo or video to be displayed on the Review screen before the camera changes back to the Viewfinder screen. ⅷ Widescreen (photo mode only): When this check box is selected (default), photo resolutions available for selection are in 16:9 ratio and you can use the entire Viewfinder screen to frame your subject. When not selected, photo resolutions available for selection are in standard 4:3 ratio. ⅷ Geo-tag photos (photo mode only): Select to store GPS location in your captured photos. ⅷ Mirror mode (front camera only): Select to show the mirror image on the viewfinder screen. 2G. Camera & Multimedia 95
-
 1
1 -
2
-
3
-
4
-
5
-
6
-
7
-
8
-
9
-
10
-
11
-
12
-
13
-
14
-
15
-
16
-
17
-
18
-
19
-
20
-
21
-
22
-
23
-
24
-
25
-
26
-
27
-
28
-
29
-
30
-
31
-
32
-
33
-
34
-
35
-
36
-
37
-
38
-
39
-
40
-
41
-
42
-
43
-
44
-
45
-
46
-
47
-
48
-
49
-
50
-
51
-
52
-
53
-
54
-
55
-
56
-
57
-
58
-
59
-
60
-
61
-
62
-
63
-
64
-
65
-
66
-
67
-
68
-
69
-
70
-
71
-
72
-
73
-
74
-
75
-
76
-
77
-
78
-
79
-
80
-
81
-
82
-
83
-
84
-
85
-
86
-
87
-
88
-
89
-
90
-
91
-
92
-
93
-
94
-
95
-
96
-
97
-
98
-
99
-
100
-
101
-
 102
102 -
 103
103 -
 104
104 -
 105
105 -
 106
106 -
 107
107 -
 108
108 -
 109
109 -
 110
110 -
 111
111 -
 112
112 -
113
-
114
-
115
-
116
-
117
-
118
-
119
-
120
-
121
-
122
-
123
-
124
-
125
-
126
-
127
-
128
-
129
-
130
-
131
-
132
-
133
-
134
-
135
-
136
-
137
-
138
-
139
-
140
-
141
-
142
-
143
-
144
-
145
-
146
-
147
-
148
-
149
-
150
-
151
-
152
-
153
-
154
-
155
-
156
-
157
-
158
-
159
-
160
-
161
-
162
-
163
-
164
-
165
-
166
-
167
-
168
-
169
-
170
-
171
-
172
-
173
-
174
-
175
-
176
-
177
-
178
-
179
-
180
-
181
-
182
-
183
-
184
-
185
-
186
-
187
-
188
-
189
-
190
-
191
-
192
-
193
-
194
-
195
-
196
-
197
-
198
-
199
-
200
-
201
-
202
-
203
-
204
-
205
-
206
-
207
-
208
-
209
-
210
-
211
-
212
-
213
-
214
-
215
-
216
-
217
-
218
-
219
-
220
-
221
-
222
-
223
-
224
-
225
-
226
-
227
-
228
-
229
-
230
-
231
-
232
-
233
-
234
-
235
-
236
-
237
 |
 |