HTC EVO View 4G User Manual (Gingerbread) - Page 54
Date & Time Settings, Setting Local Date, Time Zone, and Time, Power-Saving Tips
 |
View all HTC EVO View 4G manuals
Add to My Manuals
Save this manual to your list of manuals |
Page 54 highlights
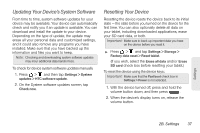
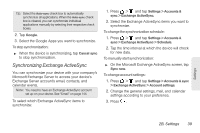
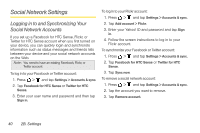
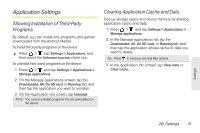
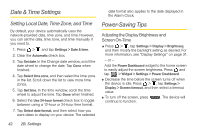
Date & Time Settings Setting Local Date, Time Zone, and Time By default, your device automatically uses the network-provided date, time zone, and time. However, you can set the date, time zone, and time manually if you need to. 1. Press > and tap Settings > Date & time. 2. Clear the Automatic check box. 3. Tap Set date. In the Change date window, scroll the date wheel to change the date. Tap Done when finished. 4. Tap Select time zone, and then select the time zone in the list. Scroll down the list to view more time zones. 5. Tap Set time. In the time window, scroll the time wheel to adjust the time. Tap Done when finished. 6. Select the Use 24-hour format check box to toggle between using a 12-hour or 24-hour time format. 7. Tap Select date format, and then select how you want dates to display on your device. The selected date format also applies to the date displayed in the Alarm Clock. Power-Saving Tips Adjusting the Display Brightness and Screen On-Time ⅷ Press > , tap Settings > Display > Brightness, and then modify the backlight setting as desired. For more information, see "Display Settings" on page 31. - or - Add the Power Dashboard widget to the home screen to easily adjust the screen brightness. Press and tap > Widget > Settings > Power Dashboard. ⅷ Decrease the time before the screen turns off when the device is idle. Press > , tap Settings > Display > Screen timeout, and then select a timeout value. ⅷ To turn off the screen, press continue to function. . The device will 42 2B. Settings
-
 1
1 -
2
-
3
-
4
-
5
-
6
-
7
-
8
-
9
-
10
-
11
-
12
-
13
-
14
-
15
-
16
-
17
-
18
-
19
-
20
-
21
-
22
-
23
-
24
-
25
-
26
-
27
-
28
-
29
-
30
-
31
-
32
-
33
-
34
-
35
-
36
-
37
-
38
-
39
-
40
-
41
-
42
-
43
-
44
-
45
-
46
-
47
-
48
-
 49
49 -
 50
50 -
 51
51 -
 52
52 -
 53
53 -
 54
54 -
 55
55 -
 56
56 -
 57
57 -
 58
58 -
 59
59 -
60
-
61
-
62
-
63
-
64
-
65
-
66
-
67
-
68
-
69
-
70
-
71
-
72
-
73
-
74
-
75
-
76
-
77
-
78
-
79
-
80
-
81
-
82
-
83
-
84
-
85
-
86
-
87
-
88
-
89
-
90
-
91
-
92
-
93
-
94
-
95
-
96
-
97
-
98
-
99
-
100
-
101
-
102
-
103
-
104
-
105
-
106
-
107
-
108
-
109
-
110
-
111
-
112
-
113
-
114
-
115
-
116
-
117
-
118
-
119
-
120
-
121
-
122
-
123
-
124
-
125
-
126
-
127
-
128
-
129
-
130
-
131
-
132
-
133
-
134
-
135
-
136
-
137
-
138
-
139
-
140
-
141
-
142
-
143
-
144
-
145
-
146
-
147
-
148
-
149
-
150
-
151
-
152
-
153
-
154
-
155
-
156
-
157
-
158
-
159
-
160
-
161
-
162
-
163
-
164
-
165
-
166
-
167
-
168
-
169
-
170
-
171
-
172
-
173
-
174
-
175
-
176
-
177
-
178
-
179
-
180
-
181
-
182
-
183
-
184
-
185
-
186
-
187
-
188
-
189
-
190
-
191
-
192
-
193
-
194
-
195
-
196
-
197
-
198
-
199
-
200
-
201
-
202
-
203
-
204
-
205
-
206
-
207
-
208
-
209
-
210
-
211
-
212
-
213
-
214
-
215
-
216
-
217
-
218
-
219
-
220
-
221
-
222
-
223
-
224
-
225
-
226
-
227
-
228
-
229
-
230
-
231
-
232
-
233
-
234
-
235
-
236
-
237
 |
 |
