HTC EVO View 4G User Manual (Gingerbread) - Page 91
Setting up Synchronization for Music, Windows Media
 |
View all HTC EVO View 4G manuals
Add to My Manuals
Save this manual to your list of manuals |
Page 91 highlights
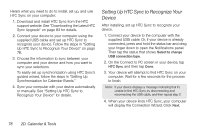
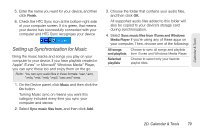
Calendar & Tools 5. Enter the name you want for your device, and then click Finish. 6. Check the HTC Sync icon at the bottom-right side of your computer screen. If it is green, that means your device has successfully connected with your computer and HTC Sync recognizes your device Setting up Synchronization for Music Bring the music tracks and songs you play on your computer to your device. If you have playlists created in Apple® iTunes® or Microsoft® Windows Media® Player, you can sync these too and enjoy them on the go. Note: You can sync audio files in these formats: *.aac, *.amr, *.m4a, *.mid, *.midi, *.mp3, *.wav, and *.wma. 1. On the Device panel, click Music and then click the On button. Turning Music sync on means you want this category included every time you sync your computer and device. 2. Select Sync music files from, and then click Add. 3. Choose the folder that contains your audio files, and then click OK. All supported audio files added to this folder will also be copied to your device's storage card during synchronization. 4. Select Sync music files from iTunes and Windows Media Player if you're using any of these apps on your computer. Then, choose one of the following: All songs Choose to sync all songs and playlists and playlists from iTunes and Windows Media Player. Selected playlists Choose to select only your favorite playlist titles. 2D. Calendar & Tools 79
-
 1
1 -
2
-
3
-
4
-
5
-
6
-
7
-
8
-
9
-
10
-
11
-
12
-
13
-
14
-
15
-
16
-
17
-
18
-
19
-
20
-
21
-
22
-
23
-
24
-
25
-
26
-
27
-
28
-
29
-
30
-
31
-
32
-
33
-
34
-
35
-
36
-
37
-
38
-
39
-
40
-
41
-
42
-
43
-
44
-
45
-
46
-
47
-
48
-
49
-
50
-
51
-
52
-
53
-
54
-
55
-
56
-
57
-
58
-
59
-
60
-
61
-
62
-
63
-
64
-
65
-
66
-
67
-
68
-
69
-
70
-
71
-
72
-
73
-
74
-
75
-
76
-
77
-
78
-
79
-
80
-
81
-
82
-
83
-
84
-
85
-
 86
86 -
 87
87 -
 88
88 -
 89
89 -
 90
90 -
 91
91 -
 92
92 -
 93
93 -
 94
94 -
 95
95 -
 96
96 -
97
-
98
-
99
-
100
-
101
-
102
-
103
-
104
-
105
-
106
-
107
-
108
-
109
-
110
-
111
-
112
-
113
-
114
-
115
-
116
-
117
-
118
-
119
-
120
-
121
-
122
-
123
-
124
-
125
-
126
-
127
-
128
-
129
-
130
-
131
-
132
-
133
-
134
-
135
-
136
-
137
-
138
-
139
-
140
-
141
-
142
-
143
-
144
-
145
-
146
-
147
-
148
-
149
-
150
-
151
-
152
-
153
-
154
-
155
-
156
-
157
-
158
-
159
-
160
-
161
-
162
-
163
-
164
-
165
-
166
-
167
-
168
-
169
-
170
-
171
-
172
-
173
-
174
-
175
-
176
-
177
-
178
-
179
-
180
-
181
-
182
-
183
-
184
-
185
-
186
-
187
-
188
-
189
-
190
-
191
-
192
-
193
-
194
-
195
-
196
-
197
-
198
-
199
-
200
-
201
-
202
-
203
-
204
-
205
-
206
-
207
-
208
-
209
-
210
-
211
-
212
-
213
-
214
-
215
-
216
-
217
-
218
-
219
-
220
-
221
-
222
-
223
-
224
-
225
-
226
-
227
-
228
-
229
-
230
-
231
-
232
-
233
-
234
-
235
-
236
-
237
 |
 |