HP Officejet Pro L7600 User Guide - Page 200
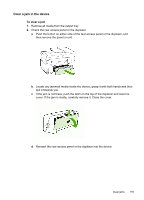
Close the ADF., Reinstall the jam cleanout part by inserting it as shown. Push down on the two tabs
 |
View all HP Officejet Pro L7600 manuals
Add to My Manuals
Save this manual to your list of manuals |
Page 200 highlights
Chapter 10 4. While lifting the green lever, rotate the pick mechanism until it stays open. 5. Gently try to remove the page without tearing it. If you feel resistance, continue with the next step. 6. Open the ADF and gently loosen the media by using both hands. 7. When the media is free, gently pull it out. 8. Close the ADF. 9. Lower the green lever. 10. Reinstall the jam cleanout part by inserting it as shown. Push down on the two tabs until the part snaps into place. NOTE: If the cleanout part is not replaced correctly, future jamming might occur. 196 Maintain and troubleshoot
-
 1
1 -
2
-
3
-
4
-
5
-
6
-
7
-
8
-
9
-
10
-
11
-
12
-
13
-
14
-
15
-
16
-
17
-
18
-
19
-
20
-
21
-
22
-
23
-
24
-
25
-
26
-
27
-
28
-
29
-
30
-
31
-
32
-
33
-
34
-
35
-
36
-
37
-
38
-
39
-
40
-
41
-
42
-
43
-
44
-
45
-
46
-
47
-
48
-
49
-
50
-
51
-
52
-
53
-
54
-
55
-
56
-
57
-
58
-
59
-
60
-
61
-
62
-
63
-
64
-
65
-
66
-
67
-
68
-
69
-
70
-
71
-
72
-
73
-
74
-
75
-
76
-
77
-
78
-
79
-
80
-
81
-
82
-
83
-
84
-
85
-
86
-
87
-
88
-
89
-
90
-
91
-
92
-
93
-
94
-
95
-
96
-
97
-
98
-
99
-
100
-
101
-
102
-
103
-
104
-
105
-
106
-
107
-
108
-
109
-
110
-
111
-
112
-
113
-
114
-
115
-
116
-
117
-
118
-
119
-
120
-
121
-
122
-
123
-
124
-
125
-
126
-
127
-
128
-
129
-
130
-
131
-
132
-
133
-
134
-
135
-
136
-
137
-
138
-
139
-
140
-
141
-
142
-
143
-
144
-
145
-
146
-
147
-
148
-
149
-
150
-
151
-
152
-
153
-
154
-
155
-
156
-
157
-
158
-
159
-
160
-
161
-
162
-
163
-
164
-
165
-
166
-
167
-
168
-
169
-
170
-
171
-
172
-
173
-
174
-
175
-
176
-
177
-
178
-
179
-
180
-
181
-
182
-
183
-
184
-
185
-
186
-
187
-
188
-
189
-
190
-
191
-
192
-
193
-
194
-
 195
195 -
 196
196 -
 197
197 -
 198
198 -
 199
199 -
 200
200 -
 201
201 -
 202
202 -
 203
203 -
 204
204 -
 205
205 -
206
-
207
-
208
-
209
-
210
-
211
-
212
-
213
-
214
-
215
-
216
-
217
-
218
-
219
-
220
-
221
-
222
-
223
-
224
-
225
-
226
-
227
-
228
-
229
-
230
-
231
-
232
-
233
-
234
-
235
-
236
-
237
-
238
-
239
-
240
-
241
-
242
-
243
-
244
-
245
 |
 |
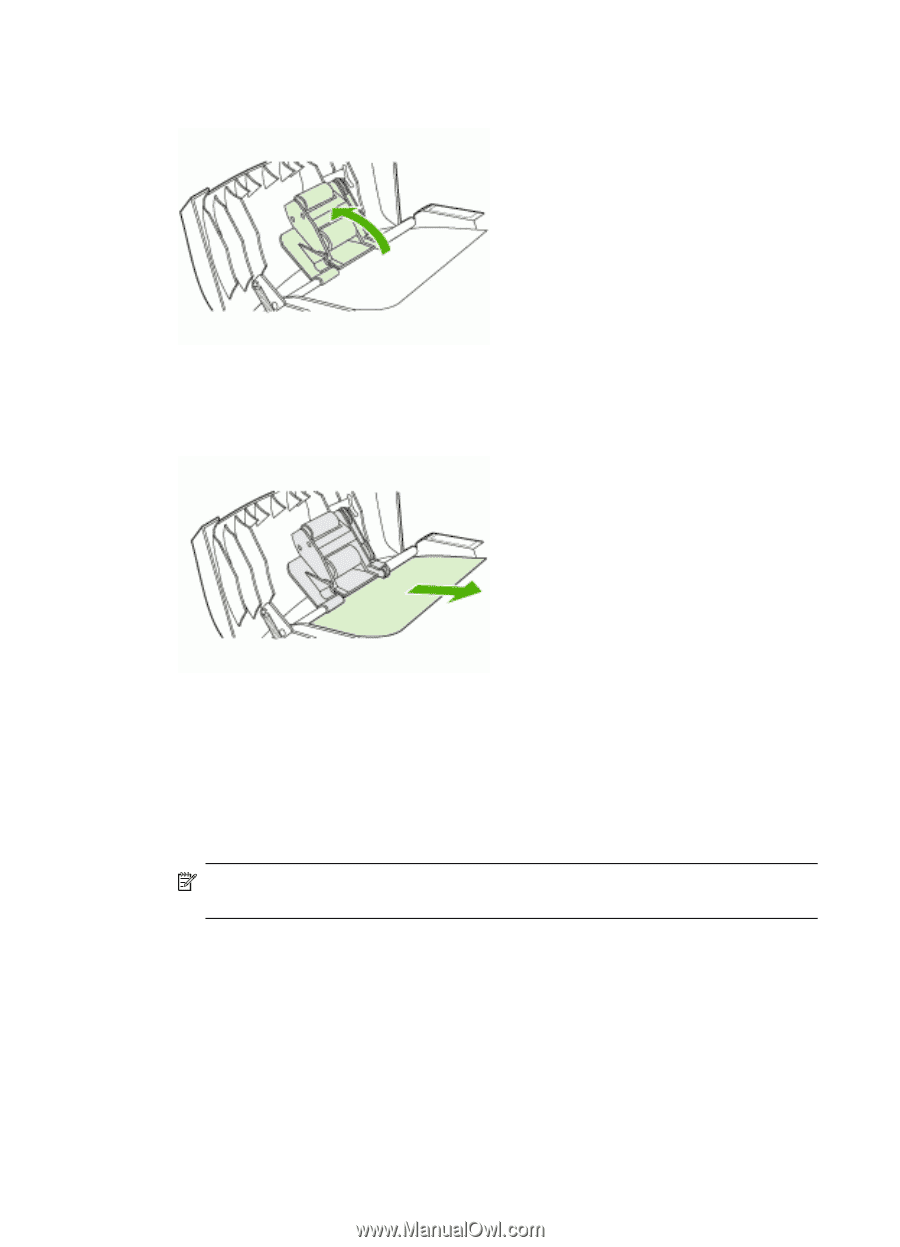
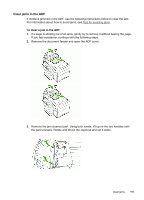
4.
While lifting the green lever, rotate the pick mechanism until it stays open.
5.
Gently try to remove the page without tearing it. If you feel resistance, continue
with the next step.
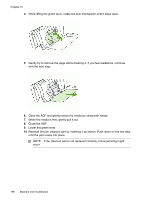
6.
Open the ADF and gently loosen the media by using both hands.
7.
When the media is free, gently pull it out.
8.
Close the ADF.
9.
Lower the green lever.
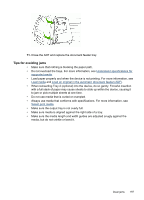
10.
Reinstall the jam cleanout part by inserting it as shown. Push down on the two tabs
until the part snaps into place.
NOTE:
If the cleanout part is not replaced correctly, future jamming might
occur.
Chapter 10
196
Maintain and troubleshoot