HP Officejet Pro L7600 User Guide - Page 93
HP Printer Utility Mac OS, Con Direct Digital Filing settings - wireless printing setup
 |
View all HP Officejet Pro L7600 manuals
Add to My Manuals
Save this manual to your list of manuals |
Page 93 highlights
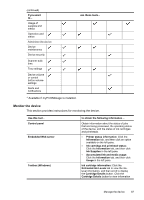
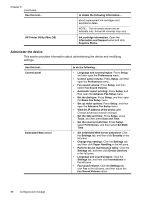
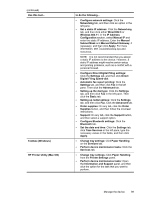
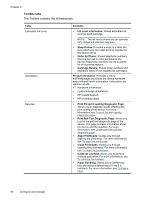
(continued) Use this tool... Toolbox (Windows) HP Printer Utility (Mac OS) to do the following... • Configure network settings: Click the Networking tab, and then click an option in the left pane. • Set a static IP address: Click the Networking tab, and then click either Wired 802.3 or Wireless 802.11. In the IP Address Configuration section, select Manual IP and enter the static IP address. Enter the Manual Subnet Mask and Manual Default Gateway, if necessary, and then click Apply. For more information, see Troubleshooting tips and resources. NOTE: It is not recommended that you assign a static IP address to the device. However, a static IP address might resolve certain setup and printing problems, such as a conflict with a personal firewall. • Configure Direct Digital Filing settings: Click the Settings tab, and then click Direct Digital Filing Speed-dial. • Automatic fax report printing: Click the Settings tab, and then click Fax in the left pane. Then click the Advanced tab. • Setting up the dial type: Click the Settings tab, and then click Fax in the left pane. Then click the Basic tab. • Setting up redial options: Click the Settings tab, and then click Fax. Click the Advanced tab. • Order supplies: On any tab, click the Order Supplies button, and then follow the onscreen instructions. • Support: On any tab, click the Support button, and then select a support option. • Configure Bluetooth settings: Click the Bluetooth tab. • Set the date and time: Click the Settings tab, click Time Services in the left pane, type the necessary values in the fields, and then click Apply. • Change tray settings: Click Paper Handling on the Services tab. • Perform device maintenance tasks: Click the Services tab. • Change tray settings: Click Paper Handling from the Printer Settings panel. • Perform device maintenance tasks: Open the Information and Support panel, and then click the option for the task that you want to perform. Manage the device 89
-
 1
1 -
2
-
3
-
4
-
5
-
6
-
7
-
8
-
9
-
10
-
11
-
12
-
13
-
14
-
15
-
16
-
17
-
18
-
19
-
20
-
21
-
22
-
23
-
24
-
25
-
26
-
27
-
28
-
29
-
30
-
31
-
32
-
33
-
34
-
35
-
36
-
37
-
38
-
39
-
40
-
41
-
42
-
43
-
44
-
45
-
46
-
47
-
48
-
49
-
50
-
51
-
52
-
53
-
54
-
55
-
56
-
57
-
58
-
59
-
60
-
61
-
62
-
63
-
64
-
65
-
66
-
67
-
68
-
69
-
70
-
71
-
72
-
73
-
74
-
75
-
76
-
77
-
78
-
79
-
80
-
81
-
82
-
83
-
84
-
85
-
86
-
87
-
 88
88 -
 89
89 -
 90
90 -
 91
91 -
 92
92 -
 93
93 -
 94
94 -
 95
95 -
 96
96 -
 97
97 -
 98
98 -
99
-
100
-
101
-
102
-
103
-
104
-
105
-
106
-
107
-
108
-
109
-
110
-
111
-
112
-
113
-
114
-
115
-
116
-
117
-
118
-
119
-
120
-
121
-
122
-
123
-
124
-
125
-
126
-
127
-
128
-
129
-
130
-
131
-
132
-
133
-
134
-
135
-
136
-
137
-
138
-
139
-
140
-
141
-
142
-
143
-
144
-
145
-
146
-
147
-
148
-
149
-
150
-
151
-
152
-
153
-
154
-
155
-
156
-
157
-
158
-
159
-
160
-
161
-
162
-
163
-
164
-
165
-
166
-
167
-
168
-
169
-
170
-
171
-
172
-
173
-
174
-
175
-
176
-
177
-
178
-
179
-
180
-
181
-
182
-
183
-
184
-
185
-
186
-
187
-
188
-
189
-
190
-
191
-
192
-
193
-
194
-
195
-
196
-
197
-
198
-
199
-
200
-
201
-
202
-
203
-
204
-
205
-
206
-
207
-
208
-
209
-
210
-
211
-
212
-
213
-
214
-
215
-
216
-
217
-
218
-
219
-
220
-
221
-
222
-
223
-
224
-
225
-
226
-
227
-
228
-
229
-
230
-
231
-
232
-
233
-
234
-
235
-
236
-
237
-
238
-
239
-
240
-
241
-
242
-
243
-
244
-
245
 |
 |