HP Officejet Pro L7600 User Guide - Page 37
Understand specifications for supported media, Understand supported sizes, Photo media, Transparencies - drivers
 |
View all HP Officejet Pro L7600 manuals
Add to My Manuals
Save this manual to your list of manuals |
Page 37 highlights
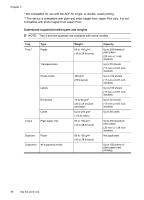
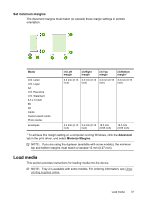
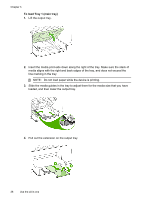
Photo media • Use the Best mode to print photographs. Note that in this mode, printing takes longer and more memory is required from your computer. • Remove each sheet as it prints and set it aside to dry. Allowing wet media to stack up may cause smearing. Transparencies • Insert transparencies with the rough side down and the adhesive strip pointing towards the back of the device. • Use the Normal mode to print transparencies. This mode provides longer drying time and ensures that the ink dries completely before the next page is delivered to the output tray. • Remove each sheet as it prints and set it aside to dry. Allowing wet media to stack up may cause smearing. Custom-sized media • Use only custom-sized media that is supported by the device. • If your application supports custom-sized media, set the media size in the application before printing the document. If not, set the size in the print driver. You might need to reformat existing documents to print them correctly on custom-sized media. Understand specifications for supported media Use the Understand supported sizes and Understand supported media types and weights tables to determine the correct media to use with your device, and determine what features will work with your media. • Understand supported sizes • Understand supported media types and weights Understand supported sizes NOTE: Tray 2 and the duplexer are available with some models. Media size Standard media sizes U.S. Letter (216 x 279 mm; 8.5 x 11 inches) 8.5 x 13 inches (216 x 330 mm)* U.S. Legal (216 x 356 mm; 8.5 x 14 inches) A4 (210 x 297 mm; 8.3 x 11.7 inches) U.S. Executive (184 x 267 mm; 7.25 x 10.5 inches) Tray 1 Tray 2 Duplexer ADF Select print media 33
-
 1
1 -
2
-
3
-
4
-
5
-
6
-
7
-
8
-
9
-
10
-
11
-
12
-
13
-
14
-
15
-
16
-
17
-
18
-
19
-
20
-
21
-
22
-
23
-
24
-
25
-
26
-
27
-
28
-
29
-
30
-
31
-
 32
32 -
 33
33 -
 34
34 -
 35
35 -
 36
36 -
 37
37 -
 38
38 -
 39
39 -
 40
40 -
 41
41 -
 42
42 -
43
-
44
-
45
-
46
-
47
-
48
-
49
-
50
-
51
-
52
-
53
-
54
-
55
-
56
-
57
-
58
-
59
-
60
-
61
-
62
-
63
-
64
-
65
-
66
-
67
-
68
-
69
-
70
-
71
-
72
-
73
-
74
-
75
-
76
-
77
-
78
-
79
-
80
-
81
-
82
-
83
-
84
-
85
-
86
-
87
-
88
-
89
-
90
-
91
-
92
-
93
-
94
-
95
-
96
-
97
-
98
-
99
-
100
-
101
-
102
-
103
-
104
-
105
-
106
-
107
-
108
-
109
-
110
-
111
-
112
-
113
-
114
-
115
-
116
-
117
-
118
-
119
-
120
-
121
-
122
-
123
-
124
-
125
-
126
-
127
-
128
-
129
-
130
-
131
-
132
-
133
-
134
-
135
-
136
-
137
-
138
-
139
-
140
-
141
-
142
-
143
-
144
-
145
-
146
-
147
-
148
-
149
-
150
-
151
-
152
-
153
-
154
-
155
-
156
-
157
-
158
-
159
-
160
-
161
-
162
-
163
-
164
-
165
-
166
-
167
-
168
-
169
-
170
-
171
-
172
-
173
-
174
-
175
-
176
-
177
-
178
-
179
-
180
-
181
-
182
-
183
-
184
-
185
-
186
-
187
-
188
-
189
-
190
-
191
-
192
-
193
-
194
-
195
-
196
-
197
-
198
-
199
-
200
-
201
-
202
-
203
-
204
-
205
-
206
-
207
-
208
-
209
-
210
-
211
-
212
-
213
-
214
-
215
-
216
-
217
-
218
-
219
-
220
-
221
-
222
-
223
-
224
-
225
-
226
-
227
-
228
-
229
-
230
-
231
-
232
-
233
-
234
-
235
-
236
-
237
-
238
-
239
-
240
-
241
-
242
-
243
-
244
-
245
 |
 |