JVC GZ-EX310 User Guide - Page 100
ALL SCENES video/ALL IMAGES still image, UNSAVED SCENES video/UNSAVED IMAGES still, image
 |
View all JVC GZ-EX310 manuals
Add to My Manuals
Save this manual to your list of manuals |
Page 100 highlights
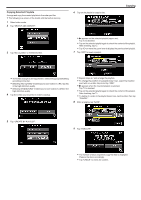
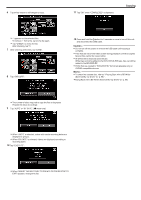
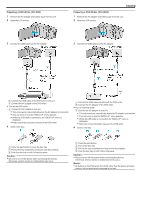
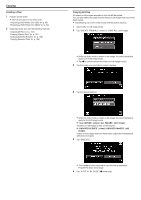
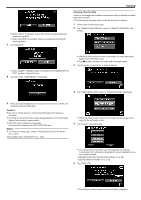
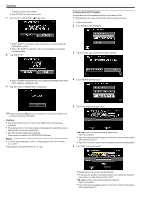
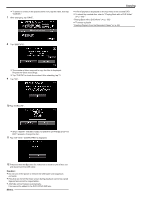
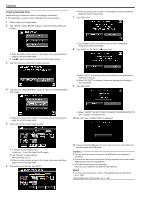
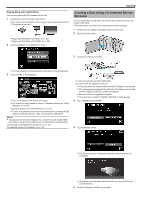
Copying Creating a Disc 1 Prepare a DVD writer. 0 Insert a new disc into the DVD writer. "Preparing a DVD Writer (CU-VD3)" (A p. 99) "Preparing a DVD Writer (CU-VD50)" (A p. 99) 2 Copy files to the disc with the following methods. "Copying All Files" (A p. 100) "Copying Files by Date" (A p. 101) "Copying Selected Playlists" (A p. 102) "Copying Selected Files" (A p. 104) Copying All Files All videos or still images recorded on this unit will be copied. You can also select and copy only the videos or still images that have never been copied. 0 The following is a screen of the model with the built-in memory. 1 Select video or still image mode. 2 Tap "CREATE FROM ALL" (video) or "SAVE ALL" (still image). 0 While the video mode is shown in the image, the same operations apply for the still image mode. 0 Tap A to switch between the video and still image modes. 3 Tap the media you would like to make a backup. . . .. 100 4 Tap the desired method. 0 While the video mode is shown in the image, the same operations apply for the still image mode. 0 "ALL SCENES" (video)/"ALL IMAGES" (still image): All videos or still images in this unit are copied. 0 "UNSAVED SCENES" (video)/"UNSAVED IMAGES" (still image): Videos or still images that have never been copied are automatically selected and copied. 5 Tap "EXECUTE". 0 The number of discs required to copy the files is displayed. Prepare the discs accordingly. 6 Tap "AUTO" or "BY DATE". (A mode only)
-
 1
1 -
2
-
3
-
4
-
5
-
6
-
7
-
8
-
9
-
10
-
11
-
12
-
13
-
14
-
15
-
16
-
17
-
18
-
19
-
20
-
21
-
22
-
23
-
24
-
25
-
26
-
27
-
28
-
29
-
30
-
31
-
32
-
33
-
34
-
35
-
36
-
37
-
38
-
39
-
40
-
41
-
42
-
43
-
44
-
45
-
46
-
47
-
48
-
49
-
50
-
51
-
52
-
53
-
54
-
55
-
56
-
57
-
58
-
59
-
60
-
61
-
62
-
63
-
64
-
65
-
66
-
67
-
68
-
69
-
70
-
71
-
72
-
73
-
74
-
75
-
76
-
77
-
78
-
79
-
80
-
81
-
82
-
83
-
84
-
85
-
86
-
87
-
88
-
89
-
90
-
91
-
92
-
93
-
94
-
 95
95 -
 96
96 -
 97
97 -
 98
98 -
 99
99 -
 100
100 -
 101
101 -
 102
102 -
 103
103 -
 104
104 -
 105
105 -
106
-
107
-
108
-
109
-
110
-
111
-
112
-
113
-
114
-
115
-
116
-
117
-
118
-
119
-
120
-
121
-
122
-
123
-
124
-
125
-
126
-
127
-
128
-
129
-
130
-
131
-
132
-
133
-
134
-
135
-
136
-
137
-
138
-
139
-
140
-
141
-
142
-
143
-
144
-
145
-
146
-
147
-
148
-
149
-
150
-
151
-
152
-
153
-
154
-
155
-
156
-
157
-
158
-
159
-
160
-
161
-
162
-
163
-
164
-
165
-
166
-
167
-
168
-
169
-
170
-
171
-
172
-
173
-
174
-
175
-
176
-
177
-
178
-
179
-
180
-
181
-
182
-
183
-
184
-
185
-
186
-
187
-
188
-
189
-
190
-
191
-
192
-
193
-
194
-
195
-
196
-
197
-
198
-
199
-
200
-
201
-
202
-
203
-
204
-
205
-
206
-
207
-
208
-
209
-
210
-
211
-
212
-
213
-
214
-
215
-
216
-
217
-
218
-
219
-
220
-
221
-
222
-
223
-
224
-
225
-
226
-
227
-
228
-
229
-
230
-
231
-
232
-
233
-
234
-
235
-
236
-
237
-
238
-
239
-
240
-
241
-
242
-
243
-
244
-
245
-
246
-
247
-
248
-
249
-
250
-
251
-
252
-
253
-
254
-
255
-
256
-
257
-
258
-
259
-
260
-
261
 |
 |
