JVC GZ-EX310 User Guide - Page 205
Regular Operation, Connecting the smartphone or computer to the access point
 |
View all JVC GZ-EX310 manuals
Add to My Manuals
Save this manual to your list of manuals |
Page 205 highlights
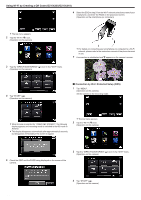
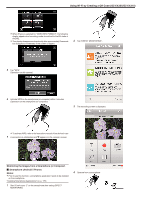
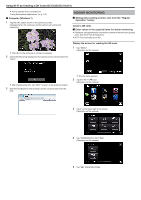
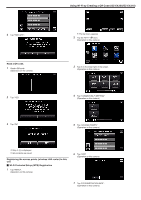
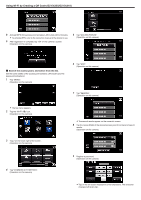
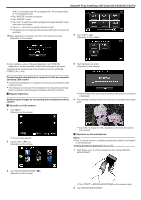
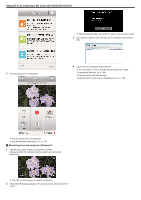
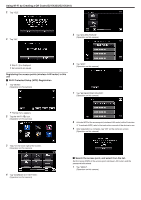
Using Wi-Fi by Creating a QR Code (GZ-EX355/GZ-EX310) "ABC", for example, enter "A" by tapping once, "B" by tapping twice, or "C" by tapping 3 times. 0 Tap "DELETE" to delete a character. 0 Tap "CANCEL" to exit. 0 Tap "A/a/1" to select character input type from upper case letter, lower case letter, and number. 0 Tap E or F to move one space to the left or right. 0 The password is not required if the wireless LAN router is not security protected. 10 After registration is complete, tap "OK" on the camera's screen. (Operation on this camera) 4 Tap "START" (I). (Operation on this camera) 0 Other methods, such as "Manual Registration" and "WPS PIN Registration" are also available. Refer to the following link for details. "Registering the Access Points of the Camera to Connect (ACCESS POINTS)" (A p. 164) Connecting the smartphone (or computer) to the access point (wireless LAN router) 0 Connect the smartphone (or computer) to the access point (wireless LAN router) at home. 0 This setting is unnecessary if the smartphone (or computer) has already been connected to the access point (wireless LAN router) at home. o Regular Operation Monitoring the images by connecting the smartphone and the camera o Operation on this camera 1 Tap "MENU". (Operation on this camera) 5 Start making a connection. (Operation on this camera) 0 Name (SSID) of the access point (wireless LAN router) in connection is displayed. 6 The following is displayed when the camera is connected to the access point. 0 The top menu appears. 2 Tap the "Wi-Fi" (Q) icon. (Operation on this camera) 0 Tap "URL" to display the URL required for connecting the camera from browser. o Operation on the smartphone Memo : 0 Prior to use this function, a smartphone application needs to be installed on the smartphone. "Installing Smartphone Applications" (A p. 175) 1 Start "Everio sync. 2" on the smartphone after setting "INDOOR MONITORING". 3 Tap "INDOOR MONITORING" (O). (Operation on this camera) 0 Tap "START" in INDOOR MONITORING on the camera to start. 2 Tap "INDOOR MONITORING". 205
-
 1
1 -
2
-
3
-
4
-
5
-
6
-
7
-
8
-
9
-
10
-
11
-
12
-
13
-
14
-
15
-
16
-
17
-
18
-
19
-
20
-
21
-
22
-
23
-
24
-
25
-
26
-
27
-
28
-
29
-
30
-
31
-
32
-
33
-
34
-
35
-
36
-
37
-
38
-
39
-
40
-
41
-
42
-
43
-
44
-
45
-
46
-
47
-
48
-
49
-
50
-
51
-
52
-
53
-
54
-
55
-
56
-
57
-
58
-
59
-
60
-
61
-
62
-
63
-
64
-
65
-
66
-
67
-
68
-
69
-
70
-
71
-
72
-
73
-
74
-
75
-
76
-
77
-
78
-
79
-
80
-
81
-
82
-
83
-
84
-
85
-
86
-
87
-
88
-
89
-
90
-
91
-
92
-
93
-
94
-
95
-
96
-
97
-
98
-
99
-
100
-
101
-
102
-
103
-
104
-
105
-
106
-
107
-
108
-
109
-
110
-
111
-
112
-
113
-
114
-
115
-
116
-
117
-
118
-
119
-
120
-
121
-
122
-
123
-
124
-
125
-
126
-
127
-
128
-
129
-
130
-
131
-
132
-
133
-
134
-
135
-
136
-
137
-
138
-
139
-
140
-
141
-
142
-
143
-
144
-
145
-
146
-
147
-
148
-
149
-
150
-
151
-
152
-
153
-
154
-
155
-
156
-
157
-
158
-
159
-
160
-
161
-
162
-
163
-
164
-
165
-
166
-
167
-
168
-
169
-
170
-
171
-
172
-
173
-
174
-
175
-
176
-
177
-
178
-
179
-
180
-
181
-
182
-
183
-
184
-
185
-
186
-
187
-
188
-
189
-
190
-
191
-
192
-
193
-
194
-
195
-
196
-
197
-
198
-
199
-
 200
200 -
 201
201 -
 202
202 -
 203
203 -
 204
204 -
 205
205 -
 206
206 -
 207
207 -
 208
208 -
 209
209 -
 210
210 -
211
-
212
-
213
-
214
-
215
-
216
-
217
-
218
-
219
-
220
-
221
-
222
-
223
-
224
-
225
-
226
-
227
-
228
-
229
-
230
-
231
-
232
-
233
-
234
-
235
-
236
-
237
-
238
-
239
-
240
-
241
-
242
-
243
-
244
-
245
-
246
-
247
-
248
-
249
-
250
-
251
-
252
-
253
-
254
-
255
-
256
-
257
-
258
-
259
-
260
-
261
 |
 |
