JVC GZ-EX310 User Guide - Page 245
Bottom, Interior
 |
View all JVC GZ-EX310 manuals
Add to My Manuals
Save this manual to your list of manuals |
Page 245 highlights
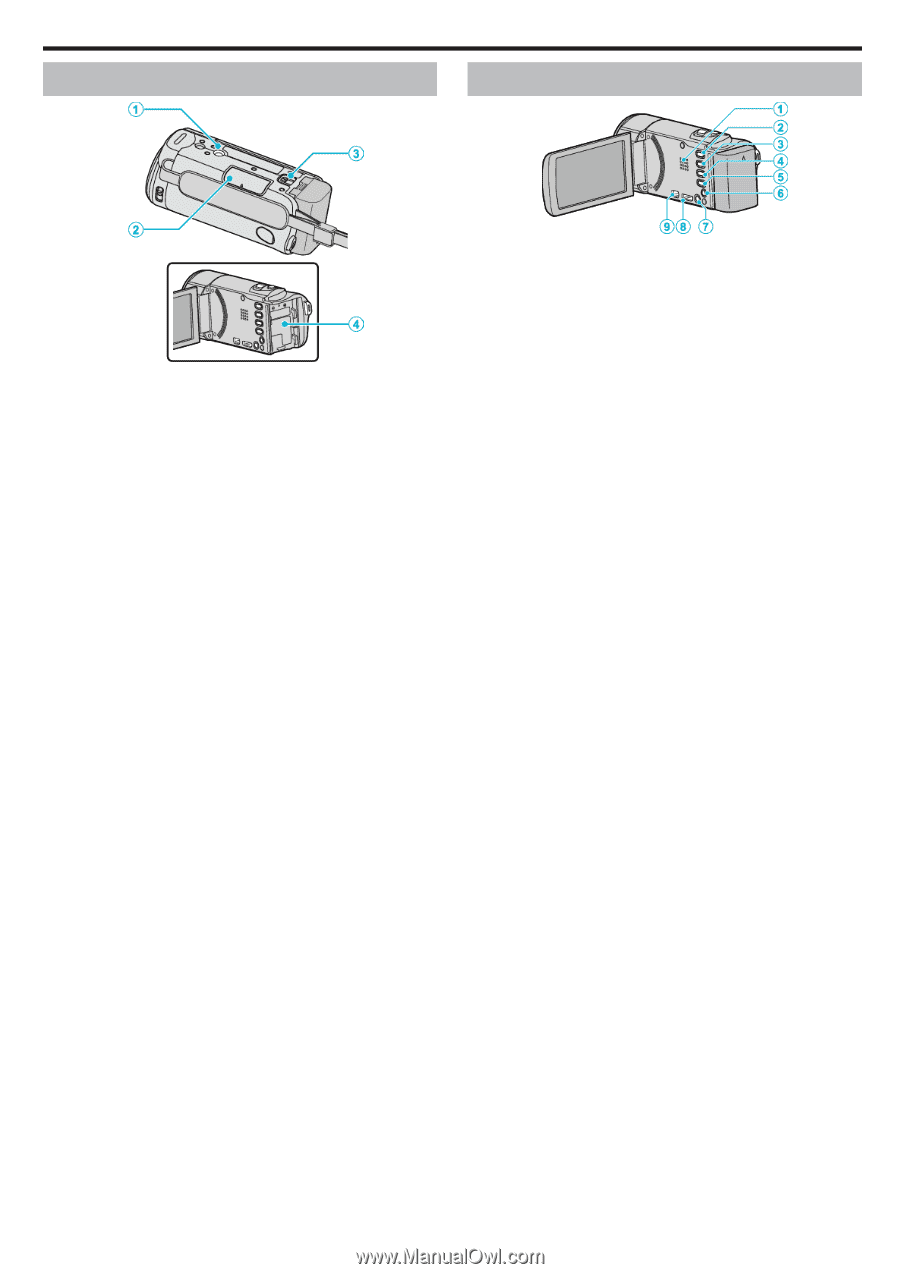
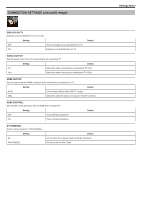
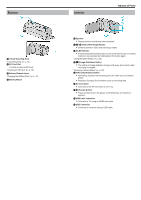
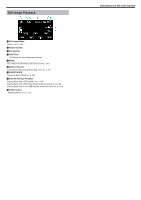
.. Bottom A Tripod Mounting Hole "Tripod Mounting" (A p. 21) B SD Card Slot 0 Insert an optional SD card. "Inserting an SD Card" (A p. 13) C Battery Release Lever "Charging the Battery Pack" (A p. 12) D Battery Mount Interior Names of Parts A Speaker 0 Outputs audio sound during video playback. B A / B (Video/Still Image) Button 0 Switches between video and still image modes. C SILENT Button 0 Press and hold the SILENT button to turn on the Silent mode. The Silent mode can be cancelled by holding down the button again. "Using the Silent Mode" (A p. 26) D a (Image Stabilizer) Button 0 The setting of image stabilizer changes with every press while video recording is stopped. "Reducing Camera Shake" (A p. 52) E INFO (Information) Button 0 Recording: Displays the remaining time (for video only) and battery power. 0 Playback: Displays file information such as recording date. F AV Connector 0 Connects to the AV connector of a TV, etc. G M (Power) Button 0 Press and hold to turn the power on/off while the LCD monitor is opened. H HDMI mini connector 0 Connects to TV using an HDMI mini cable. I USB Connector 0 Connects to computer using a USB cable. 245
-
 1
1 -
2
-
3
-
4
-
5
-
6
-
7
-
8
-
9
-
10
-
11
-
12
-
13
-
14
-
15
-
16
-
17
-
18
-
19
-
20
-
21
-
22
-
23
-
24
-
25
-
26
-
27
-
28
-
29
-
30
-
31
-
32
-
33
-
34
-
35
-
36
-
37
-
38
-
39
-
40
-
41
-
42
-
43
-
44
-
45
-
46
-
47
-
48
-
49
-
50
-
51
-
52
-
53
-
54
-
55
-
56
-
57
-
58
-
59
-
60
-
61
-
62
-
63
-
64
-
65
-
66
-
67
-
68
-
69
-
70
-
71
-
72
-
73
-
74
-
75
-
76
-
77
-
78
-
79
-
80
-
81
-
82
-
83
-
84
-
85
-
86
-
87
-
88
-
89
-
90
-
91
-
92
-
93
-
94
-
95
-
96
-
97
-
98
-
99
-
100
-
101
-
102
-
103
-
104
-
105
-
106
-
107
-
108
-
109
-
110
-
111
-
112
-
113
-
114
-
115
-
116
-
117
-
118
-
119
-
120
-
121
-
122
-
123
-
124
-
125
-
126
-
127
-
128
-
129
-
130
-
131
-
132
-
133
-
134
-
135
-
136
-
137
-
138
-
139
-
140
-
141
-
142
-
143
-
144
-
145
-
146
-
147
-
148
-
149
-
150
-
151
-
152
-
153
-
154
-
155
-
156
-
157
-
158
-
159
-
160
-
161
-
162
-
163
-
164
-
165
-
166
-
167
-
168
-
169
-
170
-
171
-
172
-
173
-
174
-
175
-
176
-
177
-
178
-
179
-
180
-
181
-
182
-
183
-
184
-
185
-
186
-
187
-
188
-
189
-
190
-
191
-
192
-
193
-
194
-
195
-
196
-
197
-
198
-
199
-
200
-
201
-
202
-
203
-
204
-
205
-
206
-
207
-
208
-
209
-
210
-
211
-
212
-
213
-
214
-
215
-
216
-
217
-
218
-
219
-
220
-
221
-
222
-
223
-
224
-
225
-
226
-
227
-
228
-
229
-
230
-
231
-
232
-
233
-
234
-
235
-
236
-
237
-
238
-
239
-
 240
240 -
 241
241 -
 242
242 -
 243
243 -
 244
244 -
 245
245 -
 246
246 -
 247
247 -
 248
248 -
 249
249 -
 250
250 -
251
-
252
-
253
-
254
-
255
-
256
-
257
-
258
-
259
-
260
-
261
 |
 |