JVC GZ-EX310 User Guide - Page 60
Recording Videos with Date and Time, to exit DATE/TIME RECORDING.
 |
View all JVC GZ-EX310 manuals
Add to My Manuals
Save this manual to your list of manuals |
Page 60 highlights
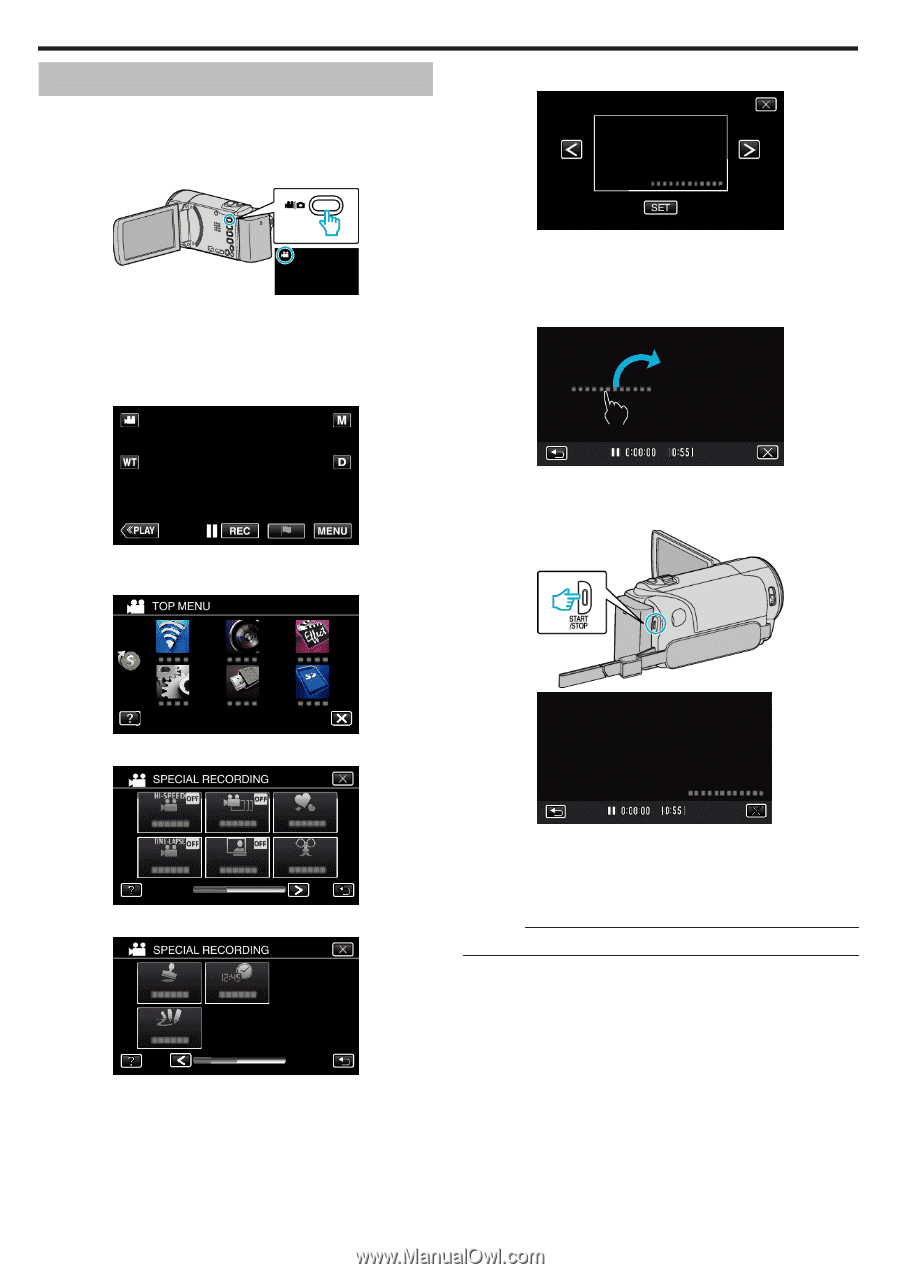
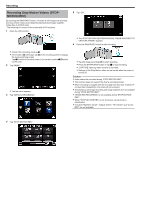
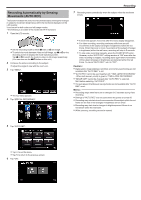
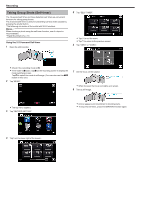
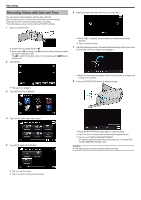
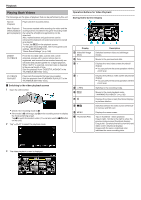
Recording Recording Videos with Date and Time You can record videos together with the date and time. Set this when you want to save the file with date and time display. (The date and time cannot be deleted after recording.) *The following is a screen of the model with Wi-Fi functions. 1 Open the LCD monitor. 6 Select the type if the clock with 0 or 1, and tap "SET". 0 Check if the recording mode is A. 0 If the mode is B still image, tap B on the recording screen to display the mode switching screen. Tap A to switch the mode to video. (You can also use the A/B button on this unit.) 2 Tap "MENU". 0 When "SET" is tapped, the precaution for date/time recording appears. 0 Tap L to exit the menu. 7 Adjust the display position of the date and time display with a finger mark by touching it with your finger and dragging it. 0 The top menu appears. 3 Tap "SPECIAL RECORDING". 0 Move the date and time display while touching it with your finger and tracing it on a screen. 8 Press the START/STOP button to start recording. 4 Tap 1 on the lower right of the screen. 5 Tap "DATE/TIME RECORDING". 0 Tap L to exit the menu. 0 Tap J to return to the previous screen. 60 0 Press the START/STOP button again to stop recording. 0 Tap J to return to the screen for selecting the types of clock. 0 Tap L to exit "DATE/TIME RECORDING". (To perform operations other than recording, tap L to cancel the "DATE/TIME RECORDING" first.) Caution : 0 The date and time cannot be deleted after recording.
-
 1
1 -
2
-
3
-
4
-
5
-
6
-
7
-
8
-
9
-
10
-
11
-
12
-
13
-
14
-
15
-
16
-
17
-
18
-
19
-
20
-
21
-
22
-
23
-
24
-
25
-
26
-
27
-
28
-
29
-
30
-
31
-
32
-
33
-
34
-
35
-
36
-
37
-
38
-
39
-
40
-
41
-
42
-
43
-
44
-
45
-
46
-
47
-
48
-
49
-
50
-
51
-
52
-
53
-
54
-
 55
55 -
 56
56 -
 57
57 -
 58
58 -
 59
59 -
 60
60 -
 61
61 -
 62
62 -
 63
63 -
 64
64 -
 65
65 -
66
-
67
-
68
-
69
-
70
-
71
-
72
-
73
-
74
-
75
-
76
-
77
-
78
-
79
-
80
-
81
-
82
-
83
-
84
-
85
-
86
-
87
-
88
-
89
-
90
-
91
-
92
-
93
-
94
-
95
-
96
-
97
-
98
-
99
-
100
-
101
-
102
-
103
-
104
-
105
-
106
-
107
-
108
-
109
-
110
-
111
-
112
-
113
-
114
-
115
-
116
-
117
-
118
-
119
-
120
-
121
-
122
-
123
-
124
-
125
-
126
-
127
-
128
-
129
-
130
-
131
-
132
-
133
-
134
-
135
-
136
-
137
-
138
-
139
-
140
-
141
-
142
-
143
-
144
-
145
-
146
-
147
-
148
-
149
-
150
-
151
-
152
-
153
-
154
-
155
-
156
-
157
-
158
-
159
-
160
-
161
-
162
-
163
-
164
-
165
-
166
-
167
-
168
-
169
-
170
-
171
-
172
-
173
-
174
-
175
-
176
-
177
-
178
-
179
-
180
-
181
-
182
-
183
-
184
-
185
-
186
-
187
-
188
-
189
-
190
-
191
-
192
-
193
-
194
-
195
-
196
-
197
-
198
-
199
-
200
-
201
-
202
-
203
-
204
-
205
-
206
-
207
-
208
-
209
-
210
-
211
-
212
-
213
-
214
-
215
-
216
-
217
-
218
-
219
-
220
-
221
-
222
-
223
-
224
-
225
-
226
-
227
-
228
-
229
-
230
-
231
-
232
-
233
-
234
-
235
-
236
-
237
-
238
-
239
-
240
-
241
-
242
-
243
-
244
-
245
-
246
-
247
-
248
-
249
-
250
-
251
-
252
-
253
-
254
-
255
-
256
-
257
-
258
-
259
-
260
-
261
 |
 |