JVC GZ-EX310 User Guide - Page 105
Playing Back with a DVD Writer, Creating a Disc Using a Connected Blu-ray Recorder
 |
View all JVC GZ-EX310 manuals
Add to My Manuals
Save this manual to your list of manuals |
Page 105 highlights
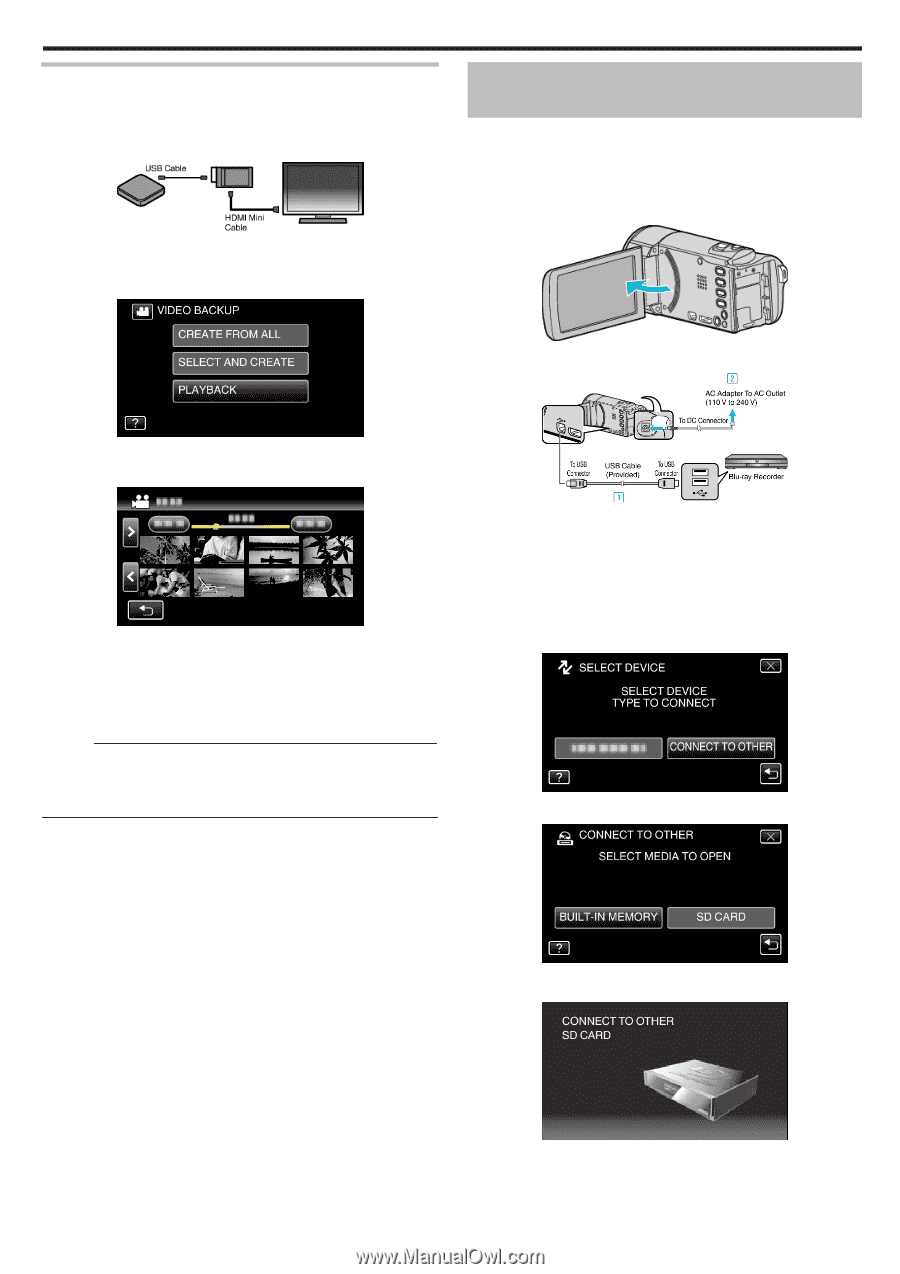
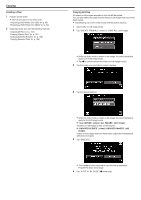
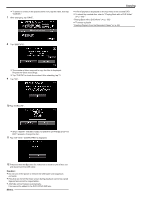
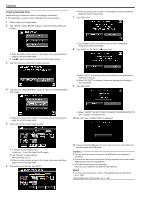
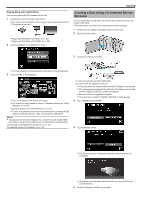
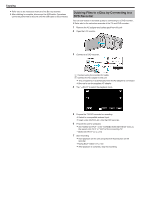
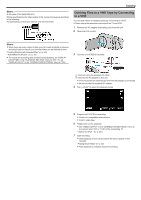
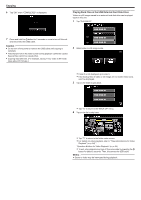
Copying Playing Back with a DVD Writer You can play back the DVDs created on this unit. 1 Connect this unit to the DVD writer and TV. (If this unit is not connected to a TV, images can be played back on the LCD monitor of this unit.) "Preparing a DVD Writer (CU-VD3)" (A p. 99) "Preparing a DVD Writer (CU-VD50)" (A p. 99) 2 Tap "PLAYBACK" in the "BACK-UP" menu. Creating a Disc Using a Connected Blu-ray Recorder You can create discs using a Blu-ray recorder by connecting it to this unit using a USB cable. 0 The following is a screen of the model with the built-in memory. 1 Remove the AC adapter and battery pack from this unit. 2 Open the LCD monitor. 3 Connect to a Blu-ray recorder. 0 An index screen (thumbnail display) of the videos in the disc appears. 3 Tap on the file to start playback. 0 Tap "J" to return to the "BACK-UP" menu. 0 For details on video playback, refer to ""Operation Buttons for Video Playback" (A p. 64) ". "Operation Buttons for Video Playback" (A p. 64) 0 To exit, stop playback and turn off the camcorder by pressing the M button for about 2 seconds. Then, disconnect the USB cable. Memo : 0 To play back the recorded image on TV, connect this unit via the HDMI mini cable or the AV Cord while this unit is connected to the DVD writer. "Connecting via the HDMI Mini Connector" (A p. 77) "Connecting via the AV Connector" (A p. 79) A Connect using the provided USB cable. B Connect the AC adapter to this unit. 0 This unit powers on automatically when the AC adapter is connected. 0 This unit powers on automatically when the AC adapter is connected, and the "SELECT DEVICE" screen is displayed. 0 Be sure to use the supplied AC adapter. 0 This unit turns on and the "SELECT DEVICE" screen appears. 4 Tap "CONNECT TO OTHER". 5 Tap the desired media. 0 The following screen is displayed after the camera operation is completed. 0 Operations are to be performed on the Blu-ray recorder after the screen switches. 6 Perform dubbing on the Blu-ray recorder. 105
-
 1
1 -
2
-
3
-
4
-
5
-
6
-
7
-
8
-
9
-
10
-
11
-
12
-
13
-
14
-
15
-
16
-
17
-
18
-
19
-
20
-
21
-
22
-
23
-
24
-
25
-
26
-
27
-
28
-
29
-
30
-
31
-
32
-
33
-
34
-
35
-
36
-
37
-
38
-
39
-
40
-
41
-
42
-
43
-
44
-
45
-
46
-
47
-
48
-
49
-
50
-
51
-
52
-
53
-
54
-
55
-
56
-
57
-
58
-
59
-
60
-
61
-
62
-
63
-
64
-
65
-
66
-
67
-
68
-
69
-
70
-
71
-
72
-
73
-
74
-
75
-
76
-
77
-
78
-
79
-
80
-
81
-
82
-
83
-
84
-
85
-
86
-
87
-
88
-
89
-
90
-
91
-
92
-
93
-
94
-
95
-
96
-
97
-
98
-
99
-
 100
100 -
 101
101 -
 102
102 -
 103
103 -
 104
104 -
 105
105 -
 106
106 -
 107
107 -
 108
108 -
 109
109 -
 110
110 -
111
-
112
-
113
-
114
-
115
-
116
-
117
-
118
-
119
-
120
-
121
-
122
-
123
-
124
-
125
-
126
-
127
-
128
-
129
-
130
-
131
-
132
-
133
-
134
-
135
-
136
-
137
-
138
-
139
-
140
-
141
-
142
-
143
-
144
-
145
-
146
-
147
-
148
-
149
-
150
-
151
-
152
-
153
-
154
-
155
-
156
-
157
-
158
-
159
-
160
-
161
-
162
-
163
-
164
-
165
-
166
-
167
-
168
-
169
-
170
-
171
-
172
-
173
-
174
-
175
-
176
-
177
-
178
-
179
-
180
-
181
-
182
-
183
-
184
-
185
-
186
-
187
-
188
-
189
-
190
-
191
-
192
-
193
-
194
-
195
-
196
-
197
-
198
-
199
-
200
-
201
-
202
-
203
-
204
-
205
-
206
-
207
-
208
-
209
-
210
-
211
-
212
-
213
-
214
-
215
-
216
-
217
-
218
-
219
-
220
-
221
-
222
-
223
-
224
-
225
-
226
-
227
-
228
-
229
-
230
-
231
-
232
-
233
-
234
-
235
-
236
-
237
-
238
-
239
-
240
-
241
-
242
-
243
-
244
-
245
-
246
-
247
-
248
-
249
-
250
-
251
-
252
-
253
-
254
-
255
-
256
-
257
-
258
-
259
-
260
-
261
 |
 |