JVC GZ-EX310 User Guide - Page 16
Names of Buttons and Functions on the LCD Monitor, Video/Still Image Mode Button
 |
View all JVC GZ-EX310 manuals
Add to My Manuals
Save this manual to your list of manuals |
Page 16 highlights
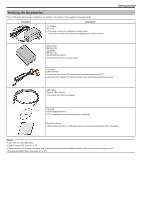
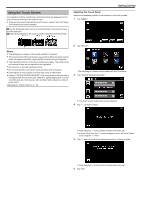
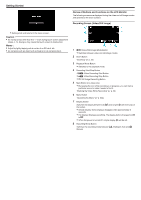
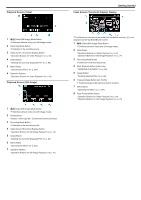
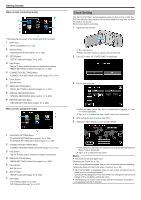
Getting Started Names of Buttons and Functions on the LCD Monitor The following screens are displayed during the video and still image modes, and operate as the touch screens. Recording Screen (Video/Still Image) .. 0 Setting ends and returns to the menu screen. Caution : 0 Do not tap areas other than the "+" mark during touch screen adjustment (steps 4 - 5). Doing so may cause the touch screen to malfunction. Memo : 0 Adjust by lightly tapping with a corner of an SD card, etc. 0 Do not press with an object with a sharp tip or do not press hard. 1 A/B (Video/Still Image) Mode Button 0 Switches between video and still image modes. 2 Zoom Button "Zooming" (A p. 30) 3 Playback Mode Button 0 Switches to the playback mode. 4 Recording Start/Stop Button 0 6: Video Recording Start Button 0 7: Video Recording Stop Button 0 Q: Still Image Recording Button 5 Mark Button (for video only) 0 By tapping the icon while recording is in progress, you can mark a particular scene to make it easier to find it. "Marking the Video While Recording" (A p. 53) 6 Menu Button "Operating the Menu" (A p. 224) 7 Display Button Switches the display between full (m) and simple (n) with every tap of the button. 0 Simple display: Some displays disappear after approximately 3 seconds. 0 Full display: Displays everything. The display button changes from n to m. 0 When the power is turned off, simple display (n) will be set. 8 Recording Mode Button Switches the recording mode between P Intelligent Auto and H Manual. 16
-
 1
1 -
2
-
3
-
4
-
5
-
6
-
7
-
8
-
9
-
10
-
 11
11 -
 12
12 -
 13
13 -
 14
14 -
 15
15 -
 16
16 -
 17
17 -
 18
18 -
 19
19 -
 20
20 -
 21
21 -
22
-
23
-
24
-
25
-
26
-
27
-
28
-
29
-
30
-
31
-
32
-
33
-
34
-
35
-
36
-
37
-
38
-
39
-
40
-
41
-
42
-
43
-
44
-
45
-
46
-
47
-
48
-
49
-
50
-
51
-
52
-
53
-
54
-
55
-
56
-
57
-
58
-
59
-
60
-
61
-
62
-
63
-
64
-
65
-
66
-
67
-
68
-
69
-
70
-
71
-
72
-
73
-
74
-
75
-
76
-
77
-
78
-
79
-
80
-
81
-
82
-
83
-
84
-
85
-
86
-
87
-
88
-
89
-
90
-
91
-
92
-
93
-
94
-
95
-
96
-
97
-
98
-
99
-
100
-
101
-
102
-
103
-
104
-
105
-
106
-
107
-
108
-
109
-
110
-
111
-
112
-
113
-
114
-
115
-
116
-
117
-
118
-
119
-
120
-
121
-
122
-
123
-
124
-
125
-
126
-
127
-
128
-
129
-
130
-
131
-
132
-
133
-
134
-
135
-
136
-
137
-
138
-
139
-
140
-
141
-
142
-
143
-
144
-
145
-
146
-
147
-
148
-
149
-
150
-
151
-
152
-
153
-
154
-
155
-
156
-
157
-
158
-
159
-
160
-
161
-
162
-
163
-
164
-
165
-
166
-
167
-
168
-
169
-
170
-
171
-
172
-
173
-
174
-
175
-
176
-
177
-
178
-
179
-
180
-
181
-
182
-
183
-
184
-
185
-
186
-
187
-
188
-
189
-
190
-
191
-
192
-
193
-
194
-
195
-
196
-
197
-
198
-
199
-
200
-
201
-
202
-
203
-
204
-
205
-
206
-
207
-
208
-
209
-
210
-
211
-
212
-
213
-
214
-
215
-
216
-
217
-
218
-
219
-
220
-
221
-
222
-
223
-
224
-
225
-
226
-
227
-
228
-
229
-
230
-
231
-
232
-
233
-
234
-
235
-
236
-
237
-
238
-
239
-
240
-
241
-
242
-
243
-
244
-
245
-
246
-
247
-
248
-
249
-
250
-
251
-
252
-
253
-
254
-
255
-
256
-
257
-
258
-
259
-
260
-
261
 |
 |