Kyocera FS-C8500DN FS-C8500DN Operation Guide - Page 126
IPv6 Setting (TCP/IP IPv6 settings), Bonjour, IPv6 Setting, TCP/IPIPv6, RAStateless, DHCPv6, Exit ]
 |
View all Kyocera FS-C8500DN manuals
Add to My Manuals
Save this manual to your list of manuals |
Page 126 highlights
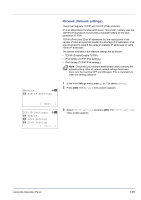
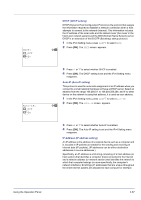
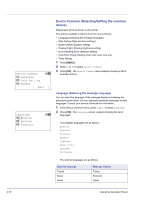
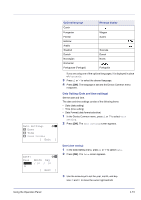
Bonjour: 1 Off 2 *On 2 Press [OK]. The Bonjour screen appears. a b IPv6 Setting: a b 1 TCP/IP(IPv6) 2 RA(Stateless) 3 DHCPv6 [ Exit ] TCP/IP(IPv6): a b 1 Off 2 *On 3 Press U or V to select whether automatic detection is enabled. 4 Press [OK]. The automatic detection setting is set and the IPv4 Setting menu reappears. IPv6 Setting (TCP/IP IPv6 settings) This selects the settings for TCP/IP (IPv6). TCP/IP (IPv6) is based on the current Internet protocol, TCP/IP (IPv4). IPv6 is the next-generation Internet protocol and expands the available address space, which resolves the problem of the lack of addresses under IPv4, while also introducing other improvements such as additional security functionality and the capacity to prioritize data transmission. 1 In the TCP/IP Settings menu, press U or V to select IPv6 Setting. 2 Press [OK]. The IPv6 Setting menu screen appears. The options available in the TCP/IP (IPv6) settings are as follows: • TCP/IP(IPv6) (Enable/disable TCP/IP (IPv6)) • RA(Stateless) (RA (Stateless) setting) • DHCPv6 (DHCPv6 setting) IMPORTANT The RA (Stateless) and DHCPv6 menu options for TCP/ IP (IPv6) are displayed when TCP/IP (IPv6) is enabled. TCP/IP(IPv6) (Enable/disable TCP/IP (IPv6)) This specified whether TCP/IP (IPv6) is used. 1 In the IPv6 Setting menu, press U or V to select TCP/IP(IPv6). 2 Press [OK]. The TCP/IP(IPv6) screen appears. 3 Press U or V to select whether TCP/IP (IPv6) is enabled. 4 Press [OK]. The TCP/IP (IPv6) setting is set and the IPv6 Setting menu reappears. 4-70 Using the Operation Panel
-
 1
1 -
2
-
3
-
4
-
5
-
6
-
7
-
8
-
9
-
10
-
11
-
12
-
13
-
14
-
15
-
16
-
17
-
18
-
19
-
20
-
21
-
22
-
23
-
24
-
25
-
26
-
27
-
28
-
29
-
30
-
31
-
32
-
33
-
34
-
35
-
36
-
37
-
38
-
39
-
40
-
41
-
42
-
43
-
44
-
45
-
46
-
47
-
48
-
49
-
50
-
51
-
52
-
53
-
54
-
55
-
56
-
57
-
58
-
59
-
60
-
61
-
62
-
63
-
64
-
65
-
66
-
67
-
68
-
69
-
70
-
71
-
72
-
73
-
74
-
75
-
76
-
77
-
78
-
79
-
80
-
81
-
82
-
83
-
84
-
85
-
86
-
87
-
88
-
89
-
90
-
91
-
92
-
93
-
94
-
95
-
96
-
97
-
98
-
99
-
100
-
101
-
102
-
103
-
104
-
105
-
106
-
107
-
108
-
109
-
110
-
111
-
112
-
113
-
114
-
115
-
116
-
117
-
118
-
119
-
120
-
 121
121 -
 122
122 -
 123
123 -
 124
124 -
 125
125 -
 126
126 -
 127
127 -
 128
128 -
 129
129 -
 130
130 -
 131
131 -
132
-
133
-
134
-
135
-
136
-
137
-
138
-
139
-
140
-
141
-
142
-
143
-
144
-
145
-
146
-
147
-
148
-
149
-
150
-
151
-
152
-
153
-
154
-
155
-
156
-
157
-
158
-
159
-
160
-
161
-
162
-
163
-
164
-
165
-
166
-
167
-
168
-
169
-
170
-
171
-
172
-
173
-
174
-
175
-
176
-
177
-
178
-
179
-
180
-
181
-
182
-
183
-
184
-
185
-
186
-
187
-
188
-
189
-
190
-
191
-
192
-
193
-
194
-
195
-
196
-
197
-
198
-
199
-
200
-
201
-
202
-
203
-
204
-
205
-
206
-
207
-
208
-
209
-
210
-
211
-
212
-
213
-
214
-
215
-
216
-
217
-
218
-
219
-
220
-
221
-
222
-
223
-
224
-
225
-
226
-
227
-
228
-
229
-
230
-
231
-
232
-
233
-
234
-
235
-
236
-
237
-
238
-
239
-
240
 |
 |