Kyocera FS-C8500DN FS-C8500DN Operation Guide - Page 64
Using the Menu Selection System, Menu Selection System
 |
View all Kyocera FS-C8500DN manuals
Add to My Manuals
Save this manual to your list of manuals |
Page 64 highlights
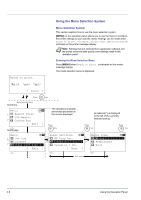
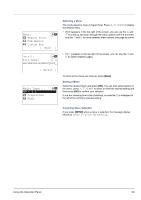
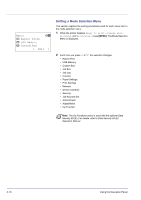
Ready to print. UW A4 VX A4 ZX A3 [ Toner ] Using the Menu Selection System Menu Selection System This section explains how to use the menu selection system. [MENU] on the operation panel allows you to use the menu to configure the printer settings to your specific needs. Settings can be made when Ready to print., Sleeping., Please wait. or Processing. is indicated on the printer message display. Note Settings that are received from application software and the printer driver will take priority over settings made in the operation panel. Entering the Mode Selection Menu Press [MENU] when Ready to print. is indicated on the printer message display. The mode selection menu is displayed. Scroll line Menu: a b 1 Report Print 2 USB Memory 3 Custom Box [ Exit ] Scroll page Menu: a b 5 Job Log 6 Counter *7**P*a*p*e*r**S*e*t**t*i*n*g*s**** [ Exit ] The directions of usable arrow keys are shown on the screen displayed. Paper Settings: a b 1 MP Tray Set. *2**C*a*s*s*e**t*t*e**1*S**e*t*.*** 3 Cassette 2 Set. [ Exit ] An asterisk (*) is displayed to the left of the currently selected setting. Media Type: a b *1***P*l*a**i*n 2 Preprinted 3 Bond 4-8 Using the Operation Panel
-
 1
1 -
2
-
3
-
4
-
5
-
6
-
7
-
8
-
9
-
10
-
11
-
12
-
13
-
14
-
15
-
16
-
17
-
18
-
19
-
20
-
21
-
22
-
23
-
24
-
25
-
26
-
27
-
28
-
29
-
30
-
31
-
32
-
33
-
34
-
35
-
36
-
37
-
38
-
39
-
40
-
41
-
42
-
43
-
44
-
45
-
46
-
47
-
48
-
49
-
50
-
51
-
52
-
53
-
54
-
55
-
56
-
57
-
58
-
 59
59 -
 60
60 -
 61
61 -
 62
62 -
 63
63 -
 64
64 -
 65
65 -
 66
66 -
 67
67 -
 68
68 -
 69
69 -
70
-
71
-
72
-
73
-
74
-
75
-
76
-
77
-
78
-
79
-
80
-
81
-
82
-
83
-
84
-
85
-
86
-
87
-
88
-
89
-
90
-
91
-
92
-
93
-
94
-
95
-
96
-
97
-
98
-
99
-
100
-
101
-
102
-
103
-
104
-
105
-
106
-
107
-
108
-
109
-
110
-
111
-
112
-
113
-
114
-
115
-
116
-
117
-
118
-
119
-
120
-
121
-
122
-
123
-
124
-
125
-
126
-
127
-
128
-
129
-
130
-
131
-
132
-
133
-
134
-
135
-
136
-
137
-
138
-
139
-
140
-
141
-
142
-
143
-
144
-
145
-
146
-
147
-
148
-
149
-
150
-
151
-
152
-
153
-
154
-
155
-
156
-
157
-
158
-
159
-
160
-
161
-
162
-
163
-
164
-
165
-
166
-
167
-
168
-
169
-
170
-
171
-
172
-
173
-
174
-
175
-
176
-
177
-
178
-
179
-
180
-
181
-
182
-
183
-
184
-
185
-
186
-
187
-
188
-
189
-
190
-
191
-
192
-
193
-
194
-
195
-
196
-
197
-
198
-
199
-
200
-
201
-
202
-
203
-
204
-
205
-
206
-
207
-
208
-
209
-
210
-
211
-
212
-
213
-
214
-
215
-
216
-
217
-
218
-
219
-
220
-
221
-
222
-
223
-
224
-
225
-
226
-
227
-
228
-
229
-
230
-
231
-
232
-
233
-
234
-
235
-
236
-
237
-
238
-
239
-
240
 |
 |