Kyocera FS-C8500DN FS-C8500DN Operation Guide - Page 54
IMPORTANT, C: Metric sizes centimeters A, B sizes
 |
View all Kyocera FS-C8500DN manuals
Add to My Manuals
Save this manual to your list of manuals |
Page 54 highlights
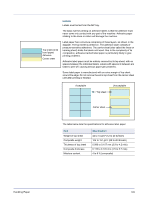
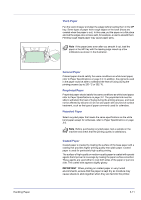
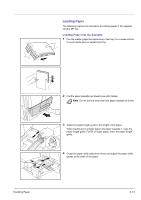
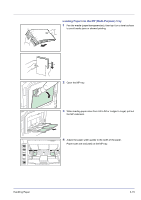
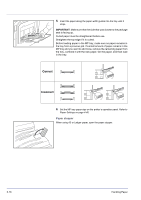
3-14 Note Paper sizes are indicated on the paper cassettes as shown. To change between inch sizes and metric sizes (A, B sizes), follow the steps below to change the setting of the size switch. 1 Grasp the paper width adjustment knob and move the paper width guides to a position other than that of the size of the paper. 2 Turn size switch A 90°. 3 Move size lever B up (C) or down (I). C: Metric sizes (centimeters) (A, B sizes) I: Inch sizes 4 Turn the size switch 90° to lock it. 5 Align the paper against the left side of the paper cassette. IMPORTANT Before loading the paper, be sure that it is not curled or folded. Paper that is curled or folded may cause paper jams. Ensure that the loaded paper is not higher than the level indicator (see illustration below). When loading the paper, make sure that the side that was closest to the package seal is facing up. The paper length and width guides must be adjusted to the paper size. Loading the paper without adjusting these guides may cause skewed feeding and paper jams. Make sure that the paper length and width guides are in contact with the paper. If there is a gap, readjust the guides. 6 Insert the appropriate paper size card in the slot to indicate the size of the paper. 7 Gently push the paper cassette back in. Note If the machine will not be used for a prolonged period, protect the paper from humidity by removing it from the paper cassettes and sealing it in its original packaging. 8 On the operation panel, set the type of paper (plain, recycled, etc.) that is loaded in the paper cassette. Refer to Paper Settings on page 4-46. Handling Paper
-
 1
1 -
2
-
3
-
4
-
5
-
6
-
7
-
8
-
9
-
10
-
11
-
12
-
13
-
14
-
15
-
16
-
17
-
18
-
19
-
20
-
21
-
22
-
23
-
24
-
25
-
26
-
27
-
28
-
29
-
30
-
31
-
32
-
33
-
34
-
35
-
36
-
37
-
38
-
39
-
40
-
41
-
42
-
43
-
44
-
45
-
46
-
47
-
48
-
 49
49 -
 50
50 -
 51
51 -
 52
52 -
 53
53 -
 54
54 -
 55
55 -
 56
56 -
 57
57 -
 58
58 -
 59
59 -
60
-
61
-
62
-
63
-
64
-
65
-
66
-
67
-
68
-
69
-
70
-
71
-
72
-
73
-
74
-
75
-
76
-
77
-
78
-
79
-
80
-
81
-
82
-
83
-
84
-
85
-
86
-
87
-
88
-
89
-
90
-
91
-
92
-
93
-
94
-
95
-
96
-
97
-
98
-
99
-
100
-
101
-
102
-
103
-
104
-
105
-
106
-
107
-
108
-
109
-
110
-
111
-
112
-
113
-
114
-
115
-
116
-
117
-
118
-
119
-
120
-
121
-
122
-
123
-
124
-
125
-
126
-
127
-
128
-
129
-
130
-
131
-
132
-
133
-
134
-
135
-
136
-
137
-
138
-
139
-
140
-
141
-
142
-
143
-
144
-
145
-
146
-
147
-
148
-
149
-
150
-
151
-
152
-
153
-
154
-
155
-
156
-
157
-
158
-
159
-
160
-
161
-
162
-
163
-
164
-
165
-
166
-
167
-
168
-
169
-
170
-
171
-
172
-
173
-
174
-
175
-
176
-
177
-
178
-
179
-
180
-
181
-
182
-
183
-
184
-
185
-
186
-
187
-
188
-
189
-
190
-
191
-
192
-
193
-
194
-
195
-
196
-
197
-
198
-
199
-
200
-
201
-
202
-
203
-
204
-
205
-
206
-
207
-
208
-
209
-
210
-
211
-
212
-
213
-
214
-
215
-
216
-
217
-
218
-
219
-
220
-
221
-
222
-
223
-
224
-
225
-
226
-
227
-
228
-
229
-
230
-
231
-
232
-
233
-
234
-
235
-
236
-
237
-
238
-
239
-
240
 |
 |
