Kyocera FS-C8500DN FS-C8500DN Operation Guide - Page 75
Encrypted PDF PDF password entry, TIFF/JPEG Size Adjusting the TIFF/JPEG file print out size
 |
View all Kyocera FS-C8500DN manuals
Add to My Manuals
Save this manual to your list of manuals |
Page 75 highlights
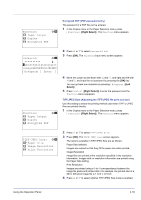
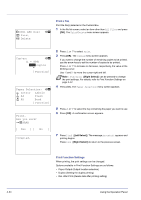
Function: a b 1 Paper Output 2 Duplex 3 Encrypted PDF Encrypted PDF (PDF password entry) The password of a PDF file can be entered. 1 In the Copies menu or the Paper Selection menu, press [Function] ([Right Select]). The Function menu appears. Password: a b S *abcdefghijklmnopqrst uvwxyzABCDEFGHIJKLMNO [Bckspace] [ Enter ] Function: a b 1 Paper Output 2 Duplex 3 Encrypted PDF 2 Press U or V to select Encrypted PDF. 3 Press [OK]. The Password input menu screen appears. 4 Move the cursor up and down with U and V, and right and left with Y and Z, and input the set password by pressing the [OK] key. You can go back one character by pressing [Bckspace] ([Left Select]). 5 Press [Enter] ([Right Select]) to enter the password and the Function menu reappears. TIFF/JPEG Size (Adjusting the TIFF/JPEG file print out size) Use this setting to select the printing method used when TIFF or JPEG files are printed directly. 1 In the Copies menu or the Paper Selection menu, press [Function] ([Right Select]). The Function menu appears. TIFF/JPEG Size: a b 1 *Paper Size 2 Image Resolution 3 Print Resolution 2 Press U or V to select TIFF/JPEG Size. 3 Press [OK]. The TIFF/JPEG Size screen appears. The options available in TIFF/JPEG Size are as follows: Paper Size (default) Images are resized so that they fill the paper size when printed. Image Resolution Image files are printed at the resolution specified in the resolution information. Images with no resolution information are printed using the Paper Size setting. Print Resolution Images are printed using a 1-to-1 correspondence between the image file pixels and printed dots. For example, the printed size of a 600 x 300-pixel image file is 1 inch x 1/2 inch. 4 Press U or V to select whether TIFF/JPEG Size mode is enabled. Using the Operation Panel 4-19
-
 1
1 -
2
-
3
-
4
-
5
-
6
-
7
-
8
-
9
-
10
-
11
-
12
-
13
-
14
-
15
-
16
-
17
-
18
-
19
-
20
-
21
-
22
-
23
-
24
-
25
-
26
-
27
-
28
-
29
-
30
-
31
-
32
-
33
-
34
-
35
-
36
-
37
-
38
-
39
-
40
-
41
-
42
-
43
-
44
-
45
-
46
-
47
-
48
-
49
-
50
-
51
-
52
-
53
-
54
-
55
-
56
-
57
-
58
-
59
-
60
-
61
-
62
-
63
-
64
-
65
-
66
-
67
-
68
-
69
-
 70
70 -
 71
71 -
 72
72 -
 73
73 -
 74
74 -
 75
75 -
 76
76 -
 77
77 -
 78
78 -
 79
79 -
 80
80 -
81
-
82
-
83
-
84
-
85
-
86
-
87
-
88
-
89
-
90
-
91
-
92
-
93
-
94
-
95
-
96
-
97
-
98
-
99
-
100
-
101
-
102
-
103
-
104
-
105
-
106
-
107
-
108
-
109
-
110
-
111
-
112
-
113
-
114
-
115
-
116
-
117
-
118
-
119
-
120
-
121
-
122
-
123
-
124
-
125
-
126
-
127
-
128
-
129
-
130
-
131
-
132
-
133
-
134
-
135
-
136
-
137
-
138
-
139
-
140
-
141
-
142
-
143
-
144
-
145
-
146
-
147
-
148
-
149
-
150
-
151
-
152
-
153
-
154
-
155
-
156
-
157
-
158
-
159
-
160
-
161
-
162
-
163
-
164
-
165
-
166
-
167
-
168
-
169
-
170
-
171
-
172
-
173
-
174
-
175
-
176
-
177
-
178
-
179
-
180
-
181
-
182
-
183
-
184
-
185
-
186
-
187
-
188
-
189
-
190
-
191
-
192
-
193
-
194
-
195
-
196
-
197
-
198
-
199
-
200
-
201
-
202
-
203
-
204
-
205
-
206
-
207
-
208
-
209
-
210
-
211
-
212
-
213
-
214
-
215
-
216
-
217
-
218
-
219
-
220
-
221
-
222
-
223
-
224
-
225
-
226
-
227
-
228
-
229
-
230
-
231
-
232
-
233
-
234
-
235
-
236
-
237
-
238
-
239
-
240
 |
 |