Kyocera FS-C8500DN FS-C8500DN Operation Guide - Page 72
USB Memory (USB memory selection), Print File List (Printing and checking the files in the USB memory)
 |
View all Kyocera FS-C8500DN manuals
Add to My Manuals
Save this manual to your list of manuals |
Page 72 highlights
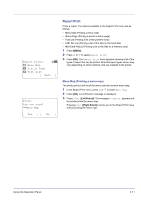
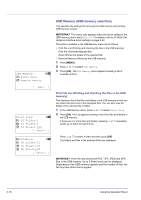
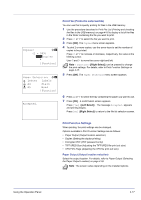
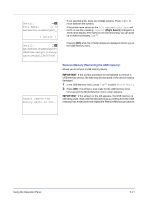
USB Memory: a b 1 Print File 2 Remove Memory [ Exit ] Print File: O b i 00 Folder-1 i 01 Folder-2 j 02 File-1.jpg [ Detail ] i Folder-1: O b i 00 Folder-11 j 01 File3.tif j 02 File4.pdf [ Detail ] USB Memory (USB memory selection) This specifies the settings for removing the USB memory and printing USB memory content. IMPORTANT This menu only appears when the block setting of the USB memory slot is set to Unblock. For details, refer to I/F Block Set. (External interface block setting) on page 4-92. The options available in the USB Memory menu are as follows: • Print File List (Printing and checking the files in the USB memory) Print File (Prints the selected file) Detail (Shows the details of the selected file) • Remove Memory (Removing the USB memory) 1 Press [MENU]. 2 Press U or V to select USB Memory. 3 Press [OK]. The USB Memory menu appears showing a list of available actions. Print File List (Printing and checking the files in the USB memory) This displays a list of the files and folders in the USB memory so that you can select and print one of the displayed files. You can also view the details of the selected file or folder. 1 In the USB Memory menu, press U or V to select Print File. 2 Press [OK]. File List appears showing a list of the files and folders in the USB memory. If there are 3 or more files and folders, pressing U or V repeatedly scrolls up or down through the list. Press U or V to select a folder and then press [OK]. The folders and files in the selected folder are displayed. IMPORTANT Print File only shows the PDF, TIFF, JPEG and XPS files in the USB memory. Up to 3 folder levels can be displayed. Depending on the USB memory capacity and the number of files, the list may take some time to appear. 4-16 Using the Operation Panel
-
 1
1 -
2
-
3
-
4
-
5
-
6
-
7
-
8
-
9
-
10
-
11
-
12
-
13
-
14
-
15
-
16
-
17
-
18
-
19
-
20
-
21
-
22
-
23
-
24
-
25
-
26
-
27
-
28
-
29
-
30
-
31
-
32
-
33
-
34
-
35
-
36
-
37
-
38
-
39
-
40
-
41
-
42
-
43
-
44
-
45
-
46
-
47
-
48
-
49
-
50
-
51
-
52
-
53
-
54
-
55
-
56
-
57
-
58
-
59
-
60
-
61
-
62
-
63
-
64
-
65
-
66
-
 67
67 -
 68
68 -
 69
69 -
 70
70 -
 71
71 -
 72
72 -
 73
73 -
 74
74 -
 75
75 -
 76
76 -
 77
77 -
78
-
79
-
80
-
81
-
82
-
83
-
84
-
85
-
86
-
87
-
88
-
89
-
90
-
91
-
92
-
93
-
94
-
95
-
96
-
97
-
98
-
99
-
100
-
101
-
102
-
103
-
104
-
105
-
106
-
107
-
108
-
109
-
110
-
111
-
112
-
113
-
114
-
115
-
116
-
117
-
118
-
119
-
120
-
121
-
122
-
123
-
124
-
125
-
126
-
127
-
128
-
129
-
130
-
131
-
132
-
133
-
134
-
135
-
136
-
137
-
138
-
139
-
140
-
141
-
142
-
143
-
144
-
145
-
146
-
147
-
148
-
149
-
150
-
151
-
152
-
153
-
154
-
155
-
156
-
157
-
158
-
159
-
160
-
161
-
162
-
163
-
164
-
165
-
166
-
167
-
168
-
169
-
170
-
171
-
172
-
173
-
174
-
175
-
176
-
177
-
178
-
179
-
180
-
181
-
182
-
183
-
184
-
185
-
186
-
187
-
188
-
189
-
190
-
191
-
192
-
193
-
194
-
195
-
196
-
197
-
198
-
199
-
200
-
201
-
202
-
203
-
204
-
205
-
206
-
207
-
208
-
209
-
210
-
211
-
212
-
213
-
214
-
215
-
216
-
217
-
218
-
219
-
220
-
221
-
222
-
223
-
224
-
225
-
226
-
227
-
228
-
229
-
230
-
231
-
232
-
233
-
234
-
235
-
236
-
237
-
238
-
239
-
240
 |
 |
