Kyocera FS-C8500DN FS-C8500DN Operation Guide - Page 30
Installing the Printer Driver, Installing the Software in Windows
 |
View all Kyocera FS-C8500DN manuals
Add to My Manuals
Save this manual to your list of manuals |
Page 30 highlights
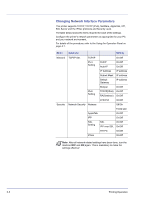
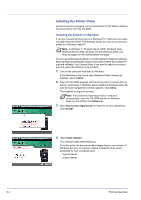
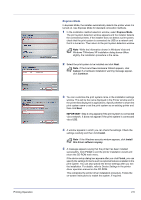
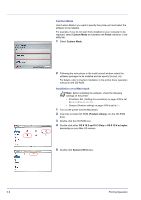
Installing the Printer Driver Ensure the printer is plugged in and connected to the PC before installing the printer driver from the CD-ROM. Installing the Software in Windows If you are connecting this printer to a Windows PC, follow the next steps to install the printer driver. The example shows you how to connect your printer to a Windows Vista PC. Note In Windows 7, Windows Server 2008, Windows Vista, Windows Server 2003, Windows XP and Windows 2000, you must be logged on with administrator privileges. You can use either Express Mode or Custom Mode to install the software. Express Mode automatically detects connected printers and installs the required software. Use Custom Mode if you want to specify the printer port and select the software to be installed. 1 Turn on the computer and start up Windows. If the Welcome to the Found New Hardware Wizard dialog box displays, select Cancel. 2 Insert the CD-ROM supplied with the printer into the optical drive of the PC. In Windows 7, Windows Server 2008 and Windows Vista, the user account management window appears. Click Allow. The installation program launches. Note If the software install wizard does not launch automatically, open the CD-ROM window in Windows Explorer and double-click Setup.exe. 3 Click View License Agreement and read the License Agreement. Click Accept. 4 Click Install software. The software install wizard starts up. From this point, the procedure differs depending on your version of Windows and your connection method. Proceed to the correct procedure for your connection type. • Express Mode • Custom Mode 2-4 Printing Operation
-
 1
1 -
2
-
3
-
4
-
5
-
6
-
7
-
8
-
9
-
10
-
11
-
12
-
13
-
14
-
15
-
16
-
17
-
18
-
19
-
20
-
21
-
22
-
23
-
24
-
 25
25 -
 26
26 -
 27
27 -
 28
28 -
 29
29 -
 30
30 -
 31
31 -
 32
32 -
 33
33 -
 34
34 -
 35
35 -
36
-
37
-
38
-
39
-
40
-
41
-
42
-
43
-
44
-
45
-
46
-
47
-
48
-
49
-
50
-
51
-
52
-
53
-
54
-
55
-
56
-
57
-
58
-
59
-
60
-
61
-
62
-
63
-
64
-
65
-
66
-
67
-
68
-
69
-
70
-
71
-
72
-
73
-
74
-
75
-
76
-
77
-
78
-
79
-
80
-
81
-
82
-
83
-
84
-
85
-
86
-
87
-
88
-
89
-
90
-
91
-
92
-
93
-
94
-
95
-
96
-
97
-
98
-
99
-
100
-
101
-
102
-
103
-
104
-
105
-
106
-
107
-
108
-
109
-
110
-
111
-
112
-
113
-
114
-
115
-
116
-
117
-
118
-
119
-
120
-
121
-
122
-
123
-
124
-
125
-
126
-
127
-
128
-
129
-
130
-
131
-
132
-
133
-
134
-
135
-
136
-
137
-
138
-
139
-
140
-
141
-
142
-
143
-
144
-
145
-
146
-
147
-
148
-
149
-
150
-
151
-
152
-
153
-
154
-
155
-
156
-
157
-
158
-
159
-
160
-
161
-
162
-
163
-
164
-
165
-
166
-
167
-
168
-
169
-
170
-
171
-
172
-
173
-
174
-
175
-
176
-
177
-
178
-
179
-
180
-
181
-
182
-
183
-
184
-
185
-
186
-
187
-
188
-
189
-
190
-
191
-
192
-
193
-
194
-
195
-
196
-
197
-
198
-
199
-
200
-
201
-
202
-
203
-
204
-
205
-
206
-
207
-
208
-
209
-
210
-
211
-
212
-
213
-
214
-
215
-
216
-
217
-
218
-
219
-
220
-
221
-
222
-
223
-
224
-
225
-
226
-
227
-
228
-
229
-
230
-
231
-
232
-
233
-
234
-
235
-
236
-
237
-
238
-
239
-
240
 |
 |
