Kyocera FS-C8500DN FS-C8500DN Operation Guide - Page 32
Custom Mode, Installation on a Macintosh, Fonts, Product Library, OS X 10.2 and 10.3 Only - mac driver
 |
View all Kyocera FS-C8500DN manuals
Add to My Manuals
Save this manual to your list of manuals |
Page 32 highlights
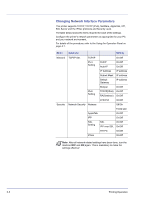
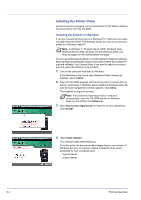
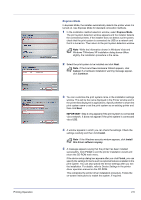
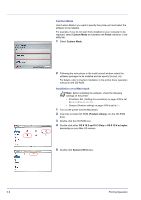
Custom Mode Use Custom Mode if you want to specify the printer port and select the software to be installed. For example, if you do not want fonts installed on your computer to be replaced, select Custom Mode and deselect the Fonts checkbox in the utility tab. 1 Select Custom Mode. 2 Following the instructions in the install wizard window, select the software packages to be installed and the specify the port, etc. For details, refer to Custom Installation in the printer driver operation manual on the CD-ROM. Installation on a Macintosh Note Before installing the software, check the following settings on the printer: • Emulation Set. (Setting the emulation) on page 4-59 is set to KPDL or KPDL(Auto). • Bonjour (Bonjour setting) on page 4-69 is set to On. 1 Turn on the printer and the Macintosh. 2 Insert the included CD-ROM (Product Library) into the CD-ROM drive. 3 Double-click the CD-ROM icon. 4 Double-click either OS X 10.2 and 10.3 Only or OS X 10.4 or higher depending on your Mac OS version. 5 Double-click Kyocera OS X vx.x. 2-6 Printing Operation
-
 1
1 -
2
-
3
-
4
-
5
-
6
-
7
-
8
-
9
-
10
-
11
-
12
-
13
-
14
-
15
-
16
-
17
-
18
-
19
-
20
-
21
-
22
-
23
-
24
-
25
-
26
-
 27
27 -
 28
28 -
 29
29 -
 30
30 -
 31
31 -
 32
32 -
 33
33 -
 34
34 -
 35
35 -
 36
36 -
 37
37 -
38
-
39
-
40
-
41
-
42
-
43
-
44
-
45
-
46
-
47
-
48
-
49
-
50
-
51
-
52
-
53
-
54
-
55
-
56
-
57
-
58
-
59
-
60
-
61
-
62
-
63
-
64
-
65
-
66
-
67
-
68
-
69
-
70
-
71
-
72
-
73
-
74
-
75
-
76
-
77
-
78
-
79
-
80
-
81
-
82
-
83
-
84
-
85
-
86
-
87
-
88
-
89
-
90
-
91
-
92
-
93
-
94
-
95
-
96
-
97
-
98
-
99
-
100
-
101
-
102
-
103
-
104
-
105
-
106
-
107
-
108
-
109
-
110
-
111
-
112
-
113
-
114
-
115
-
116
-
117
-
118
-
119
-
120
-
121
-
122
-
123
-
124
-
125
-
126
-
127
-
128
-
129
-
130
-
131
-
132
-
133
-
134
-
135
-
136
-
137
-
138
-
139
-
140
-
141
-
142
-
143
-
144
-
145
-
146
-
147
-
148
-
149
-
150
-
151
-
152
-
153
-
154
-
155
-
156
-
157
-
158
-
159
-
160
-
161
-
162
-
163
-
164
-
165
-
166
-
167
-
168
-
169
-
170
-
171
-
172
-
173
-
174
-
175
-
176
-
177
-
178
-
179
-
180
-
181
-
182
-
183
-
184
-
185
-
186
-
187
-
188
-
189
-
190
-
191
-
192
-
193
-
194
-
195
-
196
-
197
-
198
-
199
-
200
-
201
-
202
-
203
-
204
-
205
-
206
-
207
-
208
-
209
-
210
-
211
-
212
-
213
-
214
-
215
-
216
-
217
-
218
-
219
-
220
-
221
-
222
-
223
-
224
-
225
-
226
-
227
-
228
-
229
-
230
-
231
-
232
-
233
-
234
-
235
-
236
-
237
-
238
-
239
-
240
 |
 |
