Kyocera FS-C8500DN FS-C8500DN Operation Guide - Page 86
User01, All Files, Data01, Select ], Print, Delete, Copies, Are you sure?, Select/Deselect All Files
 |
View all Kyocera FS-C8500DN manuals
Add to My Manuals
Save this manual to your list of manuals |
Page 86 highlights
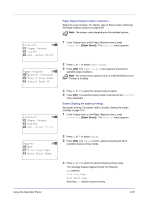
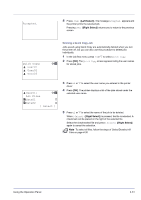
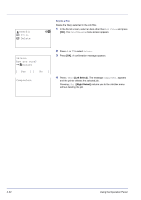
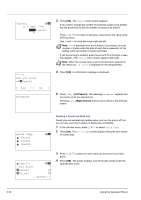
l User01: a b All Files Q Data01 g Q Data02 T [ Select ] l User01: a b All Files Q Data01 g Q Data02 g [ Select ] l User01: a b All Files Q Data01 T Q Data02 T [ Select ] l User01: a b 1 Print 2 Delete Select/Deselect All Files All files in the Job Box are selected. 1 In the file list screen, press U or V to select All Files. 2 Press [Check] ([Right Select]). When there is a file not checked in the Custom Box, all files will be checkmarked. When all files in the Custom Box are checked, all checkmarked files are deselected. Print a File Print the file(s) selected in the Job Box. 1 In the file list screen, select an item other than All Files and press [OK]. The Print/Delete menu screen appears. Copies: a b (1 - 999, ---) /**1-copies M Print. Are you sure? z Q Data01 [ Yes ] [ No ] 2 Press U or V to select Print. 3 Press [OK]. The Copies menu screen appears. To print 2 or more copies, use the arrow keys to set the number of copies to be printed. Press U or V to increase or decrease, respectively, the value at the blinking cursor. Use Y and Z to move the cursor right and left. Note --- is displayed first, and it means it according to the set number of copies when the data of each file is preserved. In this setting, each set number of copies is printed. 4 Press [OK]. A confirmation message is displayed. 4-30 Using the Operation Panel
-
 1
1 -
2
-
3
-
4
-
5
-
6
-
7
-
8
-
9
-
10
-
11
-
12
-
13
-
14
-
15
-
16
-
17
-
18
-
19
-
20
-
21
-
22
-
23
-
24
-
25
-
26
-
27
-
28
-
29
-
30
-
31
-
32
-
33
-
34
-
35
-
36
-
37
-
38
-
39
-
40
-
41
-
42
-
43
-
44
-
45
-
46
-
47
-
48
-
49
-
50
-
51
-
52
-
53
-
54
-
55
-
56
-
57
-
58
-
59
-
60
-
61
-
62
-
63
-
64
-
65
-
66
-
67
-
68
-
69
-
70
-
71
-
72
-
73
-
74
-
75
-
76
-
77
-
78
-
79
-
80
-
 81
81 -
 82
82 -
 83
83 -
 84
84 -
 85
85 -
 86
86 -
 87
87 -
 88
88 -
 89
89 -
 90
90 -
 91
91 -
92
-
93
-
94
-
95
-
96
-
97
-
98
-
99
-
100
-
101
-
102
-
103
-
104
-
105
-
106
-
107
-
108
-
109
-
110
-
111
-
112
-
113
-
114
-
115
-
116
-
117
-
118
-
119
-
120
-
121
-
122
-
123
-
124
-
125
-
126
-
127
-
128
-
129
-
130
-
131
-
132
-
133
-
134
-
135
-
136
-
137
-
138
-
139
-
140
-
141
-
142
-
143
-
144
-
145
-
146
-
147
-
148
-
149
-
150
-
151
-
152
-
153
-
154
-
155
-
156
-
157
-
158
-
159
-
160
-
161
-
162
-
163
-
164
-
165
-
166
-
167
-
168
-
169
-
170
-
171
-
172
-
173
-
174
-
175
-
176
-
177
-
178
-
179
-
180
-
181
-
182
-
183
-
184
-
185
-
186
-
187
-
188
-
189
-
190
-
191
-
192
-
193
-
194
-
195
-
196
-
197
-
198
-
199
-
200
-
201
-
202
-
203
-
204
-
205
-
206
-
207
-
208
-
209
-
210
-
211
-
212
-
213
-
214
-
215
-
216
-
217
-
218
-
219
-
220
-
221
-
222
-
223
-
224
-
225
-
226
-
227
-
228
-
229
-
230
-
231
-
232
-
233
-
234
-
235
-
236
-
237
-
238
-
239
-
240
 |
 |