Kyocera TASKalfa 181 Fax System (R) Operation Guide - Page 128
Turning Fax Forwarding ON/OFF
 |
View all Kyocera TASKalfa 181 manuals
Add to My Manuals
Save this manual to your list of manuals |
Page 128 highlights
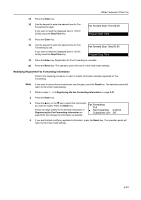
Other Features of this Fax Turning Fax Forwarding ON/OFF In order to use Fax Forwarding, it is necessary to turn it ON in advance. Note If you want to cancel the procedure part way through, press the Reset key. The operation panel will return to the initial mode settings. 1 Press the System Menu key. 2 Press the S key or the T key to select Fax Default and press the Enter key. System Menu / Counter Machine Default Printer Default Fax Default 3 Press the S key or the T key to select Fax Forwarding. Fax Default: Print Report Password Check Comm. Fax Forwarding :Off 4 Press the Enter key. 5 Press the S key or the T key to select whether you want to turn Fax Forwarding ON or OFF. Fax Forwarding: On The asterisk (*) in the message display indicates the *Off current setting. 6 Press the Enter key. The setting for Fax Forwarding settings is complete. 7 Press the Reset key. The operation panel will return to the initial mode settings. 5-34
-
 1
1 -
2
-
3
-
4
-
5
-
6
-
7
-
8
-
9
-
10
-
11
-
12
-
13
-
14
-
15
-
16
-
17
-
18
-
19
-
20
-
21
-
22
-
23
-
24
-
25
-
26
-
27
-
28
-
29
-
30
-
31
-
32
-
33
-
34
-
35
-
36
-
37
-
38
-
39
-
40
-
41
-
42
-
43
-
44
-
45
-
46
-
47
-
48
-
49
-
50
-
51
-
52
-
53
-
54
-
55
-
56
-
57
-
58
-
59
-
60
-
61
-
62
-
63
-
64
-
65
-
66
-
67
-
68
-
69
-
70
-
71
-
72
-
73
-
74
-
75
-
76
-
77
-
78
-
79
-
80
-
81
-
82
-
83
-
84
-
85
-
86
-
87
-
88
-
89
-
90
-
91
-
92
-
93
-
94
-
95
-
96
-
97
-
98
-
99
-
100
-
101
-
102
-
103
-
104
-
105
-
106
-
107
-
108
-
109
-
110
-
111
-
112
-
113
-
114
-
115
-
116
-
117
-
118
-
119
-
120
-
121
-
122
-
 123
123 -
 124
124 -
 125
125 -
 126
126 -
 127
127 -
 128
128 -
 129
129 -
 130
130 -
 131
131 -
 132
132 -
 133
133 -
134
-
135
-
136
-
137
-
138
-
139
-
140
-
141
-
142
-
143
-
144
-
145
-
146
-
147
-
148
-
149
-
150
-
151
-
152
-
153
-
154
-
155
-
156
-
157
-
158
-
159
-
160
-
161
-
162
-
163
-
164
-
165
-
166
-
167
-
168
-
169
-
170
-
171
-
172
-
173
-
174
-
175
-
176
-
177
-
178
-
179
-
180
-
181
-
182
-
183
-
184
-
185
-
186
-
187
-
188
-
189
-
190
-
191
-
192
-
193
-
194
-
195
-
196
-
197
-
198
-
199
-
200
-
201
-
202
-
203
-
204
-
205
-
206
-
207
-
208
-
209
-
210
-
211
-
212
-
213
-
214
-
215
-
216
-
217
-
218
-
219
-
220
 |
 |
