Kyocera TASKalfa 181 Fax System (R) Operation Guide - Page 19
Preparations
 |
View all Kyocera TASKalfa 181 manuals
Add to My Manuals
Save this manual to your list of manuals |
Page 19 highlights
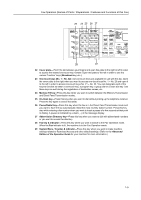
Fax Operation (Names of Parts / Preparations / Features and Functions of this Fax) Preparations When using the fax functions of this machine for the first time after purchasing your Fax System, perform the procedures as explained in "Designating the Type of Phone Line Being Used ("Line Type" setting)" through "Setting the Current Date And Time ("Date & Time" setting)". Note If your service representative performs these settings during set-up of your Fax System, there is no further need for you to perform these procedures. Designating the Type of Phone Line Being Used ("Line Type" setting) (Inch version only) Set the type of phone line here to correspond to the type of telephone service that you are using. BE SURE the type of phone line you select here is correct because, if the setting is incorrect, dialing - and therefore fax communication - will be impossible. Notes 1 • Prior to operation, check the message display to make sure that the touch panel is in the initial mode for fax operation. (See What is the "Initial Mode"? on page 1-13.) • If you want to cancel the procedure part way through, press the Reset key. The operation panel will return to the initial mode settings. Press the System Menu key. 2 Press the T key to select Fax Default. System Menu / Counter Machine Default Printer Default Fax Default 3 Press the Enter key. 4 Make sure that Line Type is selected in the message display and press the Enter key. Fax Default: End The asterisk (*) in the message display indicates the Line Type current setting. TTI :Tone Dial :Outside P. 5 Press the S key or the T key to select the type of phone line that you are using. Select between Tone(DTMF) Line and Pulse(10PPS) Line. Line Type: *Tone(DTMF) Line Pulse(10PPS) Line 6 Press the Enter key. The Setting for the type of phone line is completed. 7 Press the S key or the T key to select End and press the Enter key. To finish the setting and turn to the initial mode settings, press the Reset key. 1-7
-
 1
1 -
2
-
3
-
4
-
5
-
6
-
7
-
8
-
9
-
10
-
11
-
12
-
13
-
 14
14 -
 15
15 -
 16
16 -
 17
17 -
 18
18 -
 19
19 -
 20
20 -
 21
21 -
 22
22 -
 23
23 -
 24
24 -
25
-
26
-
27
-
28
-
29
-
30
-
31
-
32
-
33
-
34
-
35
-
36
-
37
-
38
-
39
-
40
-
41
-
42
-
43
-
44
-
45
-
46
-
47
-
48
-
49
-
50
-
51
-
52
-
53
-
54
-
55
-
56
-
57
-
58
-
59
-
60
-
61
-
62
-
63
-
64
-
65
-
66
-
67
-
68
-
69
-
70
-
71
-
72
-
73
-
74
-
75
-
76
-
77
-
78
-
79
-
80
-
81
-
82
-
83
-
84
-
85
-
86
-
87
-
88
-
89
-
90
-
91
-
92
-
93
-
94
-
95
-
96
-
97
-
98
-
99
-
100
-
101
-
102
-
103
-
104
-
105
-
106
-
107
-
108
-
109
-
110
-
111
-
112
-
113
-
114
-
115
-
116
-
117
-
118
-
119
-
120
-
121
-
122
-
123
-
124
-
125
-
126
-
127
-
128
-
129
-
130
-
131
-
132
-
133
-
134
-
135
-
136
-
137
-
138
-
139
-
140
-
141
-
142
-
143
-
144
-
145
-
146
-
147
-
148
-
149
-
150
-
151
-
152
-
153
-
154
-
155
-
156
-
157
-
158
-
159
-
160
-
161
-
162
-
163
-
164
-
165
-
166
-
167
-
168
-
169
-
170
-
171
-
172
-
173
-
174
-
175
-
176
-
177
-
178
-
179
-
180
-
181
-
182
-
183
-
184
-
185
-
186
-
187
-
188
-
189
-
190
-
191
-
192
-
193
-
194
-
195
-
196
-
197
-
198
-
199
-
200
-
201
-
202
-
203
-
204
-
205
-
206
-
207
-
208
-
209
-
210
-
211
-
212
-
213
-
214
-
215
-
216
-
217
-
218
-
219
-
220
 |
 |
