Kyocera TASKalfa 181 Fax System (R) Operation Guide - Page 187
Receiving Faxes at the Same Size or a Reduced Size, Reception size setting
 |
View all Kyocera TASKalfa 181 manuals
Add to My Manuals
Save this manual to your list of manuals |
Page 187 highlights
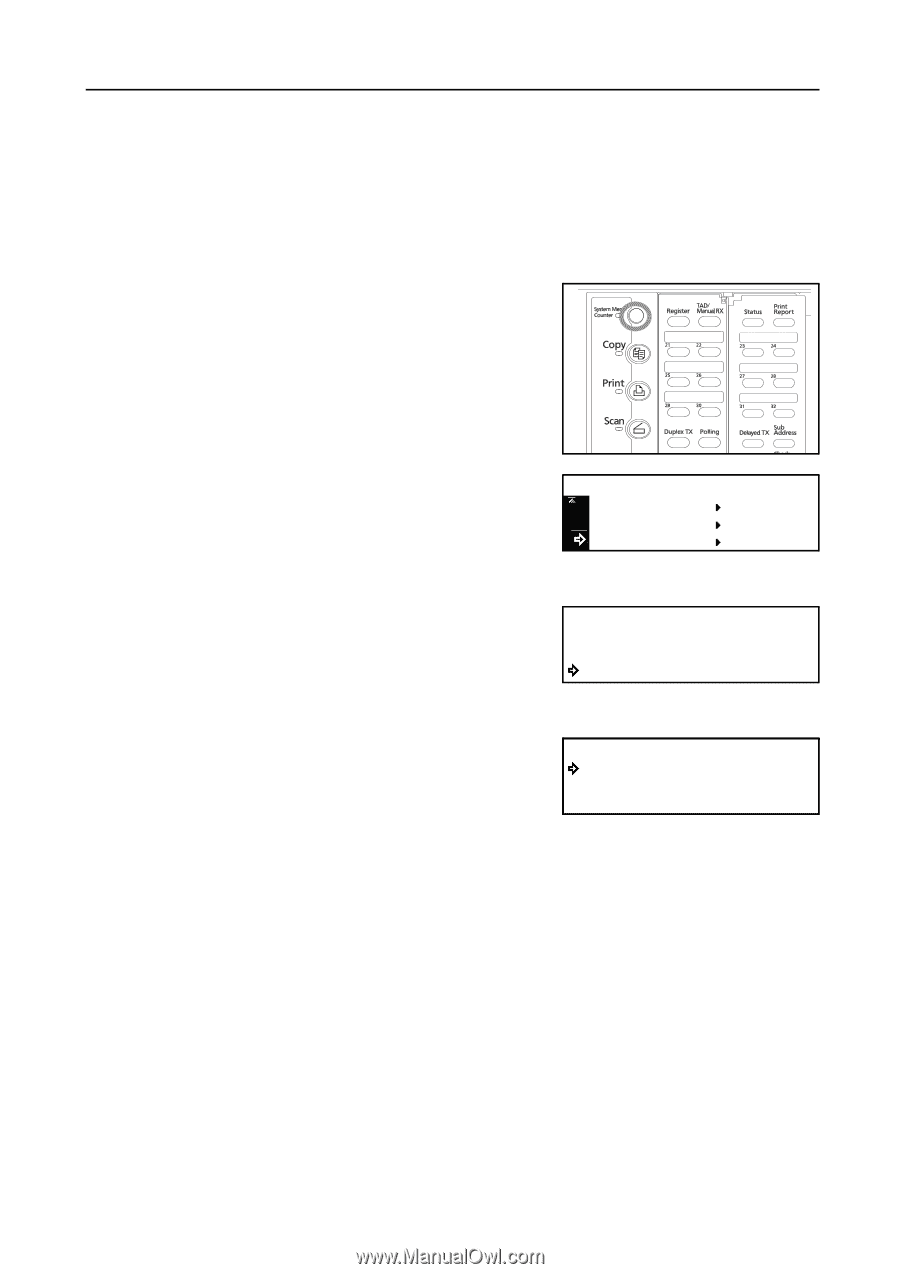
Various Settings and Registration Receiving Faxes at the Same Size or a Reduced Size ("Reception size" setting) If Auto Selection is selected under the "Fax Paper Feeding Tray setting", and the size of an incoming fax is larger than the size of paper loaded in the drawer[cassette] to be used for print out, you can select whether to have such faxes printed out at their original size onto multiple sheets of paper, or have them reduced as much as possible to fit onto the available size of paper. Note If you want to cancel the procedure part way through, press the Reset key. The operation panel will return to the initial mode settings. 1 Press the System Menu key. 2 Press the T key to select Fax Default. System Menu / Counter Machine Default Printer Default Fax Default 3 Press the Enter key. 4 Press the S key or the T key to select RX size [Reception size]. Fax Default: Dest. List Tag Remote Diag. RX Size :Alphabet :Off :Zoom(Reduce) 5 Press the Enter key. 6 Press the S key or the T key to select whether have faxes printed at their original size or have them reduced to fit the available size of paper. RX Size: *Zoom(Reduce) 100% The asterisk (*) in the message display indicates the current setting. 7 Press the Enter key. The setting for the size of received faxes is complete. If you are finished making settings, press the Reset key. The operation panel will return to the initial mode settings. 7-19
-
 1
1 -
2
-
3
-
4
-
5
-
6
-
7
-
8
-
9
-
10
-
11
-
12
-
13
-
14
-
15
-
16
-
17
-
18
-
19
-
20
-
21
-
22
-
23
-
24
-
25
-
26
-
27
-
28
-
29
-
30
-
31
-
32
-
33
-
34
-
35
-
36
-
37
-
38
-
39
-
40
-
41
-
42
-
43
-
44
-
45
-
46
-
47
-
48
-
49
-
50
-
51
-
52
-
53
-
54
-
55
-
56
-
57
-
58
-
59
-
60
-
61
-
62
-
63
-
64
-
65
-
66
-
67
-
68
-
69
-
70
-
71
-
72
-
73
-
74
-
75
-
76
-
77
-
78
-
79
-
80
-
81
-
82
-
83
-
84
-
85
-
86
-
87
-
88
-
89
-
90
-
91
-
92
-
93
-
94
-
95
-
96
-
97
-
98
-
99
-
100
-
101
-
102
-
103
-
104
-
105
-
106
-
107
-
108
-
109
-
110
-
111
-
112
-
113
-
114
-
115
-
116
-
117
-
118
-
119
-
120
-
121
-
122
-
123
-
124
-
125
-
126
-
127
-
128
-
129
-
130
-
131
-
132
-
133
-
134
-
135
-
136
-
137
-
138
-
139
-
140
-
141
-
142
-
143
-
144
-
145
-
146
-
147
-
148
-
149
-
150
-
151
-
152
-
153
-
154
-
155
-
156
-
157
-
158
-
159
-
160
-
161
-
162
-
163
-
164
-
165
-
166
-
167
-
168
-
169
-
170
-
171
-
172
-
173
-
174
-
175
-
176
-
177
-
178
-
179
-
180
-
181
-
 182
182 -
 183
183 -
 184
184 -
 185
185 -
 186
186 -
 187
187 -
 188
188 -
 189
189 -
 190
190 -
 191
191 -
 192
192 -
193
-
194
-
195
-
196
-
197
-
198
-
199
-
200
-
201
-
202
-
203
-
204
-
205
-
206
-
207
-
208
-
209
-
210
-
211
-
212
-
213
-
214
-
215
-
216
-
217
-
218
-
219
-
220
 |
 |