Kyocera TASKalfa 181 Fax System (R) Operation Guide - Page 170
Delayed Comm. Report
 |
View all Kyocera TASKalfa 181 manuals
Add to My Manuals
Save this manual to your list of manuals |
Page 170 highlights
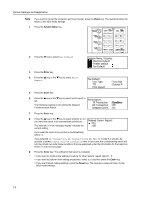
Various Settings and Registration Note 1 If you want to cancel the procedure part way through, press the Reset key. The operation panel will return to the initial mode settings. Press the System Menu key. 2 Press the T key to select Fax Default. System Menu / Counter Machine Default Printer Default Fax Default 3 Press the Enter key. 4 Press the S key or the T key to select Print Report. Fax Default: Line Type TTI Print Report :Tone Dial :Outside P. 5 Press the Enter key. 6 Press the S key or the T key to select which report to set. Print Report: TX Transaction :Condition The following example is for setting the Delayed RX Transaction :Off Communication Report. Delayed Comm. :On 7 Press the Enter key. 8 Press the S key or the T key to select whether or not you want that report to be automatically printed out. Delayed Comm. Report: *On The asterisk (*) in the message display indicates the Off current setting. If you want the report to be printed out automatically, select On. If you selected TX Transaction, RX Transaction or NW-FAX TX in step 6, it will also be possible to select Output only be Condition here. In this case, the corresponding report will only be printed out under those conditions that are explained under the information for that report as shown on the previous page. 9 Press the Enter key. The setting for that report is complete. > If you want to continue the setting procedure for other reports, repeat steps 6 - 9. > If you want to perform other setting procedures, select End and then press the Enter key. > If you are finished making settings, press the Reset key. The operation panel will return to the initial mode settings. 7-2
-
 1
1 -
2
-
3
-
4
-
5
-
6
-
7
-
8
-
9
-
10
-
11
-
12
-
13
-
14
-
15
-
16
-
17
-
18
-
19
-
20
-
21
-
22
-
23
-
24
-
25
-
26
-
27
-
28
-
29
-
30
-
31
-
32
-
33
-
34
-
35
-
36
-
37
-
38
-
39
-
40
-
41
-
42
-
43
-
44
-
45
-
46
-
47
-
48
-
49
-
50
-
51
-
52
-
53
-
54
-
55
-
56
-
57
-
58
-
59
-
60
-
61
-
62
-
63
-
64
-
65
-
66
-
67
-
68
-
69
-
70
-
71
-
72
-
73
-
74
-
75
-
76
-
77
-
78
-
79
-
80
-
81
-
82
-
83
-
84
-
85
-
86
-
87
-
88
-
89
-
90
-
91
-
92
-
93
-
94
-
95
-
96
-
97
-
98
-
99
-
100
-
101
-
102
-
103
-
104
-
105
-
106
-
107
-
108
-
109
-
110
-
111
-
112
-
113
-
114
-
115
-
116
-
117
-
118
-
119
-
120
-
121
-
122
-
123
-
124
-
125
-
126
-
127
-
128
-
129
-
130
-
131
-
132
-
133
-
134
-
135
-
136
-
137
-
138
-
139
-
140
-
141
-
142
-
143
-
144
-
145
-
146
-
147
-
148
-
149
-
150
-
151
-
152
-
153
-
154
-
155
-
156
-
157
-
158
-
159
-
160
-
161
-
162
-
163
-
164
-
 165
165 -
 166
166 -
 167
167 -
 168
168 -
 169
169 -
 170
170 -
 171
171 -
 172
172 -
 173
173 -
 174
174 -
 175
175 -
176
-
177
-
178
-
179
-
180
-
181
-
182
-
183
-
184
-
185
-
186
-
187
-
188
-
189
-
190
-
191
-
192
-
193
-
194
-
195
-
196
-
197
-
198
-
199
-
200
-
201
-
202
-
203
-
204
-
205
-
206
-
207
-
208
-
209
-
210
-
211
-
212
-
213
-
214
-
215
-
216
-
217
-
218
-
219
-
220
 |
 |
