Kyocera TASKalfa 181 Fax System (R) Operation Guide - Page 15
Operation Panel and their Functions - service manual
 |
View all Kyocera TASKalfa 181 manuals
Add to My Manuals
Save this manual to your list of manuals |
Page 15 highlights
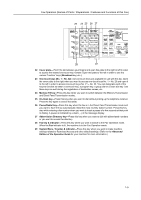
Fax Operation (Names of Parts / Preparations / Features and Functions of this Fax) Operation Panel and their Functions The following contains explanations on the names and functions of the keys and indicators that are utilized when this machine is used as a facsimile. Refer to the Basic Edition of the Operation Guide for your machine for information on the keys and indicators that are utilized when this machine is used as a copier. 1 76 4 3 2 8 9 10 11 5 1 Message display-Operation procedures and indications of trouble, etc., are shown in the message display. 2 Start key-Press this key when you want to initiate fax transmission and manual fax reception. 3 Stop/Clear key-Press this key when you want to revise data that you have entered and return the message display to the previous step. (The message display will NOT, however, return to the previous step if the Enter key has already been pressed in order to register that data.) Press this key also during registration, modification or deletion procedures when you want to delete the data that is currently displayed. 4 Reset key-Press this key when you want to cancel an operation in progress and have the operation panel return to the initial mode settings. 5 Keypad-Use the keypad to enter fax numbers, etc. Even if your telephone service is for pulse dialing, press the star (*) key after connecting to the other party and any key pressed on the keypad after that will transmit the related tone signal. (Inch version only) 6 Interrupt key & indicator-Press this key when you want to interrupt a fax reception in order to make copies. The Interrupt indicator will light when the machine is in the Interrupt mode. 7 Logout-Press this key at the end of sending to return to the ID-code entry screen when you are using Restricted Access. (Refer to the Operation Guide for your machine for more detailed information.) 8 < (Cursor left) key-Press this key when you want to move the cursor in the message display to the left. 9 T(Cursor down) key-Press this key when you want to move the cursor downward in the message display. 10 S(Cursor up) key-Press this key when you want to move the cursor upward in the message display. 11 > (Cursor right) key-Press this key when you want to move the cursor in the message display to the right. 12 Enter (OK) key-Press this key when you want to advance to the next step in an operation or when you want to register the entered data during setting and registration procedures. 1-3
-
 1
1 -
2
-
3
-
4
-
5
-
6
-
7
-
8
-
9
-
 10
10 -
 11
11 -
 12
12 -
 13
13 -
 14
14 -
 15
15 -
 16
16 -
 17
17 -
 18
18 -
 19
19 -
 20
20 -
21
-
22
-
23
-
24
-
25
-
26
-
27
-
28
-
29
-
30
-
31
-
32
-
33
-
34
-
35
-
36
-
37
-
38
-
39
-
40
-
41
-
42
-
43
-
44
-
45
-
46
-
47
-
48
-
49
-
50
-
51
-
52
-
53
-
54
-
55
-
56
-
57
-
58
-
59
-
60
-
61
-
62
-
63
-
64
-
65
-
66
-
67
-
68
-
69
-
70
-
71
-
72
-
73
-
74
-
75
-
76
-
77
-
78
-
79
-
80
-
81
-
82
-
83
-
84
-
85
-
86
-
87
-
88
-
89
-
90
-
91
-
92
-
93
-
94
-
95
-
96
-
97
-
98
-
99
-
100
-
101
-
102
-
103
-
104
-
105
-
106
-
107
-
108
-
109
-
110
-
111
-
112
-
113
-
114
-
115
-
116
-
117
-
118
-
119
-
120
-
121
-
122
-
123
-
124
-
125
-
126
-
127
-
128
-
129
-
130
-
131
-
132
-
133
-
134
-
135
-
136
-
137
-
138
-
139
-
140
-
141
-
142
-
143
-
144
-
145
-
146
-
147
-
148
-
149
-
150
-
151
-
152
-
153
-
154
-
155
-
156
-
157
-
158
-
159
-
160
-
161
-
162
-
163
-
164
-
165
-
166
-
167
-
168
-
169
-
170
-
171
-
172
-
173
-
174
-
175
-
176
-
177
-
178
-
179
-
180
-
181
-
182
-
183
-
184
-
185
-
186
-
187
-
188
-
189
-
190
-
191
-
192
-
193
-
194
-
195
-
196
-
197
-
198
-
199
-
200
-
201
-
202
-
203
-
204
-
205
-
206
-
207
-
208
-
209
-
210
-
211
-
212
-
213
-
214
-
215
-
216
-
217
-
218
-
219
-
220
 |
 |
