Canon EOS C70 Instruction Manual - Page 129
Superimposing Onscreen Displays on Video Outputs, Changing the Opacity Level of Onscreen Displays
 |
View all Canon EOS C70 manuals
Add to My Manuals
Save this manual to your list of manuals |
Page 129 highlights
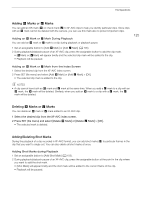
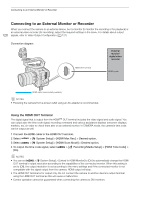
Connecting to an External Monitor or Recorder • If the camera's time code is being output and > [Æ Recording/Media Setup] > [Rec Command] is set to [On], you can use the camera's REC button to control also the recording operation of an external recorder connected to the HDMI OUT terminal. • During continuous recording, the recording command will not be output. • The time code will not be output from the HDMI OUT terminal in the following cases. - In MEDIA mode. - When the video output signal is 720x480 / 59.94P or 720x576 / 50.00P. • If > [B System Setup] > [HDMI Scan Mode] is set to [PsF (Forced 1080i)] or if > [B System Setup] > [HDMI Max Res.] is set to [1280x720], even when the frame rate is set to 23.98P or 24.00P, the frames value of the time code output from the HDMI OUT terminal will be converted so it runs from 0 to 29. 129 Superimposing Onscreen Displays on Video Outputs You can output the camera's onscreen displays along with the video output from the HDMI OUT terminal to check the onscreen displays on an external monitor. You can also adjust the opacity level of superimposed onscreen displays. This setting will not affect your recordings. Select > [¢ Monitoring Setup] > [OSD Output: HDMI] > [On]. • T appears on the right of the screen (In CAMERA mode, only if > [¢ Monitoring Setup] > [Custom Display 2] > [OSD Output] is set to [On]). NOTES • When the HDMI OUT terminal's output resolution is 720x480 or 720x576, the camera's onscreen displays will not be output. • If you set an assignable button to [OSD Output: HDMI], you can press the button to turn the camera's onscreen displays on and off. Changing the Opacity Level of Onscreen Displays You can make onscreen displays more visible or less conspicuous by changing their opacity level. You can select to which screens to apply the opacity levels. 1 To change the visibility of onscreen displays on individual video outputs, select > [¢ Monitoring Setup] > Desired [OSD Opacity:] setting > [On]. 2 Select > [¢ Monitoring Setup] > [OSD Opacity Level] > Desired option. • The smaller the percentage the more transparent the onscreen displays. 3 Select Screens]. > [¢ Monitoring Setup] > [OSD Opacity: Appl. Screens] > [All] or [Only Rec/Playback • You can apply the selected opacity level to all onscreen displays (including menus, etc.) or only to onscreen displays on the shooting and playback screens. NOTES • If you set an assignable button to one of the [OSD Opacity:] settings, you can press the button to change the opacity level of onscreen displays on the corresponding video outputs.
-
 1
1 -
2
-
3
-
4
-
5
-
6
-
7
-
8
-
9
-
10
-
11
-
12
-
13
-
14
-
15
-
16
-
17
-
18
-
19
-
20
-
21
-
22
-
23
-
24
-
25
-
26
-
27
-
28
-
29
-
30
-
31
-
32
-
33
-
34
-
35
-
36
-
37
-
38
-
39
-
40
-
41
-
42
-
43
-
44
-
45
-
46
-
47
-
48
-
49
-
50
-
51
-
52
-
53
-
54
-
55
-
56
-
57
-
58
-
59
-
60
-
61
-
62
-
63
-
64
-
65
-
66
-
67
-
68
-
69
-
70
-
71
-
72
-
73
-
74
-
75
-
76
-
77
-
78
-
79
-
80
-
81
-
82
-
83
-
84
-
85
-
86
-
87
-
88
-
89
-
90
-
91
-
92
-
93
-
94
-
95
-
96
-
97
-
98
-
99
-
100
-
101
-
102
-
103
-
104
-
105
-
106
-
107
-
108
-
109
-
110
-
111
-
112
-
113
-
114
-
115
-
116
-
117
-
118
-
119
-
120
-
121
-
122
-
123
-
 124
124 -
 125
125 -
 126
126 -
 127
127 -
 128
128 -
 129
129 -
 130
130 -
 131
131 -
 132
132 -
 133
133 -
 134
134 -
135
-
136
-
137
-
138
-
139
-
140
-
141
-
142
-
143
-
144
-
145
-
146
-
147
-
148
-
149
-
150
-
151
-
152
-
153
-
154
-
155
-
156
-
157
-
158
-
159
-
160
-
161
-
162
-
163
-
164
-
165
-
166
-
167
-
168
-
169
-
170
-
171
-
172
-
173
-
174
-
175
-
176
-
177
-
178
-
179
-
180
-
181
-
182
-
183
-
184
-
185
-
186
-
187
-
188
-
189
-
190
-
191
-
192
-
193
-
194
-
195
-
196
-
197
-
198
-
199
-
200
-
201
-
202
-
203
-
204
-
205
-
206
-
207
-
208
-
209
-
210
-
211
-
212
-
213
-
214
-
215
 |
 |
