Canon EOS C70 Instruction Manual - Page 130
Selecting the Output Range, elect, Monitoring, etup] > [Range: HDMI].
 |
View all Canon EOS C70 manuals
Add to My Manuals
Save this manual to your list of manuals |
Page 130 highlights
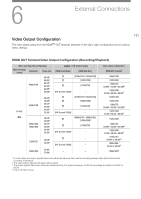
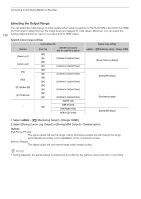
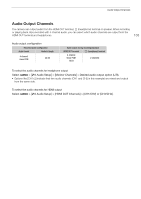
Connecting to an External Monitor or Recorder Selecting the Output Range 130 You can select the output range of video signals (when using log gamma or PQ/HLG HDR) output from the HDMI OUT terminal to determine how the image levels are mapped to code values. Moreover, you can select the setting independently for Canon Log output and for HDR output. Applied output range settings [Gamma] [Canon Log 2] [Canon Log 3] [PQ] [HLG] [BT.709 Wide DR] [BT.709 Normal] - Custom picture file [Look File] [Gamma/Color Space] after the Look File is applied [Off] - [On] [Conform to Custom Picture] [Off] - [On] [Conform to Custom Picture] [Off] - [On] [Conform to Custom Picture] [Off] - [On] [Conform to Custom Picture] [Off] - [On] [Conform to Custom Picture] [Off] - [On] [Conform to Custom Picture] [SDR BT.709] [SDR BT.2020] [On] [HDR PQ(BT.2100)] [HDR HLG(BT.2100)] Applied range settings > [¢ Monitoring Setup] > [Range: HDMI] [During Canon Log Output] [During HDR Output] - (Fixed narrow range) [During HDR Output] 1 Select > [¢ Monitoring Setup] > [Range: HDMI]. 2 Select [During Canon Log Output] or [During HDR Output] > Desired option. Options [Full Range Priority]: The signal output will use full range coding whenever possible but will change the range automatically according to the capabilities of the connected monitor. [Narrow Range]: The signal output will use narrow range (video range) coding. NOTES • During playback, the applied range is determined according to the gamma used at the time of recording.
-
 1
1 -
2
-
3
-
4
-
5
-
6
-
7
-
8
-
9
-
10
-
11
-
12
-
13
-
14
-
15
-
16
-
17
-
18
-
19
-
20
-
21
-
22
-
23
-
24
-
25
-
26
-
27
-
28
-
29
-
30
-
31
-
32
-
33
-
34
-
35
-
36
-
37
-
38
-
39
-
40
-
41
-
42
-
43
-
44
-
45
-
46
-
47
-
48
-
49
-
50
-
51
-
52
-
53
-
54
-
55
-
56
-
57
-
58
-
59
-
60
-
61
-
62
-
63
-
64
-
65
-
66
-
67
-
68
-
69
-
70
-
71
-
72
-
73
-
74
-
75
-
76
-
77
-
78
-
79
-
80
-
81
-
82
-
83
-
84
-
85
-
86
-
87
-
88
-
89
-
90
-
91
-
92
-
93
-
94
-
95
-
96
-
97
-
98
-
99
-
100
-
101
-
102
-
103
-
104
-
105
-
106
-
107
-
108
-
109
-
110
-
111
-
112
-
113
-
114
-
115
-
116
-
117
-
118
-
119
-
120
-
121
-
122
-
123
-
124
-
 125
125 -
 126
126 -
 127
127 -
 128
128 -
 129
129 -
 130
130 -
 131
131 -
 132
132 -
 133
133 -
 134
134 -
 135
135 -
136
-
137
-
138
-
139
-
140
-
141
-
142
-
143
-
144
-
145
-
146
-
147
-
148
-
149
-
150
-
151
-
152
-
153
-
154
-
155
-
156
-
157
-
158
-
159
-
160
-
161
-
162
-
163
-
164
-
165
-
166
-
167
-
168
-
169
-
170
-
171
-
172
-
173
-
174
-
175
-
176
-
177
-
178
-
179
-
180
-
181
-
182
-
183
-
184
-
185
-
186
-
187
-
188
-
189
-
190
-
191
-
192
-
193
-
194
-
195
-
196
-
197
-
198
-
199
-
200
-
201
-
202
-
203
-
204
-
205
-
206
-
207
-
208
-
209
-
210
-
211
-
212
-
213
-
214
-
215
 |
 |