Canon EOS C70 Instruction Manual - Page 47
Reviewing a Recording, et an a, ignable button to [Review Recording], elect
 |
View all Canon EOS C70 manuals
Add to My Manuals
Save this manual to your list of manuals |
Page 47 highlights
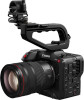
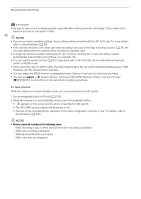
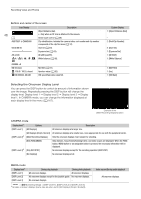
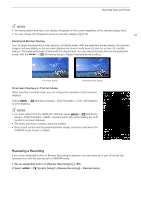
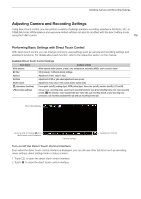
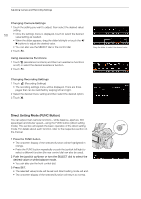
Recording Video and Photos NOTES • The zebra pattern and false color display will appear on the screen regardless of the selected display level. • You can change the transparency level of onscreen displays (A 129). 47 Peripheral Border Display You can apply the peripheral border display to all display levels. With the peripheral border display, the camera's image is reduced slightly so the onscreen displays are shown mostly around it and not on top of it, partially hiding it. The peripheral border is linked with the display level. You can select the levels that use the peripheral border with the > [¢ Monitoring Setup] > [Apply Peripheral Border] setting. Full-screen display Peripheral border display Onscreen Displays in Portrait Mode When shooting in portrait mode, you can change the orientation of the onscreen displays. Select > [¢ Monitoring Setup] > [OSD Orientation: LCD] > [90 degrees] or [270 degrees]. NOTES • For video output from the HDMI OUT terminal, select > [¢ Monitoring Setup] > [OSD Orientation: HDMI] > Desired option (only when rotating the LCD monitor's onscreen displays). • The menu and status screens cannot be rotated. • Direct touch control and the peripheral border display cannot be used when the CAMERA mode screen is rotated. Reviewing a Recording If you set an assignable button to [Review Recording] in advance, you can review all or part of the last clip recorded even with the camera set to CAMERA mode. 1 Set an assignable button to [Review Recording] (A 105). 2 Select > [B System Setup] > [Review Recording] > Desired option.
-
 1
1 -
2
-
3
-
4
-
5
-
6
-
7
-
8
-
9
-
10
-
11
-
12
-
13
-
14
-
15
-
16
-
17
-
18
-
19
-
20
-
21
-
22
-
23
-
24
-
25
-
26
-
27
-
28
-
29
-
30
-
31
-
32
-
33
-
34
-
35
-
36
-
37
-
38
-
39
-
40
-
41
-
 42
42 -
 43
43 -
 44
44 -
 45
45 -
 46
46 -
 47
47 -
 48
48 -
 49
49 -
 50
50 -
 51
51 -
 52
52 -
53
-
54
-
55
-
56
-
57
-
58
-
59
-
60
-
61
-
62
-
63
-
64
-
65
-
66
-
67
-
68
-
69
-
70
-
71
-
72
-
73
-
74
-
75
-
76
-
77
-
78
-
79
-
80
-
81
-
82
-
83
-
84
-
85
-
86
-
87
-
88
-
89
-
90
-
91
-
92
-
93
-
94
-
95
-
96
-
97
-
98
-
99
-
100
-
101
-
102
-
103
-
104
-
105
-
106
-
107
-
108
-
109
-
110
-
111
-
112
-
113
-
114
-
115
-
116
-
117
-
118
-
119
-
120
-
121
-
122
-
123
-
124
-
125
-
126
-
127
-
128
-
129
-
130
-
131
-
132
-
133
-
134
-
135
-
136
-
137
-
138
-
139
-
140
-
141
-
142
-
143
-
144
-
145
-
146
-
147
-
148
-
149
-
150
-
151
-
152
-
153
-
154
-
155
-
156
-
157
-
158
-
159
-
160
-
161
-
162
-
163
-
164
-
165
-
166
-
167
-
168
-
169
-
170
-
171
-
172
-
173
-
174
-
175
-
176
-
177
-
178
-
179
-
180
-
181
-
182
-
183
-
184
-
185
-
186
-
187
-
188
-
189
-
190
-
191
-
192
-
193
-
194
-
195
-
196
-
197
-
198
-
199
-
200
-
201
-
202
-
203
-
204
-
205
-
206
-
207
-
208
-
209
-
210
-
211
-
212
-
213
-
214
-
215
 |
 |