Canon EOS C70 Instruction Manual - Page 28
In-Camera Lens Correction, Updating the Firmware of a Lens/Mount Adapter
 |
View all Canon EOS C70 manuals
Add to My Manuals
Save this manual to your list of manuals |
Page 28 highlights
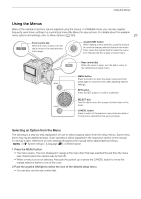
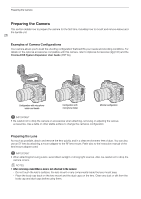
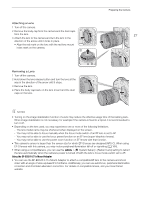
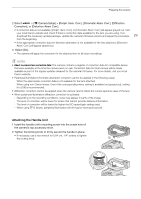
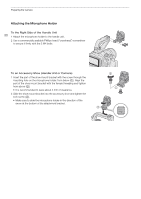
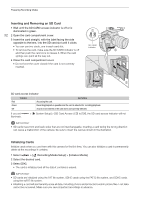
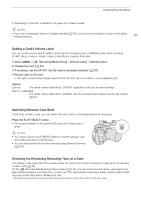
Preparing the Camera Updating the Firmware of a Lens/Mount Adapter You can update the firmware of the lens/mount adapter attached to the camera (only in CAMERA mode). For details about firmware updates, visit your local Canon website. The following example explains how to perform a 28 firmware update for lenses. 1 Download the lens/mount adapter firmware update file from the Canon website and save it on the root directory of an SD card. Insert the SD card containing the firmware update into the camera's SD card slot B (A 32). 2 Attach the lens/mount adapter you want to update and turn on the camera in CAMERA mode. • Attach a lens also when updating the firmware of the mount adapter. 3 Select > [B System Setup] > [Firmware] > [Lens] or [Mount Adapter]. • The current lens/mount adapter firmware version will appear on the screen. • If the menu option is grayed out, the attached lens/mount adapter may not support firmware updates or the SD card used may not contain a valid lens firmware file. Check the lens/mount adapter and SD card and repeat the procedure from the beginning. 4 Select [OK]. 5 Select the lens firmware file (.LFU or .AFU file). 6 Select [OK]. • The firmware will be updated. Once in progress, the lens firmware update cannot be canceled. 7 When the confirmation message appears, press SET. IMPORTANT • Be sure to observe the following precautions while the lens firmware is being updated. - Do not turn off the camera and do not remove the battery pack or other power source. - Do not remove the lens/mount adapter. - Do not operate any buttons or controls on the camera. - Do not open the card compartment cover and do not remove the SD card. NOTES • The lens firmware cannot be updated while pre-recording is activated. • Power the camera using an AC adapter or a sufficiently charged battery pack. • When using an EF extender, remove the extender before performing the procedure. In-Camera Lens Correction Depending on the characteristics of the lens used, the corners of an image frame may be darker than the center due to light fall-off (peripheral illumination drop), color shift/color fringing may be visible along high-contrast edges in the image (chromatic aberration), the image produced may not be as sharp at certain apertures (lens diffraction), or the image might appear distorted (distortion aberration). In CAMERA mode, you can apply a correction to compensate as necessary. To apply peripheral illumination or chromatic aberration correction, correction data for the lens used is necessary. Distortion aberration correction is only possible for compatible RF lenses. 1 Attach the lens you want to use and turn on the camera in CAMERA mode.
-
 1
1 -
2
-
3
-
4
-
5
-
6
-
7
-
8
-
9
-
10
-
11
-
12
-
13
-
14
-
15
-
16
-
17
-
18
-
19
-
20
-
21
-
22
-
 23
23 -
 24
24 -
 25
25 -
 26
26 -
 27
27 -
 28
28 -
 29
29 -
 30
30 -
 31
31 -
 32
32 -
 33
33 -
34
-
35
-
36
-
37
-
38
-
39
-
40
-
41
-
42
-
43
-
44
-
45
-
46
-
47
-
48
-
49
-
50
-
51
-
52
-
53
-
54
-
55
-
56
-
57
-
58
-
59
-
60
-
61
-
62
-
63
-
64
-
65
-
66
-
67
-
68
-
69
-
70
-
71
-
72
-
73
-
74
-
75
-
76
-
77
-
78
-
79
-
80
-
81
-
82
-
83
-
84
-
85
-
86
-
87
-
88
-
89
-
90
-
91
-
92
-
93
-
94
-
95
-
96
-
97
-
98
-
99
-
100
-
101
-
102
-
103
-
104
-
105
-
106
-
107
-
108
-
109
-
110
-
111
-
112
-
113
-
114
-
115
-
116
-
117
-
118
-
119
-
120
-
121
-
122
-
123
-
124
-
125
-
126
-
127
-
128
-
129
-
130
-
131
-
132
-
133
-
134
-
135
-
136
-
137
-
138
-
139
-
140
-
141
-
142
-
143
-
144
-
145
-
146
-
147
-
148
-
149
-
150
-
151
-
152
-
153
-
154
-
155
-
156
-
157
-
158
-
159
-
160
-
161
-
162
-
163
-
164
-
165
-
166
-
167
-
168
-
169
-
170
-
171
-
172
-
173
-
174
-
175
-
176
-
177
-
178
-
179
-
180
-
181
-
182
-
183
-
184
-
185
-
186
-
187
-
188
-
189
-
190
-
191
-
192
-
193
-
194
-
195
-
196
-
197
-
198
-
199
-
200
-
201
-
202
-
203
-
204
-
205
-
206
-
207
-
208
-
209
-
210
-
211
-
212
-
213
-
214
-
215
 |
 |