Canon EOS C70 Instruction Manual - Page 19
Using a Power Outlet, Checking the Remaining Battery Charge
 |
View all Canon EOS C70 manuals
Add to My Manuals
Save this manual to your list of manuals |
Page 19 highlights
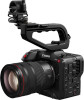
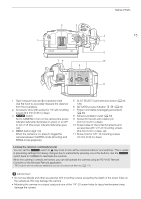
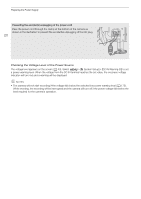
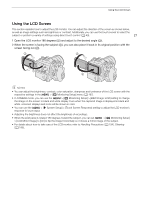
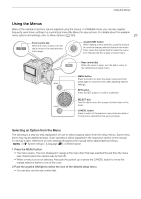
Preparing the Power Supply Checking the Remaining Battery Charge When the camera is turned on, you can check the approximate remaining battery usage time (in minutes) by looking at any recording/playback screen or the [B System Setup] status screen (A 178). You can also check the approximate charge level on the battery itself. 19 Press the CHECK button on the battery. An indicator will light for approximately 3 seconds and show the approximate remaining battery charge. 0-25% 26-50% 51-75% 76-100% Battery charge indicator CHECK button NOTES • The remaining battery charge level displayed in minutes on the screen may not match the [B System Setup] status screen or the indicators on the battery pack. Using a Power Outlet You can also power the camera directly from a power outlet using the CA-CP200 L Compact Power Adapter (AC adapter). While the camera is powered using a power outlet, you can replace the battery pack even when the camera is turned on. 1 Connect the power cord to the AC adapter and plug it into a power outlet. 2 Connect the AC adapter's DC plug to the DC IN terminal on the camera. IMPORTANT • Make sure to turn off the camera before connecting or disconnecting the AC adapter. • When using the AC adapter, do not fix it permanently to DC IN terminal ቢ one place as this may cause a malfunction. AC adapter ባ
-
 1
1 -
2
-
3
-
4
-
5
-
6
-
7
-
8
-
9
-
10
-
11
-
12
-
13
-
 14
14 -
 15
15 -
 16
16 -
 17
17 -
 18
18 -
 19
19 -
 20
20 -
 21
21 -
 22
22 -
 23
23 -
 24
24 -
25
-
26
-
27
-
28
-
29
-
30
-
31
-
32
-
33
-
34
-
35
-
36
-
37
-
38
-
39
-
40
-
41
-
42
-
43
-
44
-
45
-
46
-
47
-
48
-
49
-
50
-
51
-
52
-
53
-
54
-
55
-
56
-
57
-
58
-
59
-
60
-
61
-
62
-
63
-
64
-
65
-
66
-
67
-
68
-
69
-
70
-
71
-
72
-
73
-
74
-
75
-
76
-
77
-
78
-
79
-
80
-
81
-
82
-
83
-
84
-
85
-
86
-
87
-
88
-
89
-
90
-
91
-
92
-
93
-
94
-
95
-
96
-
97
-
98
-
99
-
100
-
101
-
102
-
103
-
104
-
105
-
106
-
107
-
108
-
109
-
110
-
111
-
112
-
113
-
114
-
115
-
116
-
117
-
118
-
119
-
120
-
121
-
122
-
123
-
124
-
125
-
126
-
127
-
128
-
129
-
130
-
131
-
132
-
133
-
134
-
135
-
136
-
137
-
138
-
139
-
140
-
141
-
142
-
143
-
144
-
145
-
146
-
147
-
148
-
149
-
150
-
151
-
152
-
153
-
154
-
155
-
156
-
157
-
158
-
159
-
160
-
161
-
162
-
163
-
164
-
165
-
166
-
167
-
168
-
169
-
170
-
171
-
172
-
173
-
174
-
175
-
176
-
177
-
178
-
179
-
180
-
181
-
182
-
183
-
184
-
185
-
186
-
187
-
188
-
189
-
190
-
191
-
192
-
193
-
194
-
195
-
196
-
197
-
198
-
199
-
200
-
201
-
202
-
203
-
204
-
205
-
206
-
207
-
208
-
209
-
210
-
211
-
212
-
213
-
214
-
215
 |
 |