Canon EOS C70 Instruction Manual - Page 27
Using the EF-EOS R 0.71x Mount Adapter, Attaching a Lens, Removing a Lens
 |
View all Canon EOS C70 manuals
Add to My Manuals
Save this manual to your list of manuals |
Page 27 highlights
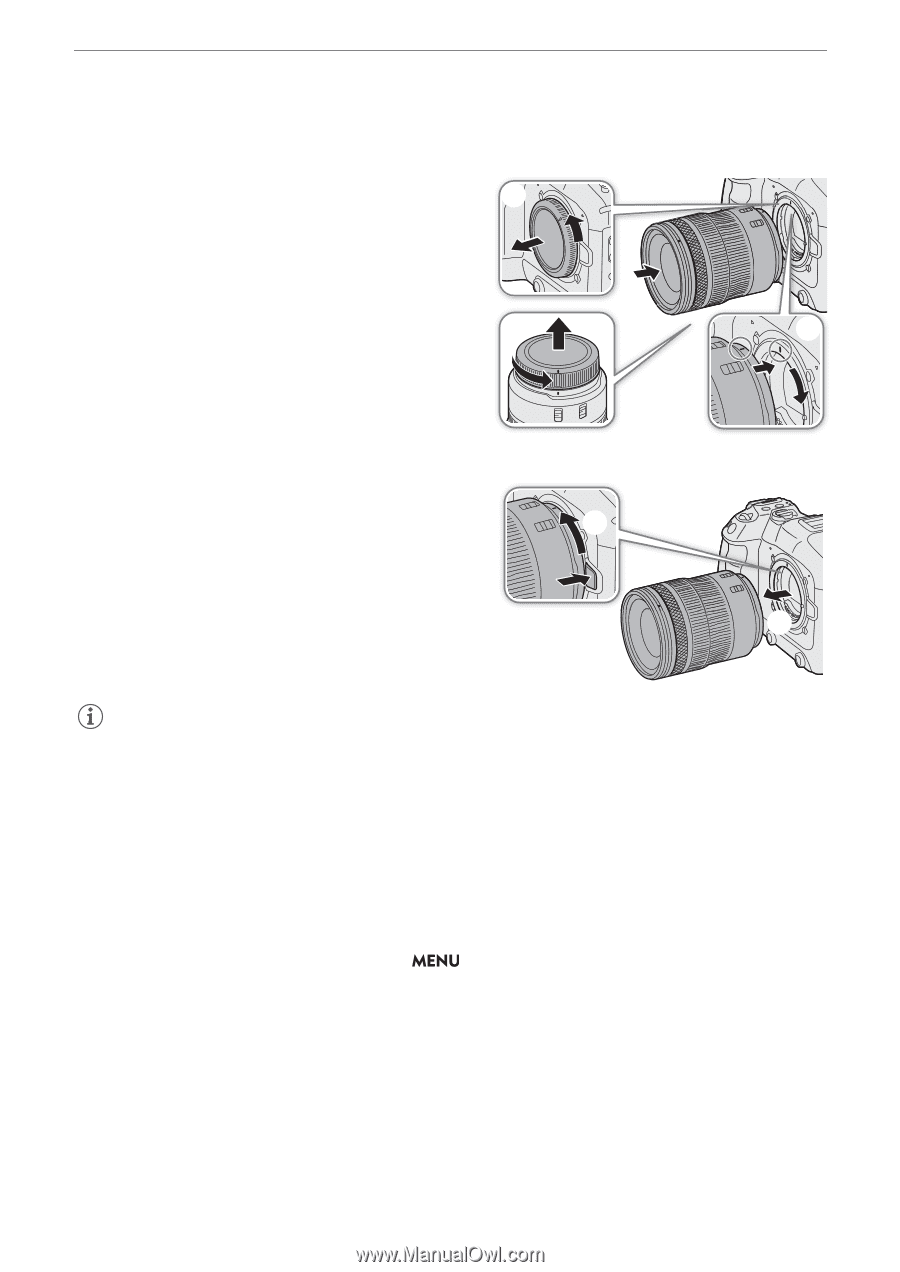
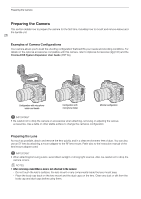
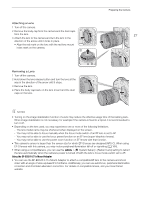
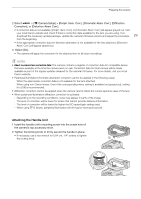
Attaching a Lens 1 Turn off the camera. 2 Remove the body cap from the camera and the dust caps ባ from the lens. 3 Attach the lens to the camera and turn the lens in the direction of the arrow until it clicks in place. • Align the red mark on the lens with the red lens mount index mark on the camera. ባ Preparing the Camera 27 ቤ Removing a Lens 1 Turn off the camera. 2 Hold down the lens release button and turn the lens all the way in the direction of the arrow until it stops. ባ 3 Remove the lens. 4 Place the body cap back on the lens mount and the dust caps on the lens. ቤ NOTES • Turning on the image stabilization function of a lens may reduce the effective usage time of the battery pack. When image stabilization is not necessary, for example if the camera is fixed to a tripod, it is recommended to turn it off. • Depending on the lens used, you may experience one or more of the following limitations. - The lens model name may be shortened when displayed on the screen. - You may not be able to focus manually when the focus mode switch of an EF lens is set to AF. - You may not be able to use the focus preset function on an EF lens (super telephoto lenses). - You may not be able to use the power zoom function on EF lenses with that function. • This camera's sensor is larger than the sensor size for which EF-S lenses are designed (APS-C). When using EF-S lenses with this camera, you may notice peripheral illumination fall-off or vignetting (A 164). • When using a compatible lens, you can use the > [B System Setup] > [Retract Lens] setting to retract the lens automatically when the camera's power is turned off with the lens's focus mode switch set to AF. Using the EF-EOS R 0.71x Mount Adapter • You can use the EF-EOS R 0.71x Mount Adapter to attach a compatible EF lens to the camera and shoot video with an angle of view equivalent to full frame. Additionally, you can use autofocus, peripheral illumination correction and chromatic aberration correction. For details on compatible lenses, visit your local Canon website.
-
 1
1 -
2
-
3
-
4
-
5
-
6
-
7
-
8
-
9
-
10
-
11
-
12
-
13
-
14
-
15
-
16
-
17
-
18
-
19
-
20
-
21
-
 22
22 -
 23
23 -
 24
24 -
 25
25 -
 26
26 -
 27
27 -
 28
28 -
 29
29 -
 30
30 -
 31
31 -
 32
32 -
33
-
34
-
35
-
36
-
37
-
38
-
39
-
40
-
41
-
42
-
43
-
44
-
45
-
46
-
47
-
48
-
49
-
50
-
51
-
52
-
53
-
54
-
55
-
56
-
57
-
58
-
59
-
60
-
61
-
62
-
63
-
64
-
65
-
66
-
67
-
68
-
69
-
70
-
71
-
72
-
73
-
74
-
75
-
76
-
77
-
78
-
79
-
80
-
81
-
82
-
83
-
84
-
85
-
86
-
87
-
88
-
89
-
90
-
91
-
92
-
93
-
94
-
95
-
96
-
97
-
98
-
99
-
100
-
101
-
102
-
103
-
104
-
105
-
106
-
107
-
108
-
109
-
110
-
111
-
112
-
113
-
114
-
115
-
116
-
117
-
118
-
119
-
120
-
121
-
122
-
123
-
124
-
125
-
126
-
127
-
128
-
129
-
130
-
131
-
132
-
133
-
134
-
135
-
136
-
137
-
138
-
139
-
140
-
141
-
142
-
143
-
144
-
145
-
146
-
147
-
148
-
149
-
150
-
151
-
152
-
153
-
154
-
155
-
156
-
157
-
158
-
159
-
160
-
161
-
162
-
163
-
164
-
165
-
166
-
167
-
168
-
169
-
170
-
171
-
172
-
173
-
174
-
175
-
176
-
177
-
178
-
179
-
180
-
181
-
182
-
183
-
184
-
185
-
186
-
187
-
188
-
189
-
190
-
191
-
192
-
193
-
194
-
195
-
196
-
197
-
198
-
199
-
200
-
201
-
202
-
203
-
204
-
205
-
206
-
207
-
208
-
209
-
210
-
211
-
212
-
213
-
214
-
215
 |
 |