Canon EOS C70 Instruction Manual - Page 141
Adding a New Connection Setting Using the Wizard, Function Settings, elect [Create New Comm.
 |
View all Canon EOS C70 manuals
Add to My Manuals
Save this manual to your list of manuals |
Page 141 highlights
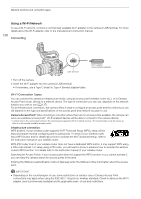
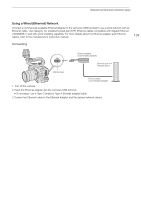
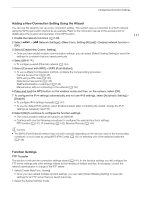
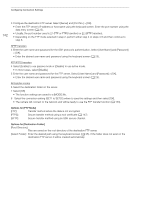
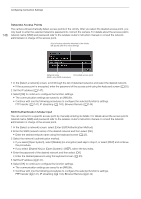
Configuring Connection Settings Adding a New Connection Setting Using the Wizard You can use the wizard to set up a new connection setting. This section uses a connection to a Wi-Fi network using the WPS push button method as an example. Refer to the instruction manual of the access point for details about the location and operation of the WPS button. 1 Enable the network functions (A 140). 2 Select [OK]. > [ Network Settings] > [New Conn. Setting (Wizard)] > Desired network function > 3 Select [Create New Comm. Setting]. • Once you have added multiple communication settings, you can select [Select Existing Setting] to reuse the settings for a network that you saved previously. 4 Select [Wi-Fi ]. • To configure a wired (Ethernet) network (A 144). 5 Select [Connect with WPS] > [WPS (Push Button)]. • To use a different configuration method, complete the corresponding procedure. Camera Access Point (A 145) WPS using a PIN code (A 145) Detected access points (A 146) SSID/authentication mode input (A 146) Manual setup without connecting to the network (A 147) 6 Press and hold the WPS button on the wireless router and then, on the camera, select [OK]. 7 To configure the IPv4 settings automatically and not use IPv6 settings, select [Automatic Setting] > [Disable]. • To configure IPv4 settings manually (A 147). • To use the default IPv6 settings, select [Enable] instead. After completing the wizard, change the IPv6 settings as necessary (A 150). 8 Select [OK] to continue to configure the function settings. • The communication settings are saved to an [NW] file. • Continue with one the following procedures to configure the selected function's settings. FTP transfer (A 141), IP streaming (A 143), Browser Remote (A 144) 141 NOTES • The [WPS (Push Button)] method may not work correctly depending on the devices used or the surrounding conditions. In such case try using [WPS (PIN Code)] (A 145) or selecting one of the detected networks (A 146). Function Settings FTP Transfer This section continues the connection settings wizard (A 141). In the function settings you will configure the FTP server settings and other settings related to the handling of folders and files. If necessary, consult the network administrator in charge of the FTP server. 1 Select [Create New Func. Setting]. • Once you have added multiple function settings, you can select [Select Existing Setting] to reuse the settings for an FTP server that you saved previously. 2 Select the desired transfer mode.
-
 1
1 -
2
-
3
-
4
-
5
-
6
-
7
-
8
-
9
-
10
-
11
-
12
-
13
-
14
-
15
-
16
-
17
-
18
-
19
-
20
-
21
-
22
-
23
-
24
-
25
-
26
-
27
-
28
-
29
-
30
-
31
-
32
-
33
-
34
-
35
-
36
-
37
-
38
-
39
-
40
-
41
-
42
-
43
-
44
-
45
-
46
-
47
-
48
-
49
-
50
-
51
-
52
-
53
-
54
-
55
-
56
-
57
-
58
-
59
-
60
-
61
-
62
-
63
-
64
-
65
-
66
-
67
-
68
-
69
-
70
-
71
-
72
-
73
-
74
-
75
-
76
-
77
-
78
-
79
-
80
-
81
-
82
-
83
-
84
-
85
-
86
-
87
-
88
-
89
-
90
-
91
-
92
-
93
-
94
-
95
-
96
-
97
-
98
-
99
-
100
-
101
-
102
-
103
-
104
-
105
-
106
-
107
-
108
-
109
-
110
-
111
-
112
-
113
-
114
-
115
-
116
-
117
-
118
-
119
-
120
-
121
-
122
-
123
-
124
-
125
-
126
-
127
-
128
-
129
-
130
-
131
-
132
-
133
-
134
-
135
-
 136
136 -
 137
137 -
 138
138 -
 139
139 -
 140
140 -
 141
141 -
 142
142 -
 143
143 -
 144
144 -
 145
145 -
 146
146 -
147
-
148
-
149
-
150
-
151
-
152
-
153
-
154
-
155
-
156
-
157
-
158
-
159
-
160
-
161
-
162
-
163
-
164
-
165
-
166
-
167
-
168
-
169
-
170
-
171
-
172
-
173
-
174
-
175
-
176
-
177
-
178
-
179
-
180
-
181
-
182
-
183
-
184
-
185
-
186
-
187
-
188
-
189
-
190
-
191
-
192
-
193
-
194
-
195
-
196
-
197
-
198
-
199
-
200
-
201
-
202
-
203
-
204
-
205
-
206
-
207
-
208
-
209
-
210
-
211
-
212
-
213
-
214
-
215
 |
 |