Canon EOS C70 Instruction Manual - Page 24
Using the Customized Menus (My Menu), elect the de
 |
View all Canon EOS C70 manuals
Add to My Manuals
Save this manual to your list of manuals |
Page 24 highlights
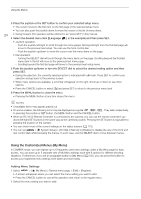
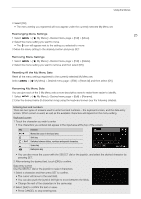
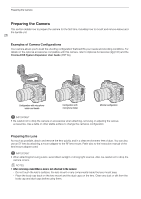
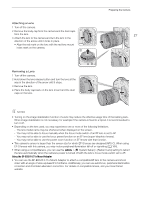
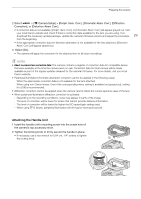
Using the Menus 3 Press the joystick or the SET button to confirm your selected setup menu. • The cursor moves to the first item on the first page of the selected setup menu. • You can also push the joystick down to move the cursor to the list of menu items. 24 • Going forward, this operation will be referred to as "press SET" in this manual. 4 Select the desired menu item ([Language H], in the example) and then press SET. • Joystick operation: - Push the joystick left/right to scroll through the menu pages. Moving left/right from the first/last page will move to the previous/next setup. You can use the front control dial. - Push the joystick up/down to move the cursor over the menu items on the page. • Dial operation: - Turning the SELECT dial will scroll through the menu items on the page. Scrolling beyond the first/last menu item in the list will move to the previous/next menu page. - Scrolling beyond the first/last page will move to the previous/next setup menu. 5 Push the joystick up/down or turn the SELECT dial to select the desired setting option and then press SET. • During the selection, the currently selected option is indicated with a mark. Press SET to confirm your selection and go back to the previous screen. • When many options are available, a scroll bar will appear on the right. Scroll up or down to see other options. • Press the CANCEL button or select [L] and press SET to return to the previous menu level. 6 Press the MENU button to close the menu. • Pressing the MENU button at any time closes the menu. NOTES • Unavailable items may appear grayed out. • On some screens, the following icons may be displayed as a guide: , , . They refer, respectively, to pressing the joystick or SET button, the MENU button and the CANCEL button. • When an RC-V100 Remote Controller is connected to the camera, you can use the remote controller's up/ down/left/right/SET buttons in the same way as the camera's joystick. Pressing the SET button is equivalent to pressing the joystick on the camera. • You can check most of the current settings on the status screens (A 173). • You can set > [B System Setup] > [Ctrl Dial in Menus] to [Disable] to disable the use of the front and rear control dials while browsing the menus. In such case, use the SELECT dial to move between menus. Using the Customized Menus (My Menu) In CAMERA mode, you can register up to 6 frequently used menu settings under a My Menu page for easy access. You can save up to 5 separate sets of My Menu settings each with 6 options for different shooting situations. Furthermore, if you set an assignable button to [My Menu] (A 105), you can press the button to access your registered menu settings even faster and more easily. Adding Menu Settings 1 Select > [¥ My Menu] > Desired menu page > [Edit] > [Register]. • A screen will appear where you can select the menu setting you want to add. • Press the CANCEL button to cancel the operation and return to the regular menu. 2 Select the menu setting you want to add.
-
 1
1 -
2
-
3
-
4
-
5
-
6
-
7
-
8
-
9
-
10
-
11
-
12
-
13
-
14
-
15
-
16
-
17
-
18
-
 19
19 -
 20
20 -
 21
21 -
 22
22 -
 23
23 -
 24
24 -
 25
25 -
 26
26 -
 27
27 -
 28
28 -
 29
29 -
30
-
31
-
32
-
33
-
34
-
35
-
36
-
37
-
38
-
39
-
40
-
41
-
42
-
43
-
44
-
45
-
46
-
47
-
48
-
49
-
50
-
51
-
52
-
53
-
54
-
55
-
56
-
57
-
58
-
59
-
60
-
61
-
62
-
63
-
64
-
65
-
66
-
67
-
68
-
69
-
70
-
71
-
72
-
73
-
74
-
75
-
76
-
77
-
78
-
79
-
80
-
81
-
82
-
83
-
84
-
85
-
86
-
87
-
88
-
89
-
90
-
91
-
92
-
93
-
94
-
95
-
96
-
97
-
98
-
99
-
100
-
101
-
102
-
103
-
104
-
105
-
106
-
107
-
108
-
109
-
110
-
111
-
112
-
113
-
114
-
115
-
116
-
117
-
118
-
119
-
120
-
121
-
122
-
123
-
124
-
125
-
126
-
127
-
128
-
129
-
130
-
131
-
132
-
133
-
134
-
135
-
136
-
137
-
138
-
139
-
140
-
141
-
142
-
143
-
144
-
145
-
146
-
147
-
148
-
149
-
150
-
151
-
152
-
153
-
154
-
155
-
156
-
157
-
158
-
159
-
160
-
161
-
162
-
163
-
164
-
165
-
166
-
167
-
168
-
169
-
170
-
171
-
172
-
173
-
174
-
175
-
176
-
177
-
178
-
179
-
180
-
181
-
182
-
183
-
184
-
185
-
186
-
187
-
188
-
189
-
190
-
191
-
192
-
193
-
194
-
195
-
196
-
197
-
198
-
199
-
200
-
201
-
202
-
203
-
204
-
205
-
206
-
207
-
208
-
209
-
210
-
211
-
212
-
213
-
214
-
215
 |
 |