Canon EOS C70 Instruction Manual - Page 14
Assignable button Camera 7, DC IN terminal
 |
View all Canon EOS C70 manuals
Add to My Manuals
Save this manual to your list of manuals |
Page 14 highlights
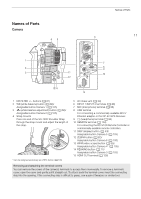
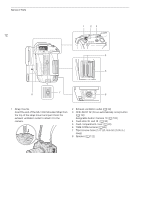
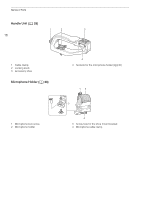
Names of Parts 1 2 14 3 45 6 7 8 9 10 11 12 13 14 15 16 1 LCD monitor (A 21) 2 INPUT 1 (top) / INPUT 2 (bottom) switches (audio source selection, A 89) 3 PUSH AUTO IRIS (momentary automatic aperture) button (A 64)/ Assignable button Camera 7 (A 105) 4 INDEX button (A 120)/ MAGN. (magnification) button (A 71)/ Assignable button Camera 8 (A 105) 5 Joystick (A 23) You can push the joystick in 8 directions (up/ down, left/right, or diagonally) and press the joystick itself to confirm. 6 Rear control dial (A 59, 63) 7 FUNC (main functions) button (A 50)/ Assignable button Camera 9 (A 105) 8 Audio level dials for CH1 (top) and CH2 (bottom) (A 91) 9 Audio level switches for CH1 (top) and CH2 (bottom) (A 90) 10 AUDIO STATUS (display the [¡ Audio Setup] status screens) button (A 177) / Assignable button Camera 13 (A 105) 11 DC IN terminal (A 19) 12 Battery compartment (A 18) 13 BATTERY RELEASE button (A 18) 14 CANCEL button (A 23) 15 SELECT dial/SET button (A 23) 16 MENU button (A 23)
-
 1
1 -
2
-
3
-
4
-
5
-
6
-
7
-
8
-
 9
9 -
 10
10 -
 11
11 -
 12
12 -
 13
13 -
 14
14 -
 15
15 -
 16
16 -
 17
17 -
 18
18 -
 19
19 -
20
-
21
-
22
-
23
-
24
-
25
-
26
-
27
-
28
-
29
-
30
-
31
-
32
-
33
-
34
-
35
-
36
-
37
-
38
-
39
-
40
-
41
-
42
-
43
-
44
-
45
-
46
-
47
-
48
-
49
-
50
-
51
-
52
-
53
-
54
-
55
-
56
-
57
-
58
-
59
-
60
-
61
-
62
-
63
-
64
-
65
-
66
-
67
-
68
-
69
-
70
-
71
-
72
-
73
-
74
-
75
-
76
-
77
-
78
-
79
-
80
-
81
-
82
-
83
-
84
-
85
-
86
-
87
-
88
-
89
-
90
-
91
-
92
-
93
-
94
-
95
-
96
-
97
-
98
-
99
-
100
-
101
-
102
-
103
-
104
-
105
-
106
-
107
-
108
-
109
-
110
-
111
-
112
-
113
-
114
-
115
-
116
-
117
-
118
-
119
-
120
-
121
-
122
-
123
-
124
-
125
-
126
-
127
-
128
-
129
-
130
-
131
-
132
-
133
-
134
-
135
-
136
-
137
-
138
-
139
-
140
-
141
-
142
-
143
-
144
-
145
-
146
-
147
-
148
-
149
-
150
-
151
-
152
-
153
-
154
-
155
-
156
-
157
-
158
-
159
-
160
-
161
-
162
-
163
-
164
-
165
-
166
-
167
-
168
-
169
-
170
-
171
-
172
-
173
-
174
-
175
-
176
-
177
-
178
-
179
-
180
-
181
-
182
-
183
-
184
-
185
-
186
-
187
-
188
-
189
-
190
-
191
-
192
-
193
-
194
-
195
-
196
-
197
-
198
-
199
-
200
-
201
-
202
-
203
-
204
-
205
-
206
-
207
-
208
-
209
-
210
-
211
-
212
-
213
-
214
-
215
 |
 |
