Canon PowerShot G1 X Mark III PowerShot G1X MarkIII Camera User Guide - Page 102
Recording Movies at Specific Shutter
 |
View all Canon PowerShot G1 X Mark III manuals
Add to My Manuals
Save this manual to your list of manuals |
Page 102 highlights
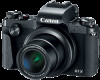
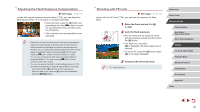
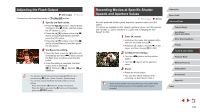
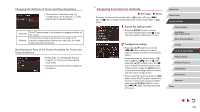
Adjusting the Flash Output Still Images Movies Choose from the three flash levels in [ ][ ][ ] modes. 1 Specify the flash mode. zzPress the [ ] button, choose [Flash Control] on the [ 5] tab, and then press the [ ] button (=31). zzPress the [ ][ ] buttons or turn the [ ] dial to choose [Flash Mode], and then press the [ ] button. zzPress the [ ][ ] buttons or turn the [ ] dial to choose [Manual], and then press the [ ] button. 2 Configure the setting. zzRaise the flash, press the [ ] button and immediately turn the [ ] dial to choose the flash level, and then press the [ ] button. zzOnce the setting is complete, the flash output level is displayed. [ ]: Minimum, [ ]: Medium, [ ]: Maximum ●● You can also set the flash level by accessing MENU (=31) and choosing [ 5] tab > [Flash Control] > [Flash Output]. ●● You can also access the [Flash Control] screen (=31) as follows. -- Press and hold the [ ] button for at least one second. -- When the flash is up, press the [ ] button and immediately press the [ ] button. Recording Movies at Specific Shutter Speeds and Aperture Values Still Images Movies Set your preferred shutter speed, exposure, aperture value, and ISO speed. For details on available shutter speeds, aperture values, and ISO speeds, see "Shutter" (= 223), "Aperture" (= 223), and "Changing the ISO Speed" (= 80). 1 Enter [ ] mode. zzHold down the mode dial release button and turn the mode dial to [ ]. zzPress the [ ] button, choose [ ] in the menu, and then choose [ ] (=30). 2 Configure the settings. zzTurn the [ speed. ] dial to set the shutter zzTurn the [ ] dial to set the aperture value. 3 Shoot. zzPress the movie button. zzYou can also adjust settings while recording, as described in step 2. ●● Some shutter speeds may cause flickering on the screen when recording under fluorescent or LED lighting, which may be recorded. Before Use Basic Guide Advanced Guide Camera Basics Auto Mode / Hybrid Auto Mode Other Shooting Modes P Mode Tv, Av, M, and C Mode Playback Mode Wireless Features Setting Menu Accessories Appendix Index 102
-
 1
1 -
2
-
3
-
4
-
5
-
6
-
7
-
8
-
9
-
10
-
11
-
12
-
13
-
14
-
15
-
16
-
17
-
18
-
19
-
20
-
21
-
22
-
23
-
24
-
25
-
26
-
27
-
28
-
29
-
30
-
31
-
32
-
33
-
34
-
35
-
36
-
37
-
38
-
39
-
40
-
41
-
42
-
43
-
44
-
45
-
46
-
47
-
48
-
49
-
50
-
51
-
52
-
53
-
54
-
55
-
56
-
57
-
58
-
59
-
60
-
61
-
62
-
63
-
64
-
65
-
66
-
67
-
68
-
69
-
70
-
71
-
72
-
73
-
74
-
75
-
76
-
77
-
78
-
79
-
80
-
81
-
82
-
83
-
84
-
85
-
86
-
87
-
88
-
89
-
90
-
91
-
92
-
93
-
94
-
95
-
96
-
 97
97 -
 98
98 -
 99
99 -
 100
100 -
 101
101 -
 102
102 -
 103
103 -
 104
104 -
 105
105 -
 106
106 -
 107
107 -
108
-
109
-
110
-
111
-
112
-
113
-
114
-
115
-
116
-
117
-
118
-
119
-
120
-
121
-
122
-
123
-
124
-
125
-
126
-
127
-
128
-
129
-
130
-
131
-
132
-
133
-
134
-
135
-
136
-
137
-
138
-
139
-
140
-
141
-
142
-
143
-
144
-
145
-
146
-
147
-
148
-
149
-
150
-
151
-
152
-
153
-
154
-
155
-
156
-
157
-
158
-
159
-
160
-
161
-
162
-
163
-
164
-
165
-
166
-
167
-
168
-
169
-
170
-
171
-
172
-
173
-
174
-
175
-
176
-
177
-
178
-
179
-
180
-
181
-
182
-
183
-
184
-
185
-
186
-
187
-
188
-
189
-
190
-
191
-
192
-
193
-
194
-
195
-
196
-
197
-
198
-
199
-
200
-
201
-
202
-
203
-
204
-
205
-
206
-
207
-
208
-
209
-
210
-
211
-
212
-
213
-
214
-
215
-
216
-
217
-
218
-
219
-
220
-
221
-
222
-
223
-
224
-
225
-
226
-
227
-
228
-
229
-
230
-
231
 |
 |