Canon PowerShot G1 X Mark III PowerShot G1X MarkIII Camera User Guide - Page 189
Using the Software
 |
View all Canon PowerShot G1 X Mark III manuals
Add to My Manuals
Save this manual to your list of manuals |
Page 189 highlights
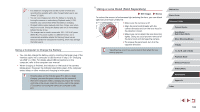
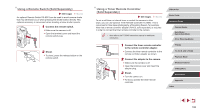
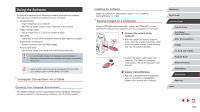
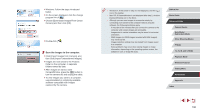
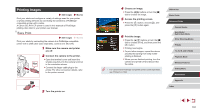
Using the Software To utilize the features of the following software, download the software from the Canon website and install it on your computer. ●● CameraWindow -- Import images to your computer -- Add Picture Styles saved on your computer to the camera ●● Image Transfer Utility -- Set up Image Sync (=162) and receive images ●● Map Utility -- Use a map to view GPS information that has been added to images ●● Digital Photo Professional -- Browse, process, and edit RAW images ●● Picture Style Editor -- Edit Picture Styles and create and save Picture Style files ●● To view and edit movies on a computer, use preinstalled or commonly available software compatible with movies recorded by the camera. ●● Image Transfer Utility can also be downloaded from the Image Sync settings page of CANON iMAGE GATEWAY. Computer Connections via a Cable Checking Your Computer Environment For detailed software system requirements and compatibility information (including support in new operating systems), visit the Canon website. Installing the Software Install the software as described in steps 1 - 2 of "Installing CameraWindow" (=149). Saving Images to a Computer Using a USB cable (sold separately; camera end: Micro-B), you can connect the camera to the computer and save images to the computer. 1 Connect the camera to the computer. zzWith the camera turned off, open the cover. With the smaller plug of the cable in the orientation shown, insert the plug fully into the camera terminal. zzConnect the larger cable plug to the computer. For details on computer connections, refer to the computer user manual. 2 Display CameraWindow. zzMac OS: CameraWindow is displayed when a connection is established between the camera and computer. Before Use Basic Guide Advanced Guide Camera Basics Auto Mode / Hybrid Auto Mode Other Shooting Modes P Mode Tv, Av, M, and C Mode Playback Mode Wireless Features Setting Menu Accessories Appendix Index 189
-
 1
1 -
2
-
3
-
4
-
5
-
6
-
7
-
8
-
9
-
10
-
11
-
12
-
13
-
14
-
15
-
16
-
17
-
18
-
19
-
20
-
21
-
22
-
23
-
24
-
25
-
26
-
27
-
28
-
29
-
30
-
31
-
32
-
33
-
34
-
35
-
36
-
37
-
38
-
39
-
40
-
41
-
42
-
43
-
44
-
45
-
46
-
47
-
48
-
49
-
50
-
51
-
52
-
53
-
54
-
55
-
56
-
57
-
58
-
59
-
60
-
61
-
62
-
63
-
64
-
65
-
66
-
67
-
68
-
69
-
70
-
71
-
72
-
73
-
74
-
75
-
76
-
77
-
78
-
79
-
80
-
81
-
82
-
83
-
84
-
85
-
86
-
87
-
88
-
89
-
90
-
91
-
92
-
93
-
94
-
95
-
96
-
97
-
98
-
99
-
100
-
101
-
102
-
103
-
104
-
105
-
106
-
107
-
108
-
109
-
110
-
111
-
112
-
113
-
114
-
115
-
116
-
117
-
118
-
119
-
120
-
121
-
122
-
123
-
124
-
125
-
126
-
127
-
128
-
129
-
130
-
131
-
132
-
133
-
134
-
135
-
136
-
137
-
138
-
139
-
140
-
141
-
142
-
143
-
144
-
145
-
146
-
147
-
148
-
149
-
150
-
151
-
152
-
153
-
154
-
155
-
156
-
157
-
158
-
159
-
160
-
161
-
162
-
163
-
164
-
165
-
166
-
167
-
168
-
169
-
170
-
171
-
172
-
173
-
174
-
175
-
176
-
177
-
178
-
179
-
180
-
181
-
182
-
183
-
 184
184 -
 185
185 -
 186
186 -
 187
187 -
 188
188 -
 189
189 -
 190
190 -
 191
191 -
 192
192 -
 193
193 -
 194
194 -
195
-
196
-
197
-
198
-
199
-
200
-
201
-
202
-
203
-
204
-
205
-
206
-
207
-
208
-
209
-
210
-
211
-
212
-
213
-
214
-
215
-
216
-
217
-
218
-
219
-
220
-
221
-
222
-
223
-
224
-
225
-
226
-
227
-
228
-
229
-
230
-
231
 |
 |