Canon PowerShot G1 X Mark III PowerShot G1X MarkIII Camera User Guide - Page 129
Cropping, Using the Menu
 |
View all Canon PowerShot G1 X Mark III manuals
Add to My Manuals
Save this manual to your list of manuals |
Page 129 highlights
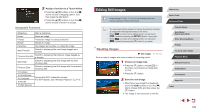
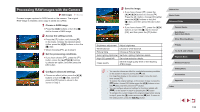
3 Review the new image. zzPress the [ ][ ] buttons or turn the [ ] dial to choose [Processed img.], and then press the [ ] button. zzThe saved image is now displayed. ●● Editing is not possible for images shot at a recording pixel setting of [ ]. ●● RAW images cannot be edited. ●● Images cannot be resized to a higher number of recording pixels. ●● You can also view saved images by touching [Processed img.] on the screen in step 3. Using the Menu 1 Choose [Resize]. zzPress the [ ] button and choose [Resize] on the [ 3] tab (=31). 2 Choose an image. zzPress the [ ][ ] buttons or turn the [ ] dial to choose an image, and then press the [ ] button. 3 Choose an image size. zzPress the [ ][ ] buttons or turn the [ ] dial to choose the size, and then press the [ ] button. 4 Save as a new image and review. zzFollow step 2 in "Resizing Images" (= 128). zzPress the [ ] button and follow step 3 in "Resizing Images" (= 128). Cropping Still Images Movies You can specify a portion of an image to save as a separate image file. 1 Access the setting screen. zzPress the [ ] button, choose [ ] in the menu, and then press the [ ] button (= 30). 2 Resize, move, and adjust the aspect ratio of the cropping frame. zzTo resize the frame, move the zoom lever. zzTo move the frame, press the buttons. zzTo change the frame orientation, turn the [ ] dial to choose [ ], and then press the [ ] button. zzTo change the frame aspect ratio, turn the [ ] dial to choose [ ]. To switch between aspect ratios and [ ]), press the [ ] button repeatedly. Before Use Basic Guide Advanced Guide Camera Basics Auto Mode / Hybrid Auto Mode Other Shooting Modes P Mode Tv, Av, M, and C Mode Playback Mode Wireless Features Setting Menu Accessories Appendix Index 129
-
 1
1 -
2
-
3
-
4
-
5
-
6
-
7
-
8
-
9
-
10
-
11
-
12
-
13
-
14
-
15
-
16
-
17
-
18
-
19
-
20
-
21
-
22
-
23
-
24
-
25
-
26
-
27
-
28
-
29
-
30
-
31
-
32
-
33
-
34
-
35
-
36
-
37
-
38
-
39
-
40
-
41
-
42
-
43
-
44
-
45
-
46
-
47
-
48
-
49
-
50
-
51
-
52
-
53
-
54
-
55
-
56
-
57
-
58
-
59
-
60
-
61
-
62
-
63
-
64
-
65
-
66
-
67
-
68
-
69
-
70
-
71
-
72
-
73
-
74
-
75
-
76
-
77
-
78
-
79
-
80
-
81
-
82
-
83
-
84
-
85
-
86
-
87
-
88
-
89
-
90
-
91
-
92
-
93
-
94
-
95
-
96
-
97
-
98
-
99
-
100
-
101
-
102
-
103
-
104
-
105
-
106
-
107
-
108
-
109
-
110
-
111
-
112
-
113
-
114
-
115
-
116
-
117
-
118
-
119
-
120
-
121
-
122
-
123
-
 124
124 -
 125
125 -
 126
126 -
 127
127 -
 128
128 -
 129
129 -
 130
130 -
 131
131 -
 132
132 -
 133
133 -
 134
134 -
135
-
136
-
137
-
138
-
139
-
140
-
141
-
142
-
143
-
144
-
145
-
146
-
147
-
148
-
149
-
150
-
151
-
152
-
153
-
154
-
155
-
156
-
157
-
158
-
159
-
160
-
161
-
162
-
163
-
164
-
165
-
166
-
167
-
168
-
169
-
170
-
171
-
172
-
173
-
174
-
175
-
176
-
177
-
178
-
179
-
180
-
181
-
182
-
183
-
184
-
185
-
186
-
187
-
188
-
189
-
190
-
191
-
192
-
193
-
194
-
195
-
196
-
197
-
198
-
199
-
200
-
201
-
202
-
203
-
204
-
205
-
206
-
207
-
208
-
209
-
210
-
211
-
212
-
213
-
214
-
215
-
216
-
217
-
218
-
219
-
220
-
221
-
222
-
223
-
224
-
225
-
226
-
227
-
228
-
229
-
230
-
231
 |
 |
